Some of the best ideas in cycling components come from someone who rides a bike and thinks, “Hmm, if i had something that did this it would make my riding life a lot easier”. That person then trawls the internet for said part and probably comes up with a few items that seem to fit the bill with a few unwanted extras or things that are almost right but not quite what the person had in mind completely and undoubtedly cost and arm and a leg. 9.9 times out of ten that person compromises but ends up generally happy with their purchase. The remaining 0.01 thinks, “right, I’ll just have to make it myself then”
One such person is Ryan Fearne from Ridestash Components. He saw a need for easily accessible and secure bike storage. He had the idea but made it harder for himself by having the goal of making it as sustainable as possible. Luckily Ryan is a bit of an expert at 3D printing and so the Ridestash bike mount went from idea to prototype to finished product and it’s all made in a bedroom in Glasgow!
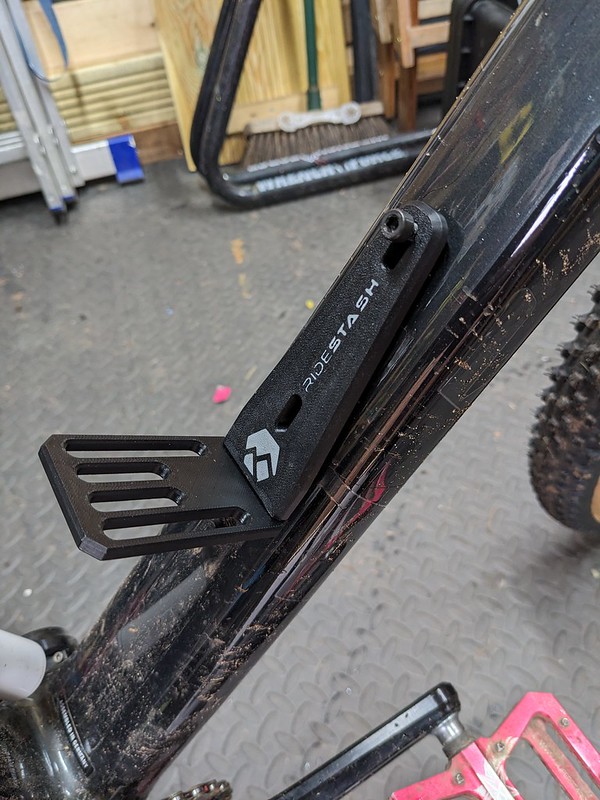
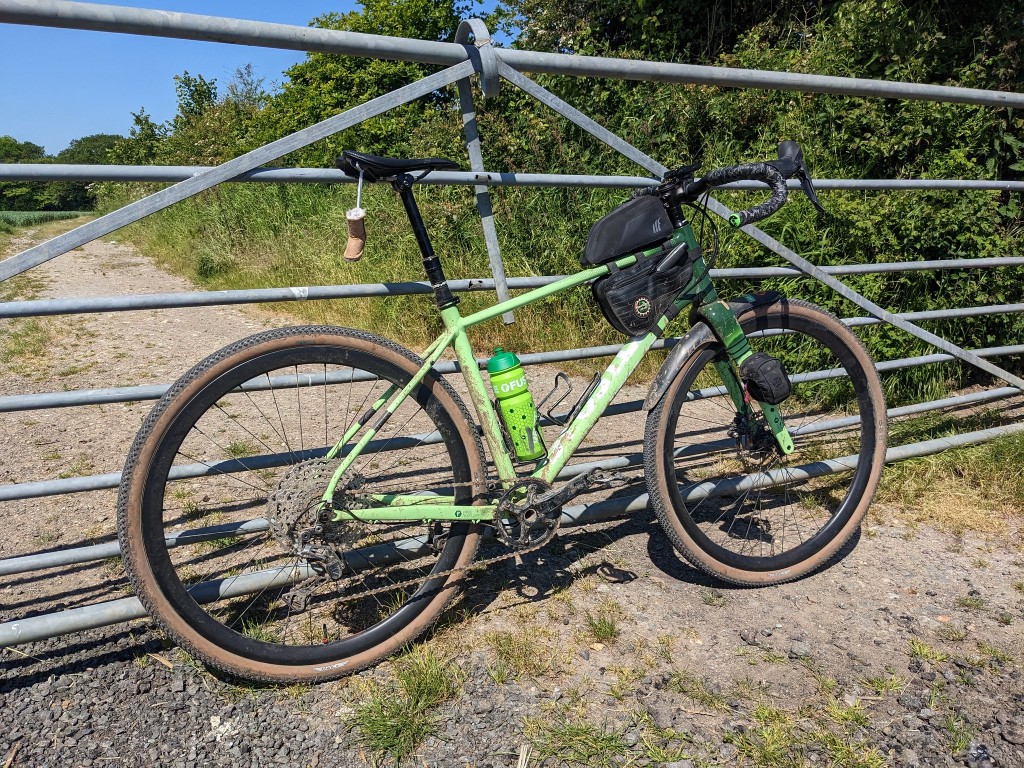
ridestash mount on mtb ridestash mount on gravel bike
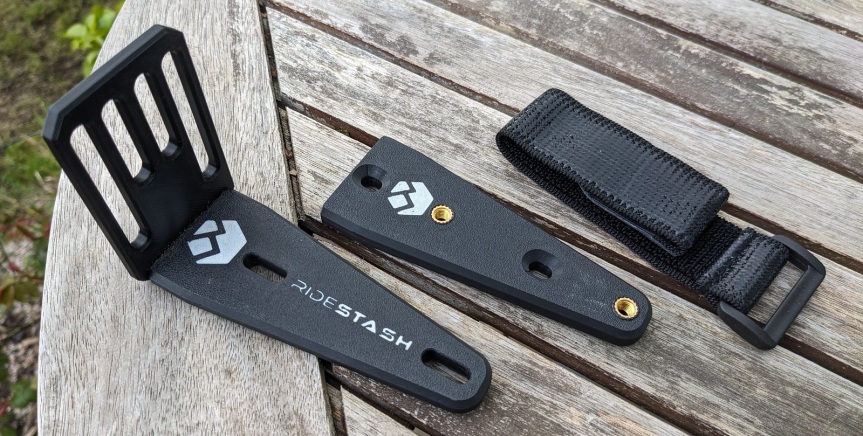
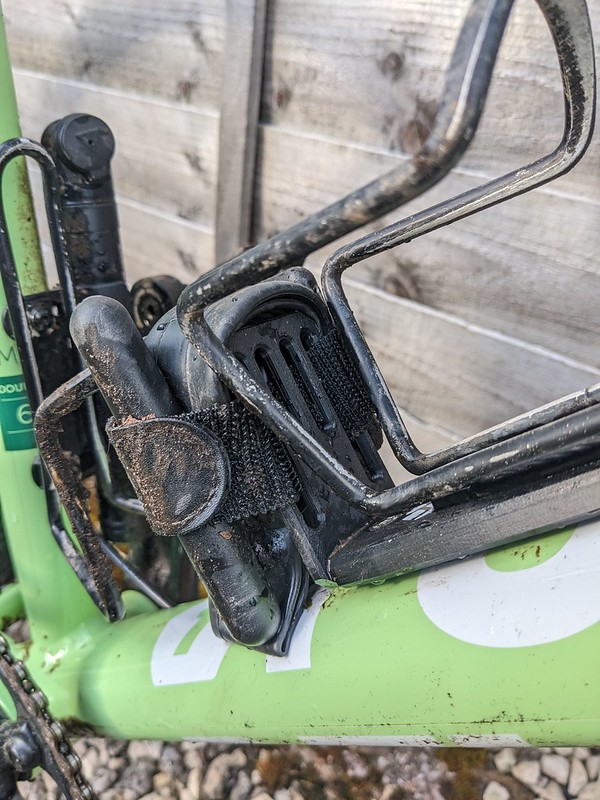
The mount comes in two parts and there are also two versions. Both feature a piece that fits underneath your bottle cage and a piece that fits at 90 degrees to this via two bolts, this piece has slats so that you can thread through the elasticated strap which holds everything you want to the mount. The first is a straight forward under the cage mount using longer than standard frame bolts (provided by ridestash) which make up for the extra height the mount generates from being underneath. The second is an offset version. if you have minimal room on your frame this is the version to get. your cage bolts directly to the mount, not the bike frame and the mount then bolts to your frame. sounds confusing but basically it moves your bottle cage upwards by 35mm towards the handlebar end giving you more room to lash stuff to the ride stash mount. In all you need around 1.5cm of clearance to fit a standard inner tube, if still tight for room even with the offset version a turbolito or equivalent light weight minimalist tube might work better.
I managed to get a standard gravel bike tube and small box with tubeless tyre repair inserts and a tubeless tyre repair tool wrapped up and secure.
ridestash mount tubeless toolridestash mount inner tube
The ride stash mount is super secure, when I bolted it together I did wonder how strong it would be but all the fittings and threads are very well made and aligned perfectly and i’ve given it some abuse through some of the wettest weather for years. I guess being designed in glasgow the midlands weather means nothing to it! the elesticated strap is secured by velcro and this hasn’t budged at all. after a crash i had to push the tubeless tool back down slightly but that was a bit of an inpact with the ground so very impressed with the way it holds on to whatever you strap on to it. I did, in the interests of testing also give it a bit of a kick a couple of times, nothing budged, nothing shattered or cracked.
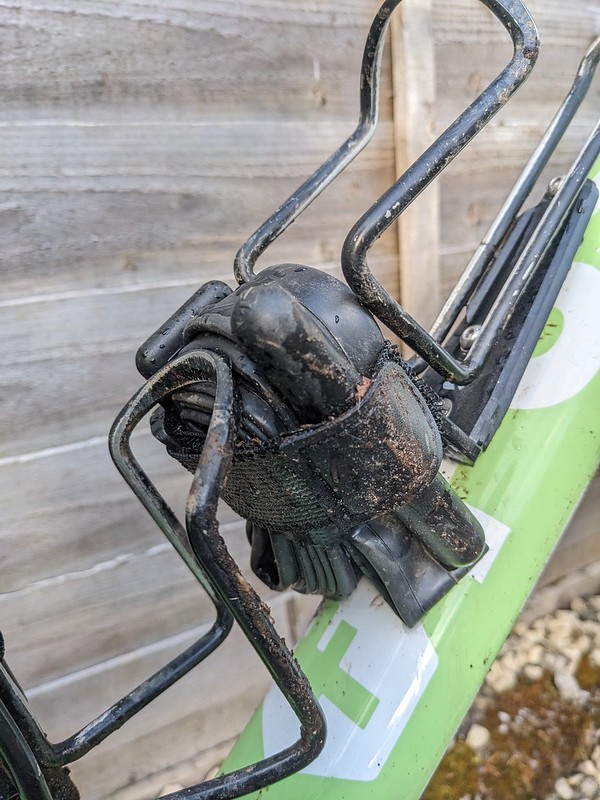
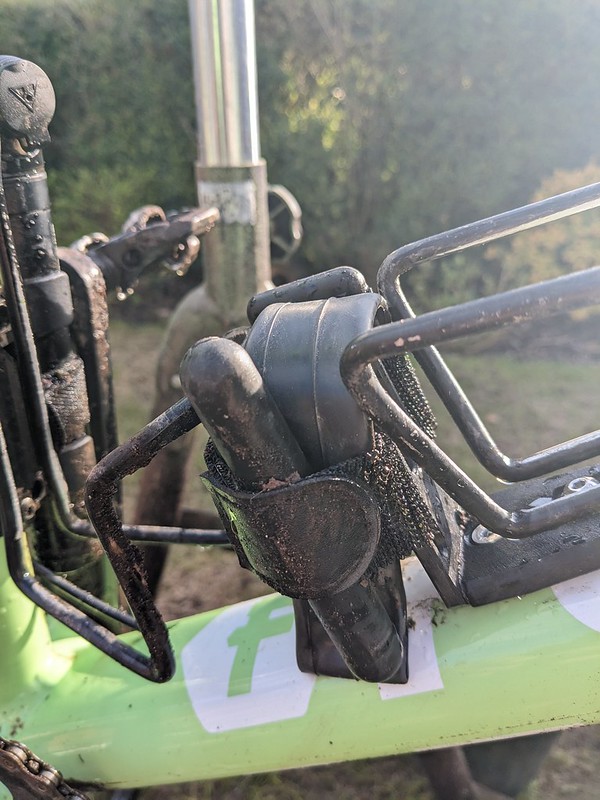
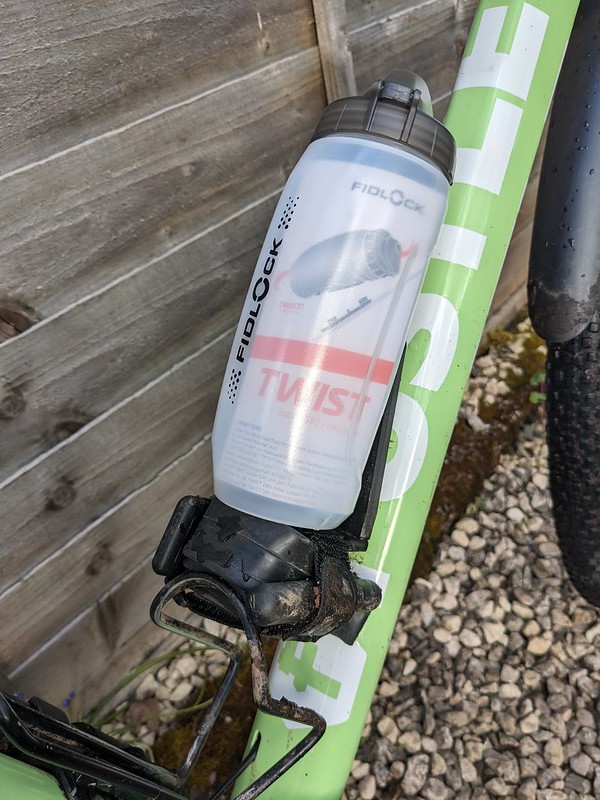
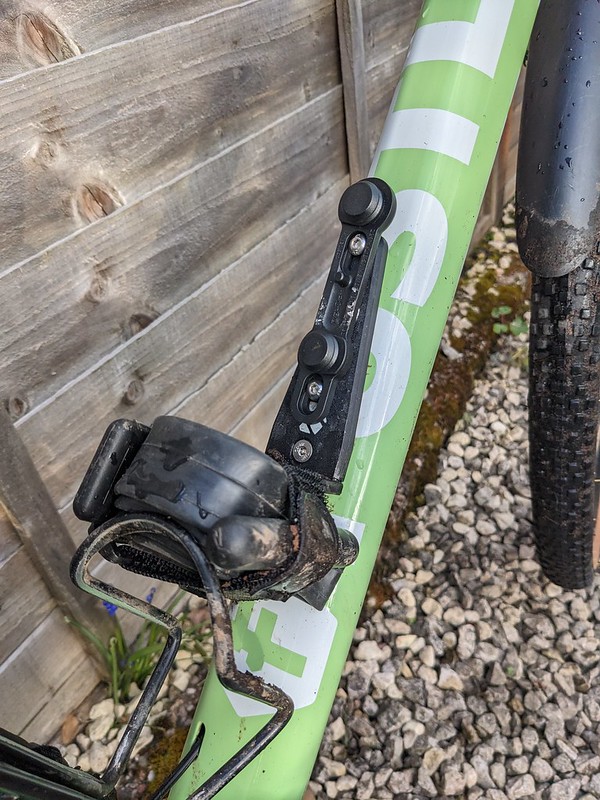
ridestash also works with fidlockfidlock mountridestash mount integration
As you can see from the picture the Ridestash mount intergrates well on my bike and frees up some room in the bags that would have been taken up with the tube etc. the only downside of course is that the tube and whatever you stash there will get a coating of mud in the worst weather. popping it all into a lightweigh waterproof bag and stashing that would be ideal.
Ryan’s idea has born fruit and The Ridestash Mount has performed flawlessly over around 2.5 months and for just under £21 for the standard mount it is worth every penny. Ryan also aceived his goal of sustainability as all the plastic used has been recycled. If this mount had a big companies name and brand printed on it it’d cost 3 times that, but probably will have been designed by a commitee rather than a rider like us who knows just whats needed. So, all hail the bedroom inventors!
If you asked someone to describe a gravel bike I’m pretty sure, apart from knobbly tyres they’d say a gravel bike has a drop bar handlebar. I know you can ride a flat bar gravel bike and I myself ran one for 18 months before buying my first drop bar bike but at the current time the predominant style of gravel bike comes with a drop bar.
Trouble is, not everyone either likes the look of a drop bar position or has had a cycling lifetime of experience on a MTB or hybrid bike with a flat bar. Lets face it, coming from a non drop bar the mere fact that the brakes are in a totally different place is daunting for a start! Also, you just might feel too stretched out on a drop bar bike (although please get the expert advice of a good bike shop when deciding on a bike as this might all be down to buying the incorrect size bike for your body shape). You might feel nervous on technical terrain, this is especially amplified if you never use the drop bar part of the bars. Trusting your grip to the hoods can result in your hands being shaken off the bars. I’d sy the great majority of riders, on the correct size bike are totally fine and at home on drop bars and you soon learn the new technique of braking, shifting and steering.
Redshift Top Shelf view from the bars
For those that can never reach the drops, from lack of confidence, poor position or just being physically unable to then Redshift claim their Top Shelf bar can address all this.
The bars have the shorter reach, shallow drop and useful flare of their standard Kitchen sink bar that I really liked in my review here, have a look at the review as all the comments and findings apply to the top shelf bar just with a 50 or 70mm rise. The bar in the picture has a 50mm rise. I fitted it to my MTB. The reason for this is that I’ve always wanted a “monstercross” bike, a drop bar MTB, why? well there doesn’t need to be a reason to mess with bikes.
monstercross Swift with redshift Top Shelf bar
I’ve tried this before with not much success, this is because a MTB generally has a longer top tube than a gravel/road bike and makes you feel really stretched out. check out the video below for a visual explaination of this. Plus doing this sort of recreates the position someone with drop bar issues might have and became the perfect rig to test the Top Shelf bars on.
Top Shelf bar dropTop Shelf bar side
Its taken the bike from a compromise that started to make my neck, shoulders and lower bike ache after 15 or so miles to one that I choose to do longer rides on. The drops have become totally useable, not only for technical riding but also just for cruising along on. It’s not 100% perfect, that top tube is always going to be long but the 50mm of rise has raised all the contact poits by 50mm which has increased the useability no end.
Now if your gravel bike, with an inherently shorter top tube has a Top shelf bar fitted it might give you the position you crave and give you the confidence to explorwe firther off the beaten track.
The Redshift top shelf bar isn’t for everyone and Redshift admit this themselves but it might just be the key part you’re looking for to open up you gravel horizons.
check out the video below of my first few rides and impressions of the Top shelf bar in action
This is the first time I’ve every had an exclusive for UkGravelCo and its very exciting. It’s so new it’s easier and more informative to show you the video I made in the weeks up to the launch of this new kit. I don’t say things like “game changing” lightly, but THE GAME HAS BEEN CHANGED FOR EVER!
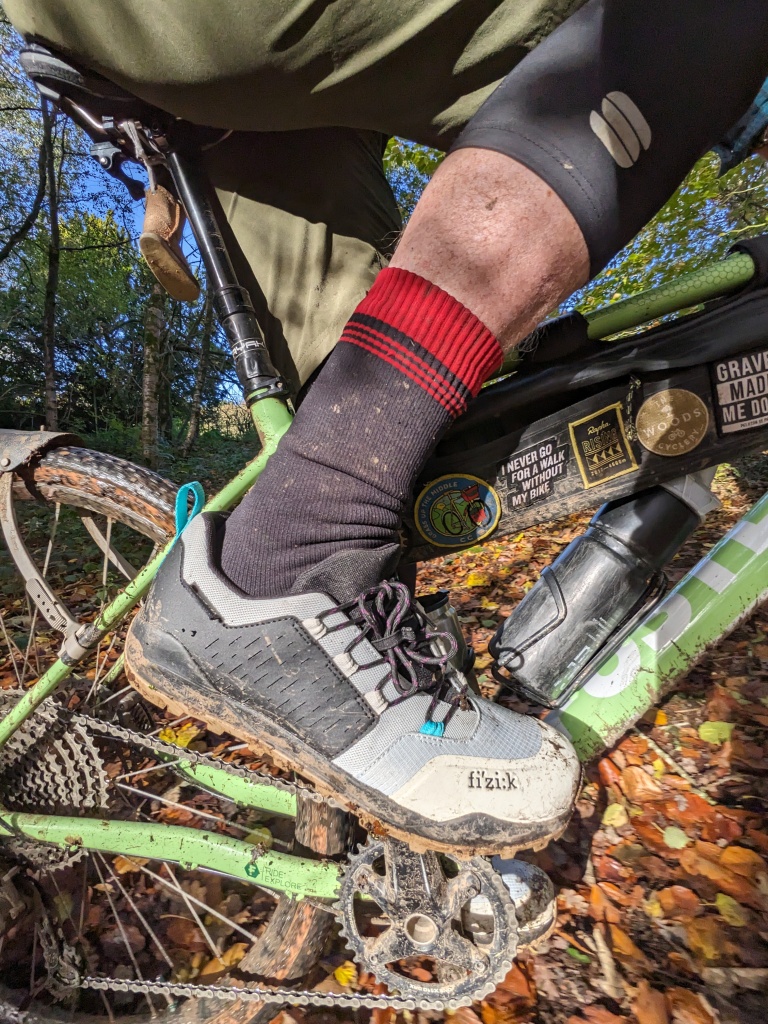
After reviewing the Terra Atlas shoe and the Artica GTX boot i really wanted to test the Terra Ergolace GTX shoe because, well they look very different to anything else on the market today. The fact that they have a goretex membrane (the GTX bit) just made them all the more intriguing.
I chatted to the guys at Extra UK who distribute Fizik in the UK and they were happy to let me try a pair but, and they put this in writing via email, they said “please don’t say this is a winter shoe just because it’s got goretex in it” Obviously I said I wouldn’t. However, I got the shoes in November 2023 and have been wearing them throughout the winter!
The Terra Ergolace, has laces, I suspect you guessed that. personally I love lace up cycling shoes, Boa and velcro are good fastening types, less so ratchet systems but nothing comes close to the micro adjustability of laces. They are difficult to adjust on the fly when cycling I’ll admit but just how many of us are copying pro cyclists tightening their shoes before the last kilometre of a break away finish in a one day classic? Not many I bet and stopping to adjust laces to compensate for foot temperature changes etc isn’t really a drawback in my book. the laces will get covered in whatever fluid/effluent/mud the front wheel throws up though so there is that. Fizik have offset the laces to one side, which they claim is “ergonomic” and I’ve had no isues with the shoe tongue irritating the top of my foot that I’ve experienced with other shoes because of laces digging in, because the laces just aren’t there to cause trouble.
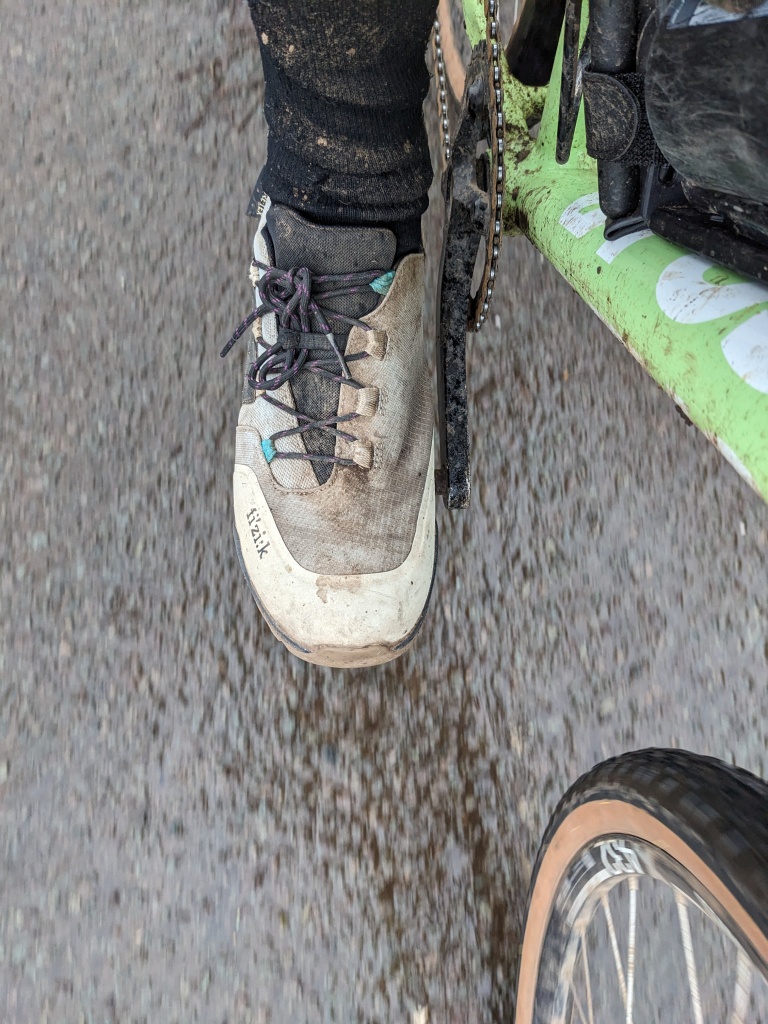
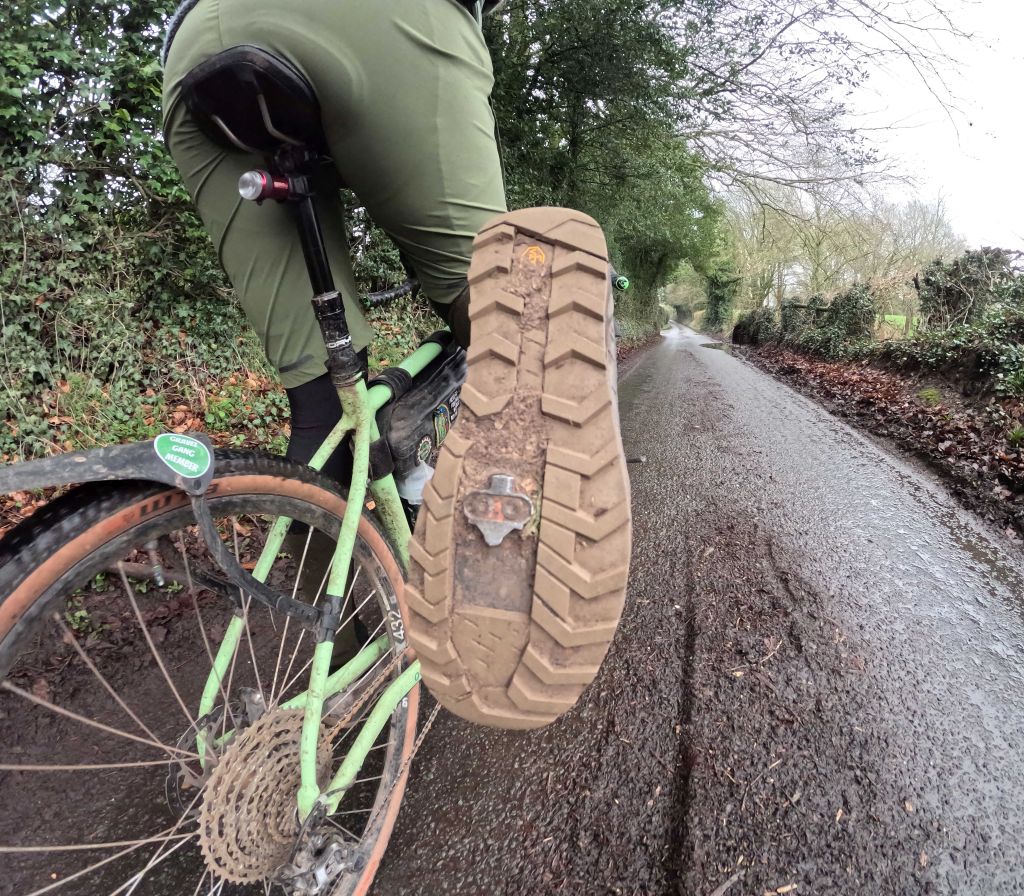
The upper lining is waterproof and breathable due to the aforementioned Goretex membrane. The outer fabric is made from Ripstop nylon and despite wearing them throughout the winter (perhaps the ice grey colour wasn’t the best idea during the muddier months) they have no cuts or pulls in the material. They have discoloured slightly. I’ve just been soaping them down with the same stuff I’ve used to clean the bike and they come up looking almost as good as new. The Vibram sole has bumpers fore and aft with a reinforced PU toe cover to deal with inevitable trail scrapes and knocks. The test shoes are the SPD version, there is a flat pedal specific version too. The cleat pocket underneath is large and the cleat can be positioned far enough backwards to be comfortable, something other shoe designers and manufacturers should take note of!.
cleat pocket
The Ergolace shoe has a stiffness rating of 3 which means it has a little give for hike a bike but still supports the foot on the pedals when riding all day. It has an EVA midsole which makes the shoe very comfortable on and off the bike. the vibram sole is grippy enough if you fail to engage the cleat in the pedal and on rock/pavement. Really muddy trails and slimy roots will defeat them but they defeat just about anything. I went a size larger than normal as I knew i’d be wearing them with waterproof socks which are a lot thicker than normal socks. This was a good idea as they fit well and were very comfortable with plenty of room in the toe box for the extra sock material.
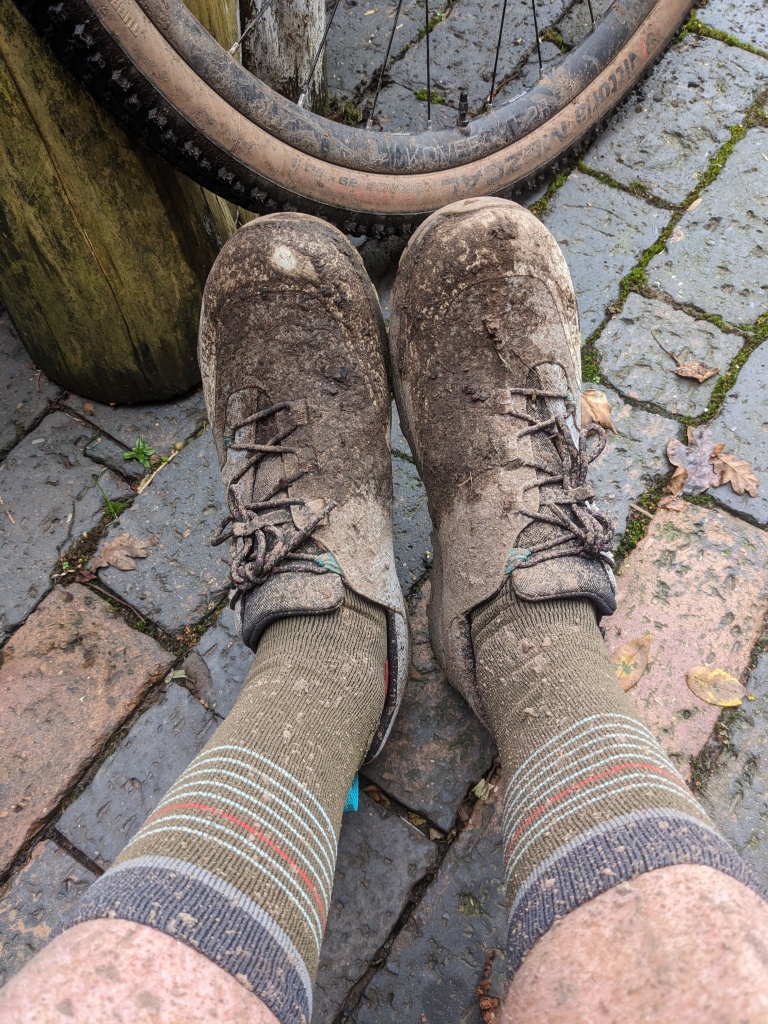
My experience of riding in the terra Ergolace Shoes has encompased one of the wettest winter seasons we’ve endured for many years. I think I can only remember 3 or four frosty days in the last 4 months. the shoes have been in near constant spray fom the front wheel and at times they looked like I’d ordered them in a deep brown colour. they got completely submerged in floods a couple of times and not even goretex can stop the shoe filling with water if it comes in via the foot hole!. Waterproof socks were invaluable in this instance. the shoes took around a day to dry on the radiator with the insoles removed which compared to other shoes I’ve soaked is a pretty good performance. With the addition of the waterproof socks and the goretex membrane the shoes have just shrugged off the spray. when the mud has got that bad that I’ve had to get off the bike and trudge through mud condition consistancies varying from cookie dough to farm yard slurry I’ve found them easy to walk in. Uphill pushes have resulted in no heel lift and cafe/pub stops are a delight (aren’t they always) as I’m not walking like bambi on ice or the Penguin from batman due to too stiff soles. I recommend you use a pedal with a platform though rather than a small race style pedal as the shoe flexibility that allows hike a bike performance will result in foot hot spots. a platform SPD pedal will support the foot and I have had zero hot spot issues while using this type of pedal.
Comfort wise I cannot fault the Terra ergolace, infact I’ll go as far as saying these are the most comfortable cycling shoe I’ve ever worn. Add this too the generous cleat adjustment and the shoe just feels spot on for riding. The goretex membrane is just the icing on the cake, this together with a waterproof sock for winter makes them the only shoe you’ll need. summer storm water and puddles wll just get shaken off. The fact that the shoes are so comfortable both on and off the bike make them the perfect bike packing shoe. You’ll only need one set of shoes for everything.
If you are in the market for an out and out super stiff race shoe then these are not for you. if you want a shoe that will do short rides, epic adventures across the globe, hike a bike up hellvellyn and still not look out of place in the pub (or at work….ask me how I know) then buy the Fizik Terra ergolace shoes. they are not cheap and I dont say this lightly, but they are worth every penny.
Throw away your other cycling shoes, get a pair of Fizik Terra Ergolace GTX shoes, they really are that good…….but obvously they are not a winter shoe, ok? 😉
you can find more information on these shoes from the Fizik website here
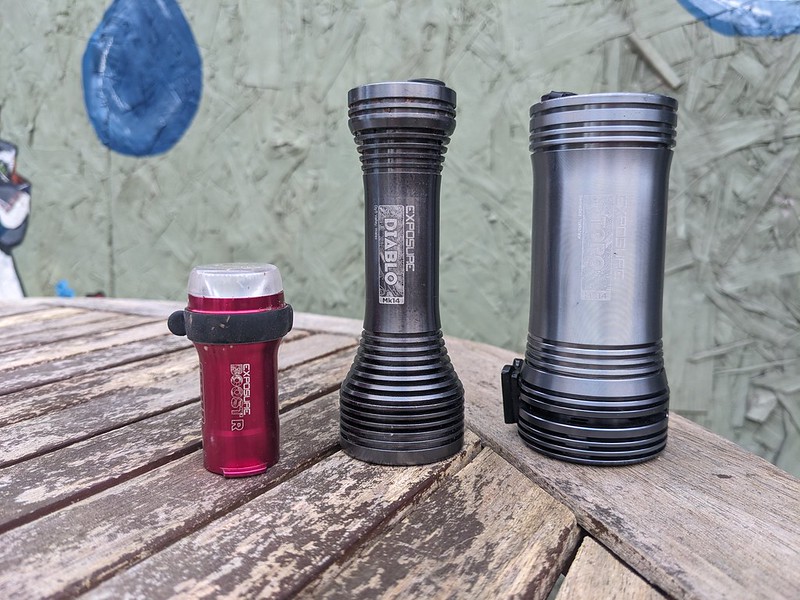
I’ve had these lights for 6 months now since USE-Exposure very kindly sent them to me to try out, these are the 2024 versions of the Toro (big one), Diablo (middle size one) and the Boost R (little one)…..I promise this isn’t going to turn into a Goldilocks “just right” scenario…..or is that Cinderella and a shoe? anyway I’d better explain why I didn’t follow every other online reviewer and magazine in the industry and publish this review before the darker evenings and winter started. If you are a regular reader you’ll know I try to do things a little differently at UKGC.
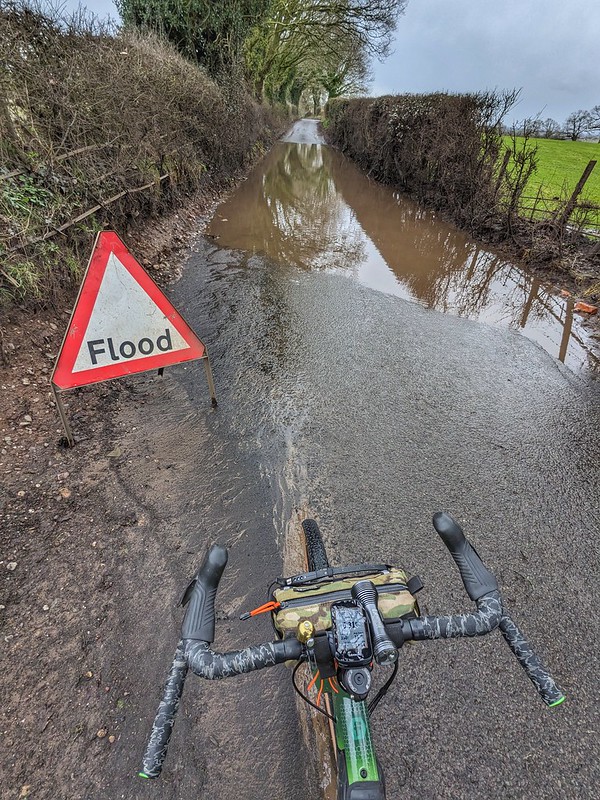
Firstly I wanted to test out the lights over a longer period of time rather than a rushed night ride test and then publish a review the next day kind of thing. I wanted to see how the batteries would perform after repeated use and recharges, how the different models stood up to being stuffed into bags, dropped on the ground accidentally or during repeated soakings by rain and flood and how the various mounts stood up to normal usage.
The second reason I didn’t rush to get a review out for the lights last October was that I thought about who might be using them. There’s lots of reviews endorsing the Exposure lights for competition, Exposure themselves sponsor many endurance events afterall so I thought there’s no reason to go into that, its a given. Not everyone though is into competition. From experience with friends and my online followers the overwhelming majority of users are those with very little time to ride. They can’t spare the time for a 24hr race or a week long bike packing trip. These are the riders who have busy work lives or family commitments. They have to sneak a ride in when the kids have gone to bed or be ultra prepared with kit and drinks the night before escaping the house for an hours intense ride before work. they might start their ride after work knowing the last hour will be into the twilight so they need lights to be able to ride at all and stay safe while they do it, they need them to be reliable, robust and ready to go at the last minute.
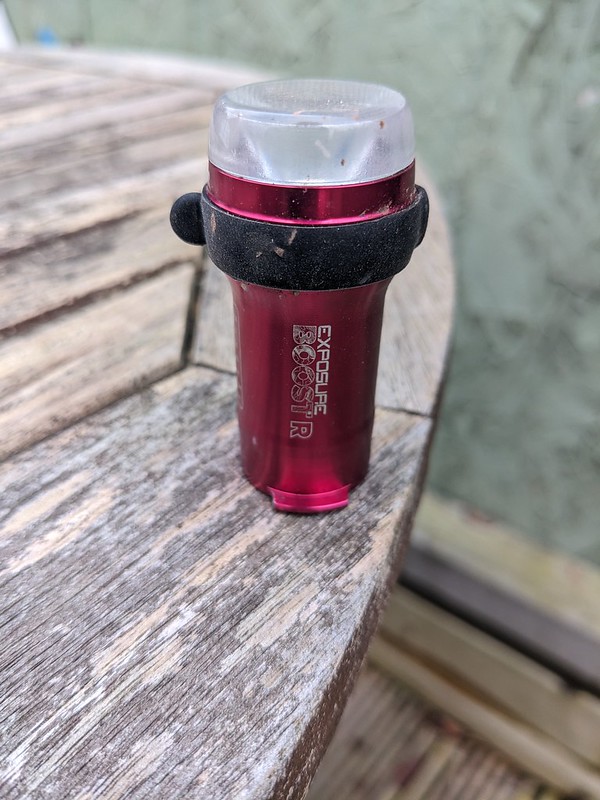
BOOST-R + ReAKT & Peloton Mk2 is a long name for a neat looking little rear light. Don’t be taken in with the diminutive size though, this light punches above it’s weigh and as the name describes isn’t just an L.E.D. light with a few flashing modes.
Boasting 80 lumens this rear light has a trick up it’s aluminium sleeve, when you hit the brakes or enter a brighter enviroment it will flare up to 150 lumens warning those behind you that you are slowing, and in the case of following cars, that you are there at all! the peleton part of the name is because if there’s a rider directly behind you with a bright light the Boost R will dim so as not to blind them. Anyone who’s closely followed someone with a flashing rear light knows it’s easy to become fixated or blinded by it to the point of missing the trail obstacles ahead. All this in a tiny package weighing just 45g. It takes 3 hours to fully charge using a mini USB cable, this was my only dislike and even this had been addressed as new models now ship with the much better and easier to insert USB-C type cable. After a full charge the light lasts 6hrs with a steady light and upto 48hrs in flash mode. The light comes with a seatpost mount with a rubber band making it easy to swap between bikes or take into work/cafe/gym with you so it doesn’t get stolen. You simply twist the light into the mount, this has been super secure in use (and when the rider falls off into the undergrowth!) This easy release band does mean it’s easy to knock out of alignment though so worth checking its pointing in the desired direction frequently. This had been my go to light for everything, commutes, night rides and “just incase i need it” rides. It’s been dropped numerous times and just continues to work.
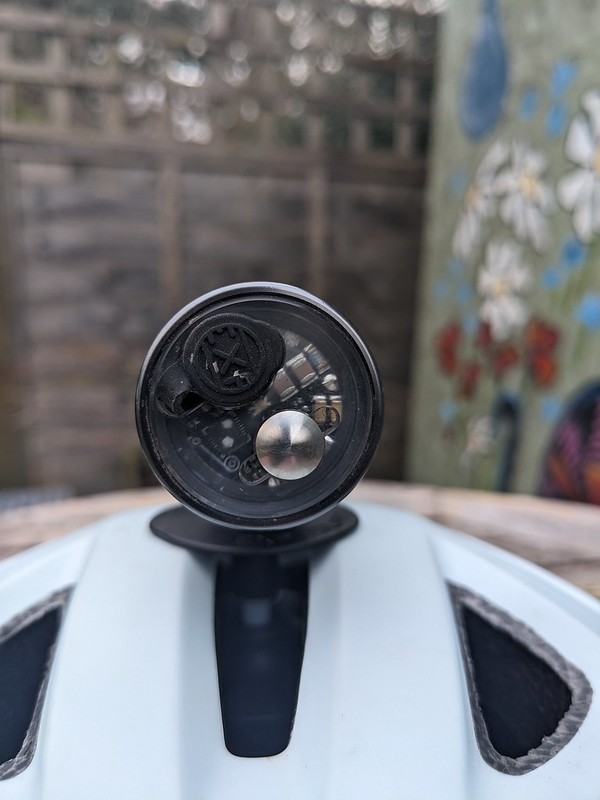
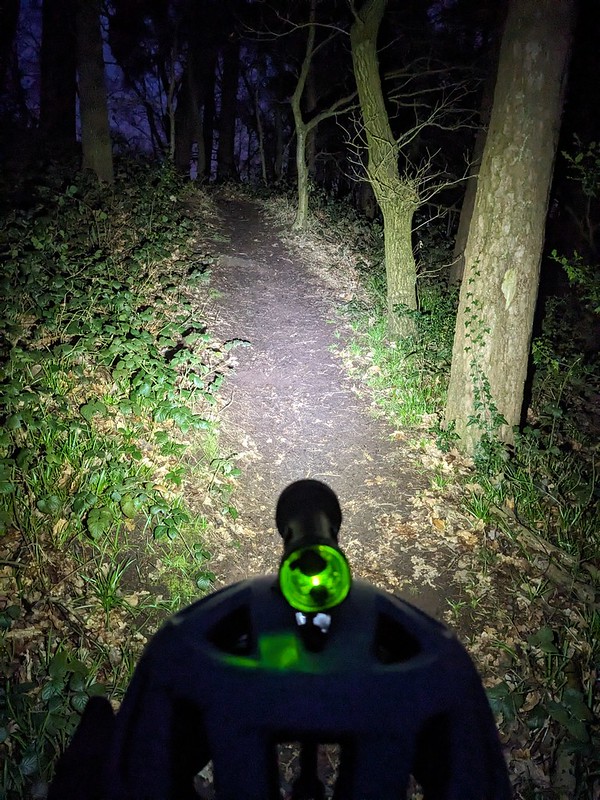
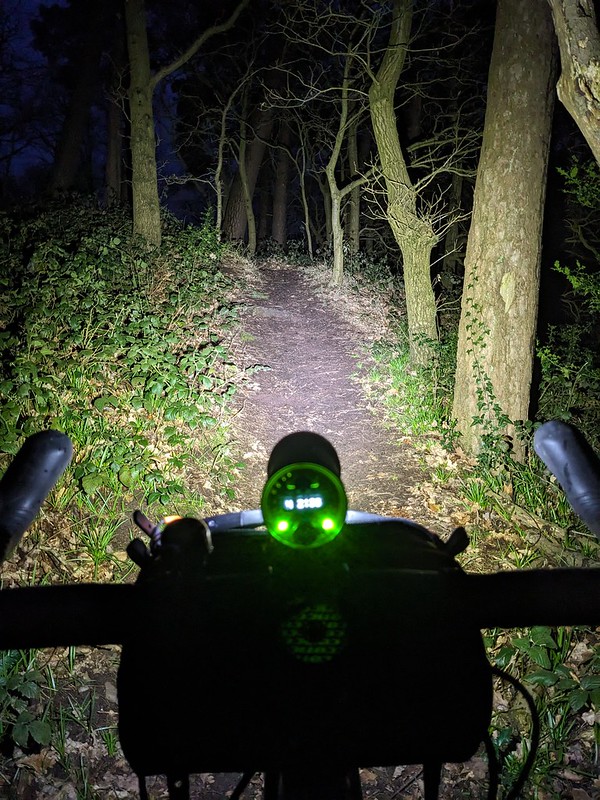
Diablo Mk14TAP is marketed as a helmet light, Why do I need a helmet light when all the other lights I see are on the handlebars I hear you ask. If you ride away from streetlights or off road a helmet light is invaluable, it allows you to see around corners, no seriously it does!
ok,obviously it doesn’t if we are thinking brick walled corners but riding off road in the dark as you approach a corner your bars and your handlebar mounted light will be facing forward, lighting the way ahead, but the corner, that’s in darkness untill you turn it may have all manner of obstacles, a fallen tree, thick mud or a wheel swallowing hole. A helmet light follows you eyes, turn your head to see where you are going and that corner is lit up allowing you to carry speed and well, not come a cropper.
The Diablo has 2000 lumens and four modes. Low, medium, high and flash plus many more available through the 8 different programs on the light. all controlled by the button on the back of the light. You can though enable the “TAP” function and this changes modes by just tapping the light with your hand, very er… handy when the light is mounted on top of your helmet and its awkward to reach or find the button in a hurry. The casing is very neatly machined aluminium making it very tough, i’ve wacked it on a few low hanging branches (it also comes with a lanyard to stop the light ejecting stage left/right in this scenario) The light takes 4 hours to full charge using a fast charger via a mains plug and depending on the mode will last from 1 (high beam) to 18 (flash) hours. An LED on the back of the light tells you the state of the battery charge so you can measure your ride length accordingly. It weighs 120g and although you’ll know its on your helmet its in no way heavy. In the box as well as a helmet mount you get a bar mount too making the Diablo very versatile as 2000 lumens is more than adequate for riding on the road/commuting and its in this position I’ve ued it the most.
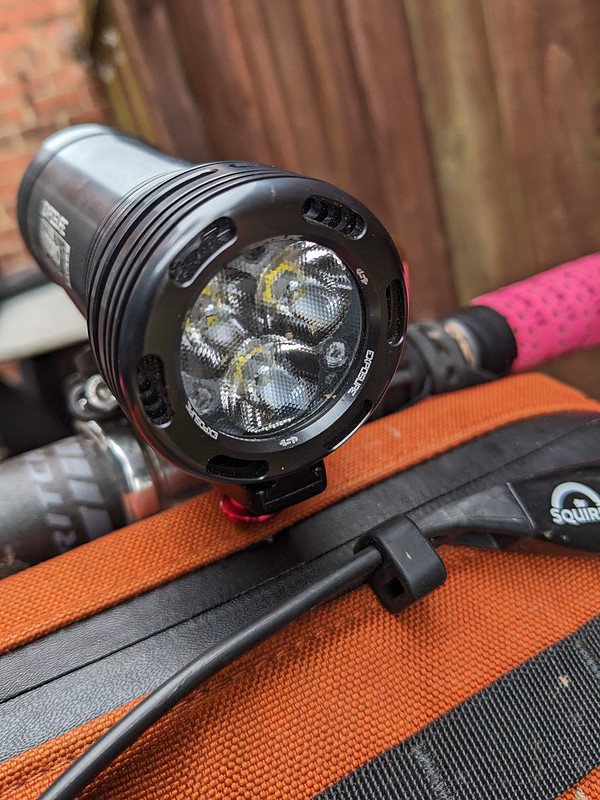
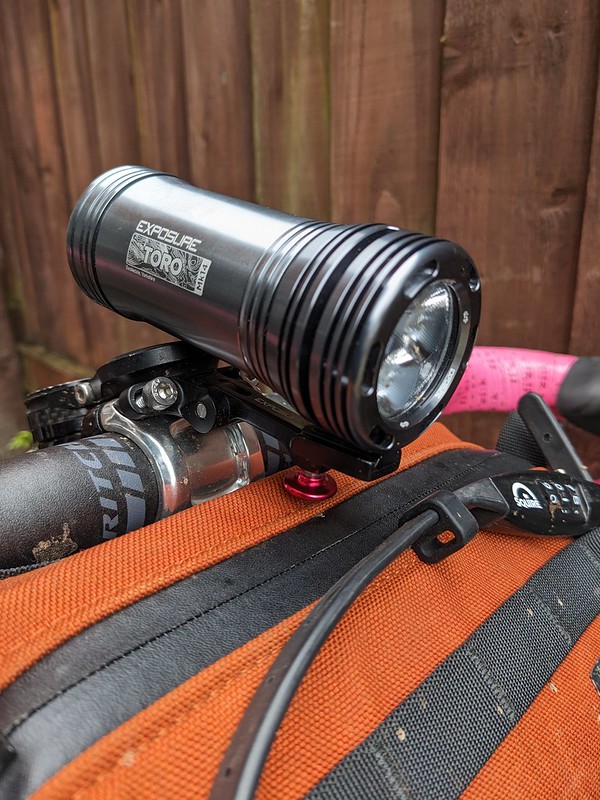
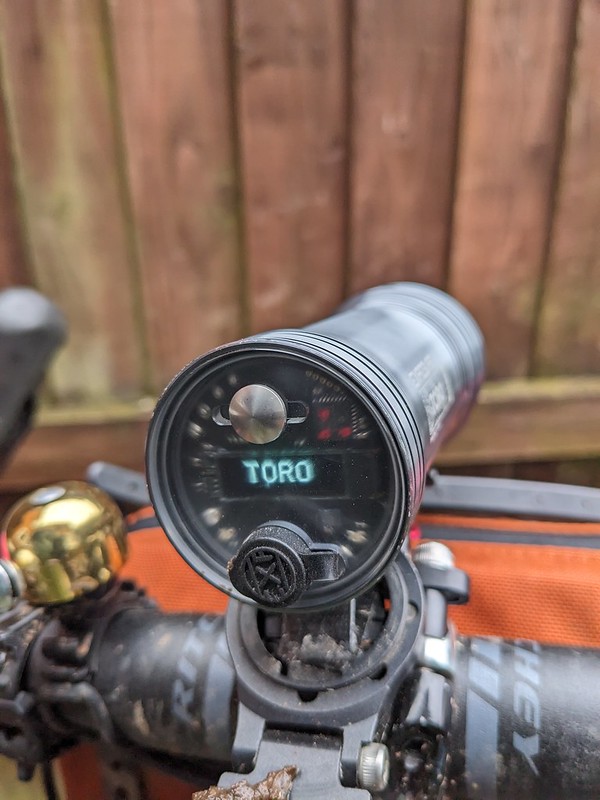
Toro Mk14with REFLEX is the largest of all the lights and is a dedicated handlebar light, nade with the same CNC machined aluminium body as the others it actually looks powerful before you even switch it on!
The Toro looks large but it is still only 236g but it smashes out 2250 lumens. it also has a hidden talent though and this is called “REFLEX” this boosts the light output to 3600 lumens via an internal accelerometer so when just riding along the light will emits normal power, if you decide to get rowdy and go faster or start throwing the bike around such as riding downhill over rough ground the light will boost the lumens without you even having to touch the light! it sounds like I’m making it up, but thats not all. it also uses temperature to change the light setting too. when crusing along those LEDS produce heat, the Toro measures this and dims the light, if you move faster and the air starts to cool the light it boosts the beam in seconds.
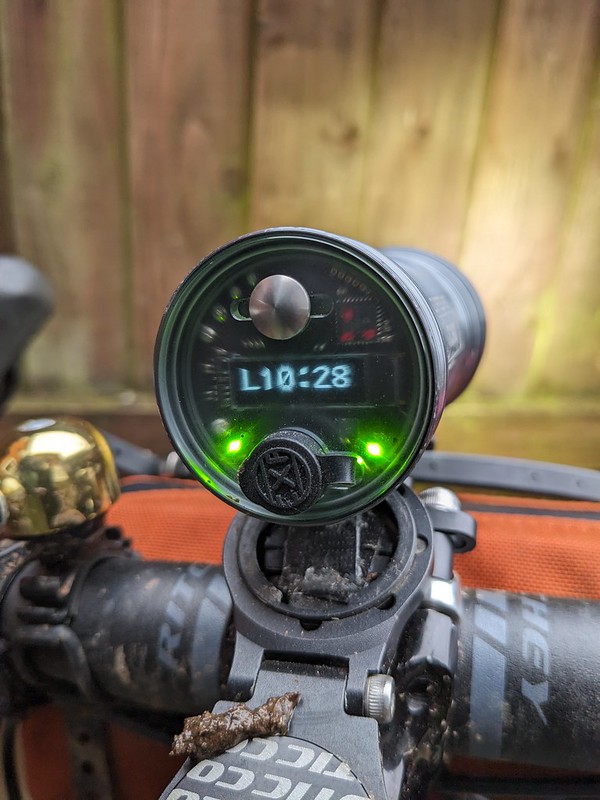
The Toro lasts 2 to 36 hours depending on the mode selected (these are printed on the side of the unit) and takes 6 hours to fully charge. The Toro comes with a quick release aluminium bar bracket that keeps the light very secure but allows quick removal if you are away from the bike. The only thing I don’t like about this is that the mount has to sit to one side of the stem or the other meaning it feels like it isn’t centered. This has no effect on light performance. To rectify this I purchased a mount that fits on the stem faceplate meaning the light is dead centre. The Toro is the only light in test I haven’t dropped! I have however took a roll into the undergrowth with it on the bars and it looks as good as new.
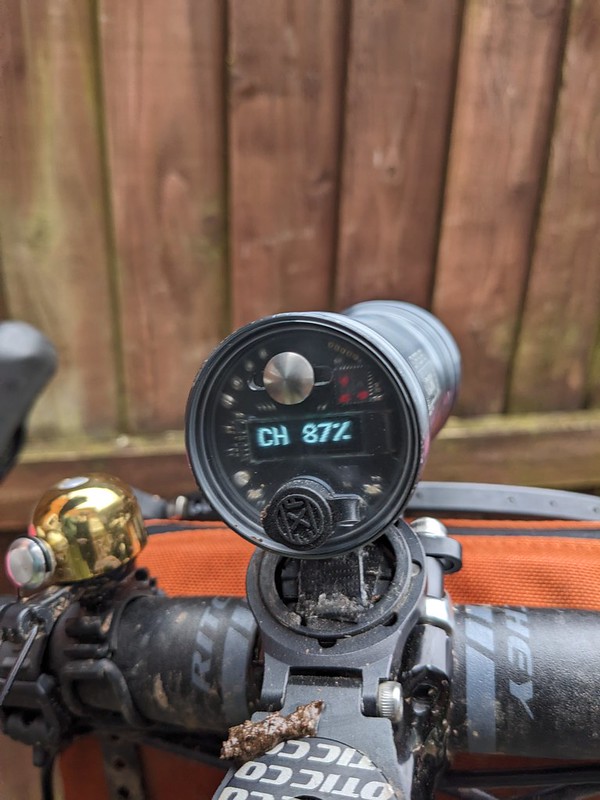
The rear screen tells you which mode the light is in and the state of the battery. The unit is charged using a fast charger that needs to be plugged into a mains outlet.
The Boost R rear light is an essential addition to you be safe and be seen equipment and a reassuring presence on your seatpost when things get dark (or indeed in daylight) I’ve failed to destroy it despite numerous ham fisted attempts. the fact that it gets brighter under braking or dimmer to stop dazzling your trailing ride buddy makes it a must buy.
The Diablo is far and away the most versatile light on test. As a helmet light its great, the TAP function raises it head and shoulders (yes deliberate) above all its competition. As a bar light it’s pretty much all you need for urban riding, commuting and it’s perfect for night time pee walks when camping.
The Toro is a specialist bit of kit, the reflex accelerometer makes it perfect for serious off roading at night. it maybe overkill for urban and commuting, it’ll certainly make sure you are seen though, just point the beam away from oncoming road users eyes!
In every case, the batteries and charging seem to be as good as the first time I used them, run times have been consistent. Although I’ve accidentally dropped, crashed and used the lights as a normal user would, I’ve not tried to be precious with them even though they aren’t mine, the finish on them still looks quality. They are built to last.
Theres’s no doubt that all of these lights are at the top of their game, there are so many built in features and battery tech that they just blow away their competition. Add in the warranty back up of a UK based company (they are still repairing lights that are 15 years old!) and it justifys the price of these lights. They are expensive it has to be said but its worth it for the features, the reliability and the back up.
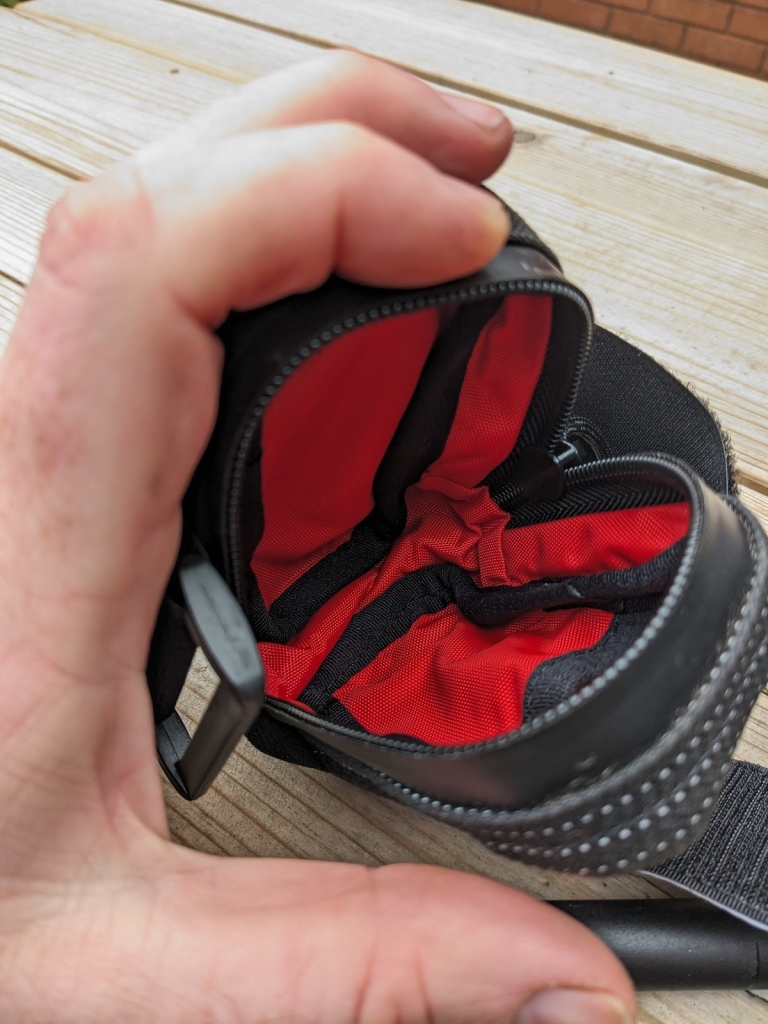
When Patch Collins dropped of his new version of the Collins Cycle Works (CCW) hip pack I didn’t like to tell him that I’m not the greatest fan of hip packs having tried many in the past. In fact I really want to like them and have been buying them since the early 90s in the hope of finding one that suits me.
I always find I dislike the way they bounce around, how narrow the waist strap is and how it cuts into you. How you constantly have to re-cinch the clasp or buckle as it constantly lose grip, usually because of the movement of the pack. They always seem to have too many pockets, all in the wrong place and either too little room for what I want to carry or too much room that stuff rattles about and the space is wasted. the clasps either are too fiddly or don’t work at all. A lot of them seem designed for running and have been marketed for bikes to cash in.
So you can see why I didn’t mention this when Patch very kindly dropped the pack off to me while I was having a pint in my local. He said I could try it out for a month or so and see what I thought of this version 3 of his roll top pack. Oh dear, this might not go as he thought it might.
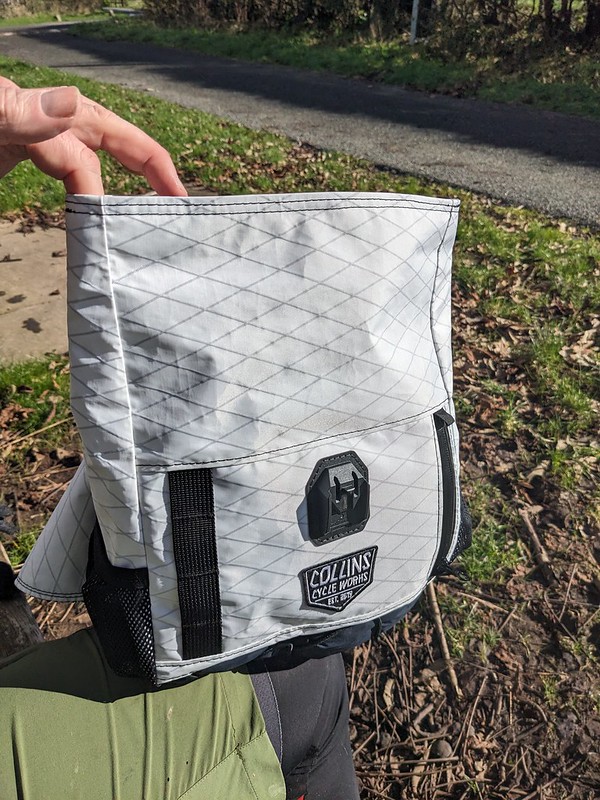
Roll top pack with jacket stashed with bungy cord
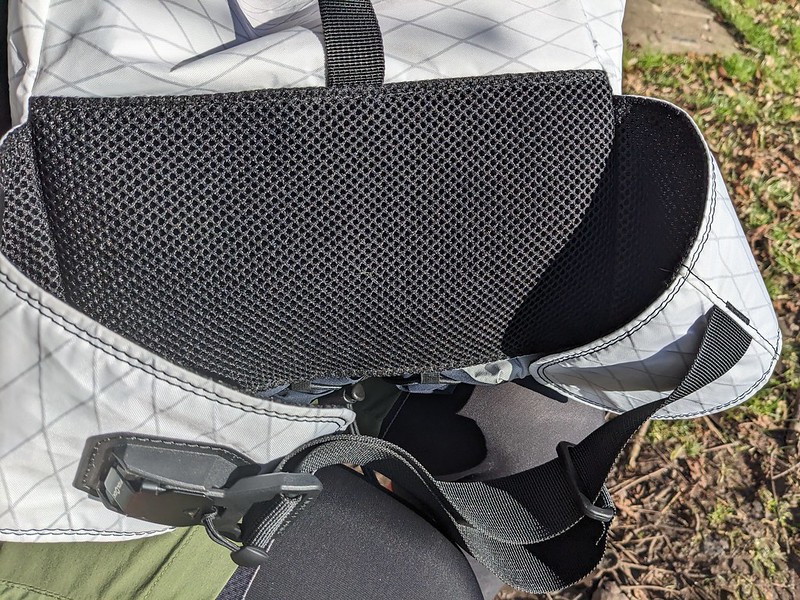
The pack is made of a Xpac VX21 outer layer, which is very water and abrasion resistant, I didn’t hold back with chucking it around on and off the bike and it survived the worst that February in the UK could throw at it and still looked like new at the end. The inside of the pack features one large space lined with welded 210d TPU Nylon to ensure maximum waterproofness, now obviously this is a roll top bag so if you open it in the pouring rain it will fill with water and the waterproof lining means that water will stay in there mixing with what ever you put in the pack. My advice is to not do this!
The roll top means you can get away with over stuffing the bag in an emergency, maybe the shop you’ve stopped at have a sake on Haribo or something? anyway the space is generous. I deliberately took the frame and bar bag off my bike to see if I could just use the hip pack for all the things I needed on a normal day ride. I had a waterproof jacket, a multitool, a gopro and mini tripod (see youtube review video below) my phone and a snack. There was plenty of room for all this and I could have stashed an inner tube and tubeless repair kit in there too with ease. these last items though were on a Ridestash components bottle cage mount I was reviewing at the same time..
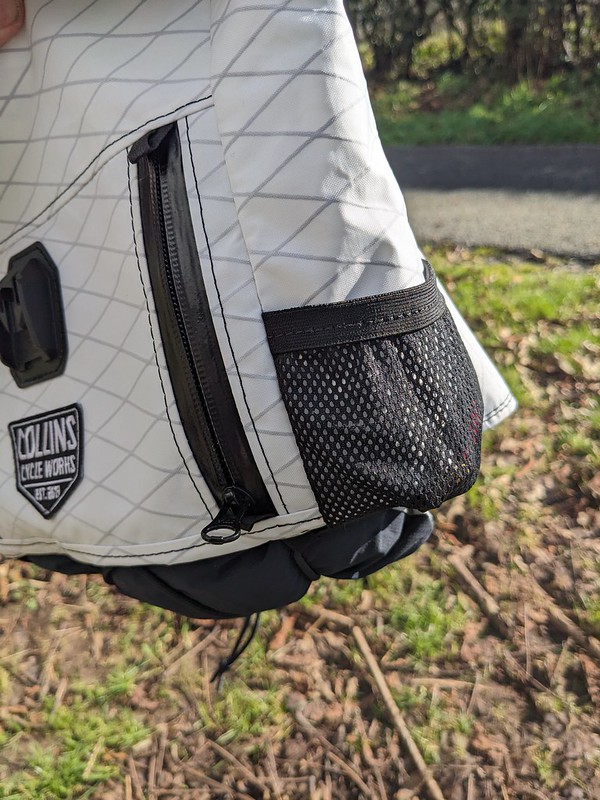
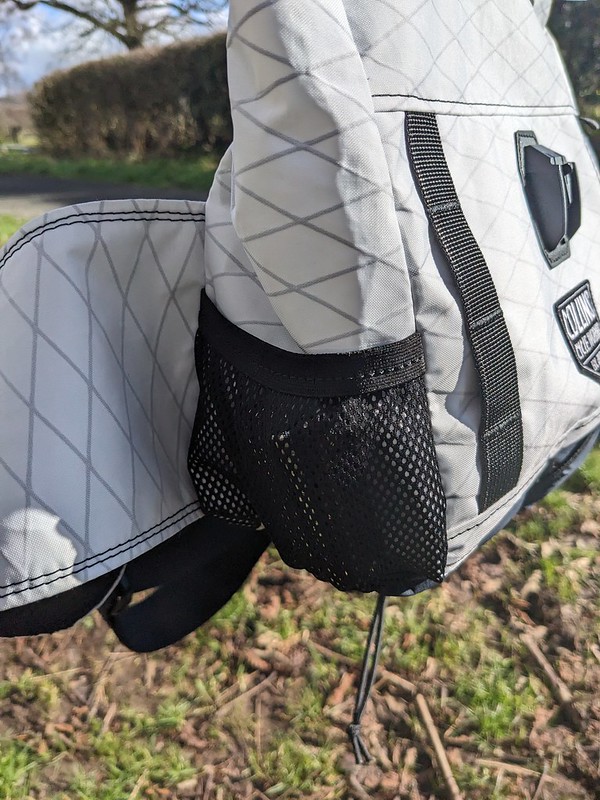
mesh 1mesh 2
The Pack has two mesh pockets on the ends and a zipped pocket on the front. I put my house keys and multitool in the end pocket and my phone in the zipped pocket. All three of these pockets are easily accessible while riding. Even the zip pocket was easy to open and close with gloved hands for those last minute instagram snaps and reels (yes, i am that sad) I was happy to have my phone under just the Xpac fabric as it just looked as if it would keep the phone moisture free. There is a very useful bungy cord on the bottom of the bag and I stashed my waterproof jacket under there, it stayed put throughout.
waterproof lining
The waist strap is broad and sat on my hips really well. It kept the pack feeling secure even over rough off road ground. When the pack was full there was some movement but it never felt annoying and the strap did not come loose, it did not need constant retightening. The strap has padding which added to the comfort but it was thin enough to not feel like a massive sponge on my back. It is also covered in a mesh material and my back didn’t feel like it was over heated but obviously the pack was used in February so temperatures were between -1 and 12 degrees.
lightly padded mesh strap and back
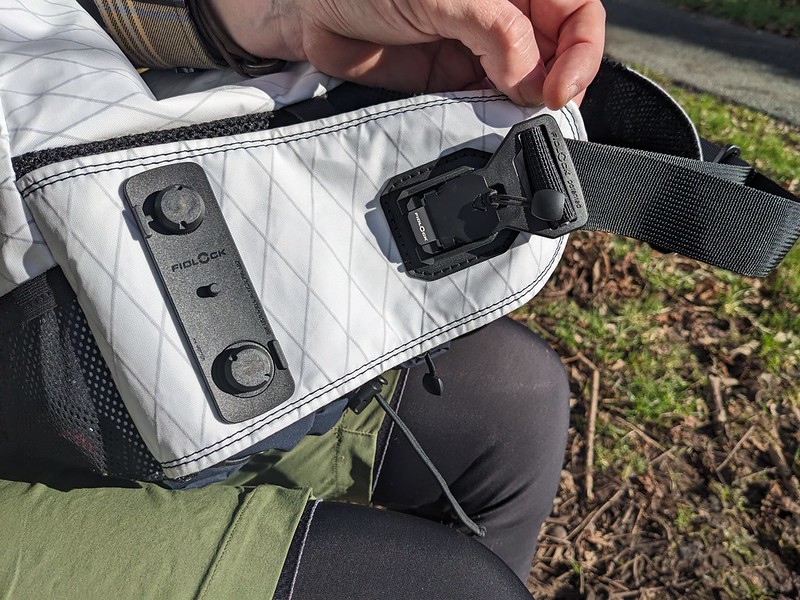
CCW has chosen to go with a company call Fidlock for the fastenings on this bag and it makes a huge difference over the usual plastic snap closures other bag makers use. Fidlock features magnets and this makes it an absolute breese to open and close the roll top and waist strap. The fidlock clasps feel reassuringly secure but the standout feature of this choice of fidlock is the bottle mount, again check out the video below to see how it works but basically you just twist the bottle to release it to drink and then vaguely wave it next to the mount on the waist strap and the magnets pull it in and secure it, you don’t need to take you eyes of the trail at any time!
the awesome Fidlock mount and clasp
So, has the Collins Cycle Works Roll Top pack won me over, am I now a hip back convert? Well in a way yes, I still like to ride pack free and have stuff on the bike rather than on me but the design has solved all the drawbacks I mentioned at the start and has changed my mind on th concept of the hip pack.
If you already like hip packs you will absolutely love the Roll Top pack from Collins Cycle Works but the use of Fidlock clasps and bottle mount just takes this pack to another level above all it competitors.
It costs £130 which isn’t cheap but is on par with its rivals but then figure in that Collins Cycle Works ship these with a fidlock bottle for that price and it is worth every penny.
Check out the Collins Cycle Works website and Instagram page for more details and please watch the video below (and please subscribe, it makes a huge difference to a little channel like mine)
I wonder what Patch would have said if I’d told him I didn’t like hip packs? 🙂
“We are so confident in performance and longevity of this new innovation that we offer a full LIFETIME warranty that also covers corrosion.“
That quote above is from the Enduro website page for their Maxhit Bottom Bracket, Bearings with a wear warranty, too good to be true surely? Actually its also pretty unheard of in the bike industry, No one offers a guarantee for wear, defects and faliures yes but premature wear and corrosion…for life??
When I was asked to review these bearings and heard the claims I thought to myself, if these bearings are as good as they claim then there are two things I’m concerned about. 1) if they “last forever” then its going to be a pretty boring review, every tester secretly likes a failure! and 2) “forever” means one heck of a long test period, its going to take a while to get a good idea how the bearings are performing.
Luckily I was sent the bearings in November 2023, and its now nearing the end of February 2024 so a decent length of time to use them and also the time of year with the wettest, muddiest, grittiest, most icy and generally miserable time of year. So pretty much perfect for me to attempt to destroy a set of bearings then!
my bike as an MTB style screw in bottom bracket, i run a Shimano standard hollowtech 2 to fit my shimano cranks. A shimano botton bracket (the cheapest) can just about last a winter around here before becoming a bit grounchy, completely seize on one side or fail completely. check out this video to see some of the conditions I’m trying to convey “its all gone a bit waterworld” and that was just one days ride in actually not as bad as normal mud!
The Enduro bearings bottom bracket differs from the standard shimano version as they fit the bearings straight into the shell, there’s no aluminium bearing carrier. This allows bigger ball bearings which give double the load carrying capacity of normal size bearings, I’m no engineer but even I know a larger surface area can help disperse any load and reduce friction.
Shimano on the left, Enduro on the right
Not that my bike goes any where near the sea but its reassuring to know Enduro fit the bottom bracket with marine grease, anything that can stave off salt water is plenty good enough for the local farm slurry and horse shit I seem to find myself riding through on local bridleways. The bottom bracket also comes with a set of seals so you can replace them if needed or just regrease as necessary.
So enough of the science, are they as good as they claim? well after four months of the worst weather we get all year, and its been especially wet this winter too I can report that……they feel as smooth and as good as they were when I fitted them!…..told you it might be boring!
how they looked in February when I removed them to see if there was any wear
The only slight spanner in the works is the price, longevity and performance come at a price, in this case £179.99, with a bog standard original manufactuer bottom bracket costing around £20 you can see that you’d get quite a few of those for the price of one Enduro BB. But, who wants to fiddle about changing bottom brackets? and thats even if you feel confident to do it yourself and have the correct tools. I have the knowledge and the tools but I’d rather be riding my bike more than tinkering in the shed or wondering if the bearings will make it through another few hours of slop. when you think about it piece of mind and performance sort of makes up for the price.
you can find out more details on the Enduro maxhit BB here
To actually hear the bearings and see how they perform before and after a winter of abuse watch my video on youtube. If you like the review and video (actually even if you don’t, I could do with more subscribers!) please take the time to click the subscribe button, it makes a huge difference if you do that.
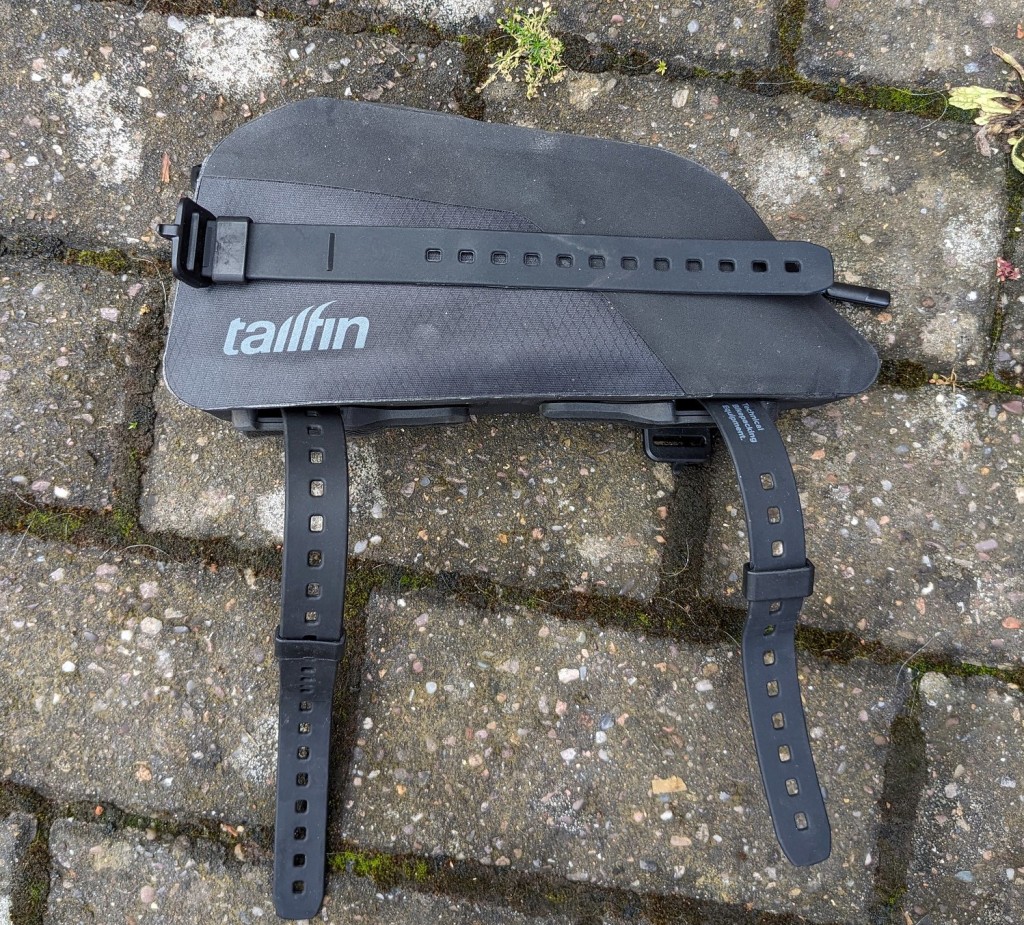
Bike packing bags are sexy in the gravel bike world, there aren’t many adverts for a new gravel bike without at least one picture of some intrepid soul out in the wilderness with a bike dripping with frame bags, bar bags and various harnesses. Fair enough, the image sells the idea of the lifestyle and is probably helping to save an ailing bike industry just at the moment.
What’s overlooked these days is the essential carry that every rider, especially those away from “civilisation” need. Namely something to fix a flat tyre, tubeless repair, maybe a multi-tool and an inner tube. Now thankfully, especially in these days of tubeless tyres you don’t need these items very often (fingers crossed) but when you do you don’t want to have to empty all your worldly goods from your other bags to dig out a tubeless anchovy or spare tube. So, maybe consider something that has been a staple of a cyclist’s kit since the first pneumatic tyre, namely a saddle bag.
Saddle bags are not sexy, in fact I’d go as far as saying they are pretty boring, something to ignore right up until the moment you are stuck on a distant hilltop, in the rain, at midnight with a flat tyre/mechanical and you need to know where your stuff is straight away and that it will work when you need it.
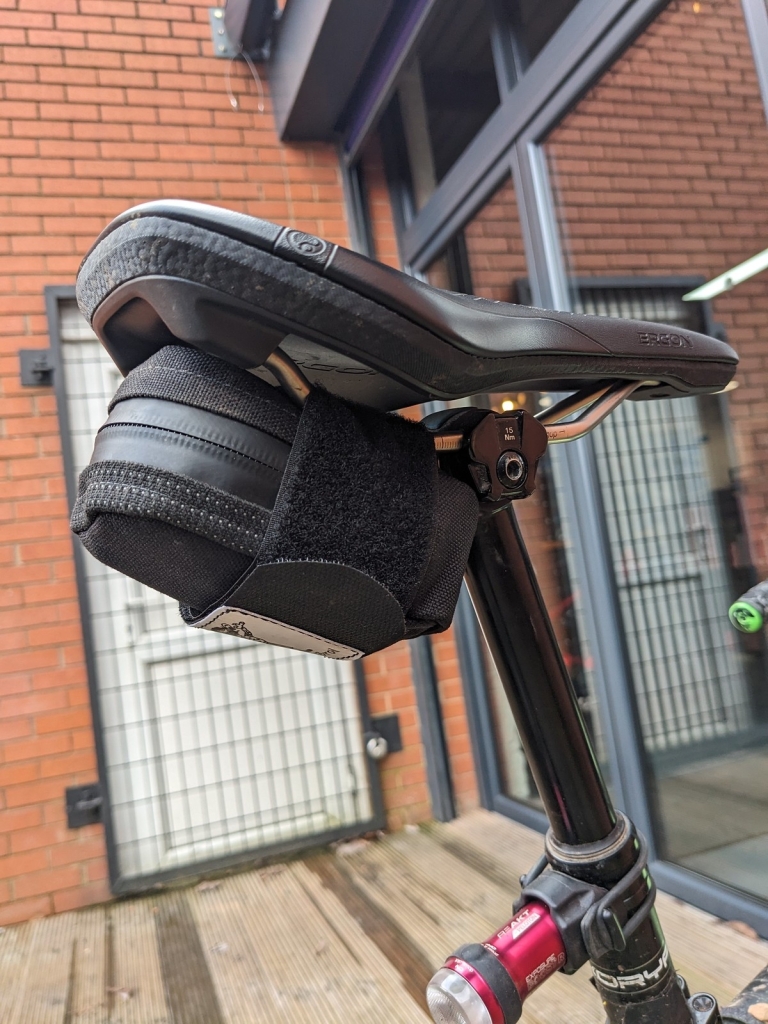
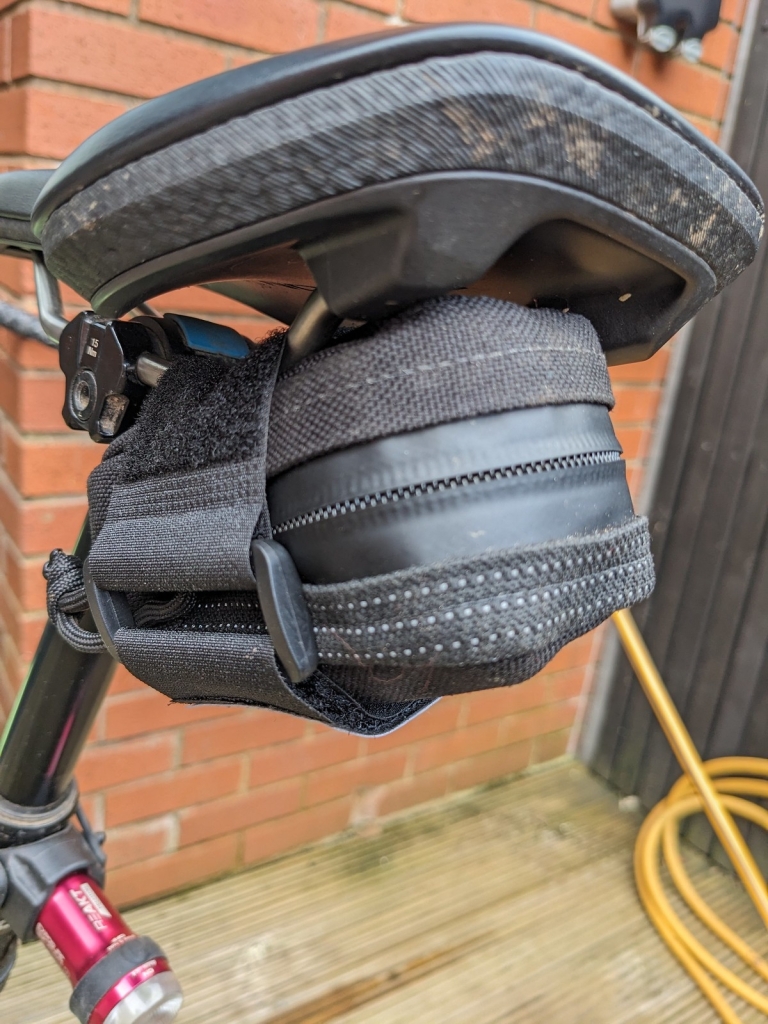
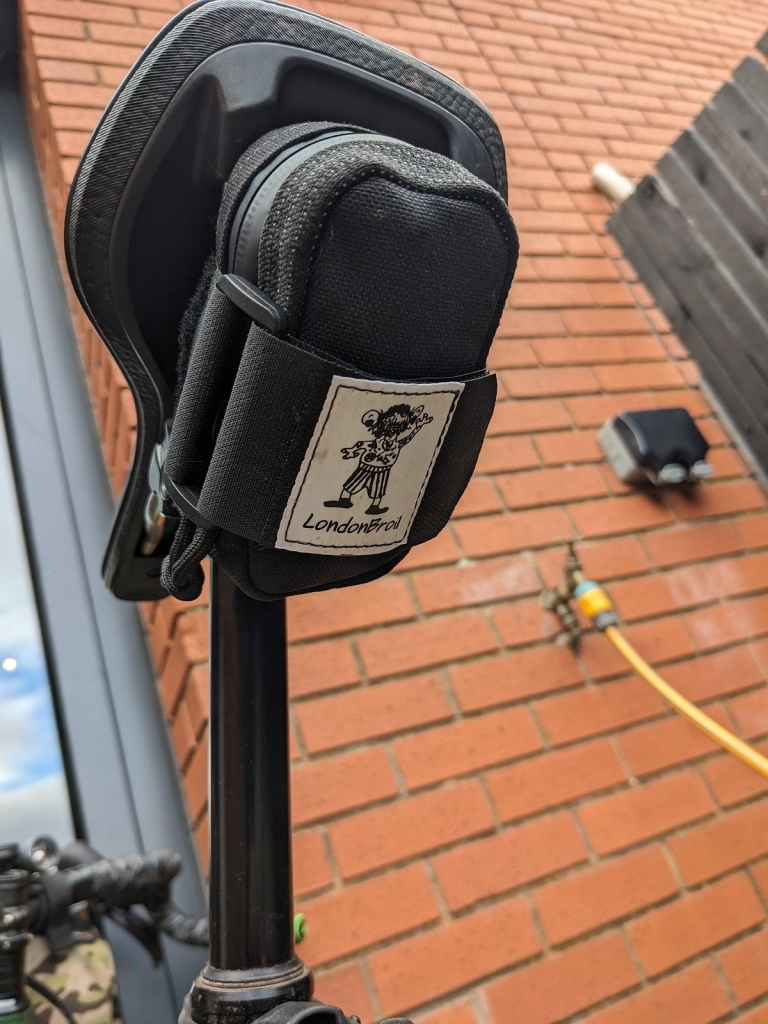
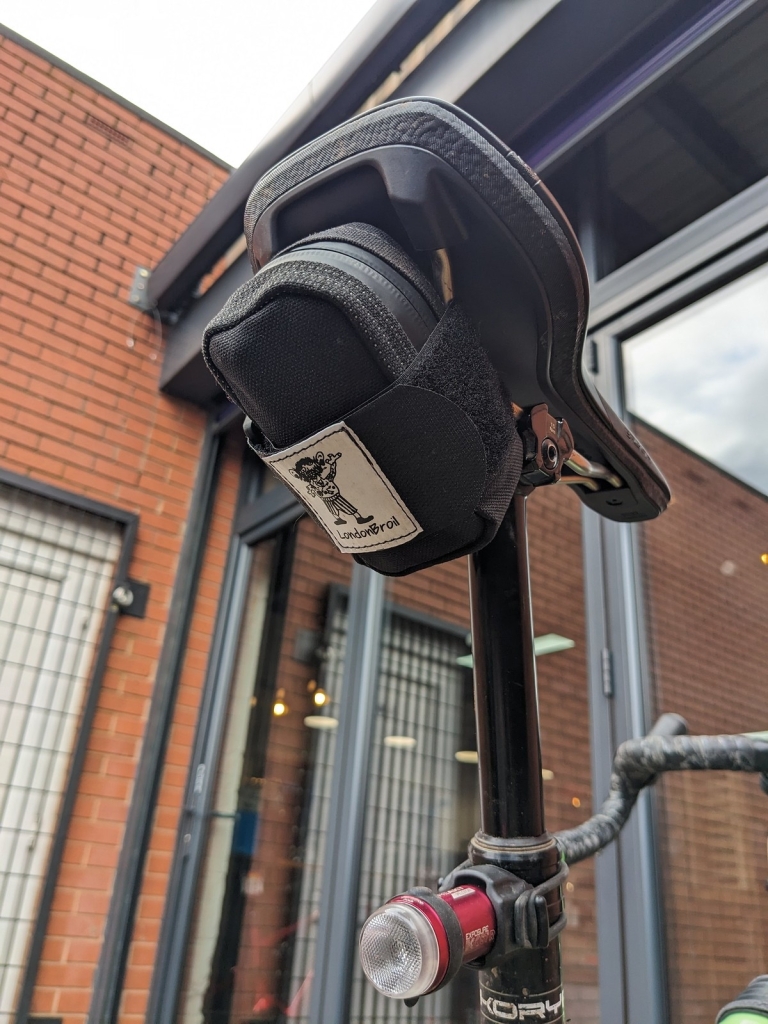
Cheltenham based Broilbags know this and produce and old fashioned saddle bag made with modern materials avaliable from their website broilbag.com off the peg or via a custom order.
Made of cordura nylon with a weather resistant zip the bag secures to your saddle rails with a big velcro strap. Once this is tightened down the saddle bag is going nowhere! Theres no wag and whatever terrain you choose to ride over the bag and its contents will still be there when you need it.
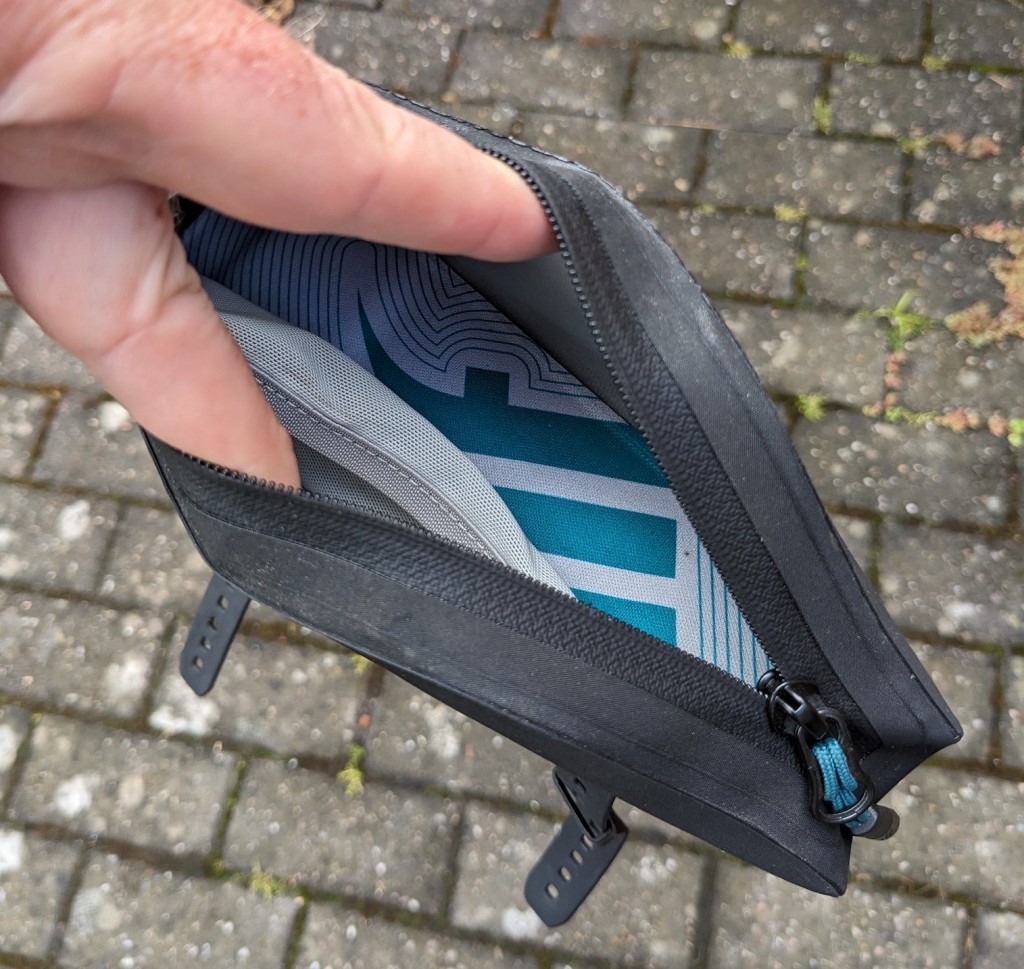
I’ve put a tube, a tubeless repair kit and a box of rubber anchovies in this one, that lot all fits well. There is an internal flat pocket too. I couldn’t fit a mutlitool in too, if I wanted to do that I’d go for a slightly bigger size but this is really up to the buyer as you can chat to Broilbags and get something perfectly suited to your needs. I can almost read the coments as I right this, those riders saying that all these items are exactly what jersey pockets were designed for, I disagree, I personally hate anything weighing down my jersey and would much rather have them attached to the bike. The fact that when I got home from a ride and emptied my pockets I’d instantly lose whatever was in there before the next ride has a lot to do with it too!
Overall, the London Broilbag saddle bag is a well made, well designed example of a simple design. Sometimes things don’t need to be complicated, they just need to work, the fact that this could sit under your saddle forgotten for years on end and still work to dispense the essentials right at the time you need them is testiment to the skill of Ian, the maker and shows the fact that they are a rider too and know whats needed.
Definately consider the saddle bag, don’t dismiss it as an old fashioned idea. There’s a reason they’ve been around for years and that’s because they just work. The London Broil bag version of the ubiquitous saddle bag could be the epitome of the design, plus it’s made by genuine rider rather than a faceless corporation.
Take a look at London broils website here and checkout the interview i did, way back when ukgravelco.com started here which includes the origin of the unusual company name
2023, what a year! Or was it? I can’t actually remember what my New Years resolution was, probably something about doing more cycling (predictable), riding different places (yep, that old chestnut) with lots of new people (ok, that happened but only up to a point).
I’m writing this in the pub with a pint in my hand, so forgive the spelling and the rambling style. After reading a post on instagram from @ipulledthepin, I realise I’ve been doing the New Year thing all wrong. Lindsey says instead of the usual, “Im going to change, get a bikini body, get promotion, be positive” bullshit that flies around at this time of year mostly by Gyms trying to shame people into joining you should just focus on one word to see you through the year. Lindsey’s word for 2023 was “soften” here’s a link to why she chose that word, she can explain it, much more eloquently than me.
So what is my word? I’ll come to that later but first lets talk about 2023 and those goals previously mentioned. I don’t think I achieved any of them. Did I ride in loads of new places? No. I’d say 80% of my rides were from the door. Did I meet new people? One or two but again I’ve mostly ridden with the same few friends, but even that seems to have been reduced this year for some reason. Have I done more cycling? Again no, around my average 4500 miles for the year.
So has 2023 been a massive fail? Up until today I’d have said yes! It’s funny how reading one post on Instagram can change your whole perspective on things but @ipulledthepin has done that today.
I’ve had a few health issues that have knocked my confidence, making long term plans awkward and the thought of bike packing a bit of a terror. I’ve said no to a lot of invites because of the “what if” demons and not wanting to let anyone down by pulling out at the last minute and felt low about it. I’ve forced myself to go and ride when not feeling great and as you’d expect, it hasn’t made the experience as enjoyable as it should have. All this comes with the worry that people will stop asking If I don’t go. Hopefully that won’t happen.
Thankfully just the simple act of riding my bike has helped with the head games even if at times it’s been hard to motivate myself to get out and ride. That’s a sentence I never thought I’d write!
So in the spirit of balance lets look at the positives of 2023. UKGRAVELCO continues to go from strength to strength, thanks to all of the people who interact with it and allow me to repost their stuff on instagram. Thanks to those who have joined the Facebook page, comment on posts on all the channels and to all the companies and distributors who have trusted me to give a fair and honest review of their products.
By far the biggest thrill for me this year has been the popularity of the UK GRAVEL COLLECTIVE youtube channel. This one here.This time last year it had around 400 subscribers and it’s now up to around 1100! Thanks to everyone who has subscribed to it or liked the videos. It has definately been hard work but so much fun and again a motivator for me to get out there. Thanks to everyone who has had to endure me whipping a camera out on group rides, asked them to ride things over and over and to all the non cyclists wondering why a bearded bloke on a bike is riding along no handed while talking to himself into a camera lens. Hopefully the growth of the channel will continue and the production values will get a bit better too! 🙂
Enough retrospection, lets look forward to 2024. I was asked by John from wildcycles.cc what my plans were for the year and I had to say I’d made none. I can update that with the fact that yesterday, I tentitively agreed to attempt the Traws Eryri (trans Snowdonia) route with a good friend and regular cycling buddy. I may live to regret that! That lack of planning frames what I thought I’d do for 2024, namely just play it by ear and see what happens. Not putting pressure on myself to do a certain amount of miles, go to important events where I (probably mistakenly) think I need to be seen to promote ukgravelco will be a good thing for me. Less pressure (I have a day job too, this cycling stuff after all is just my hobby), will hopefully mean I actually do more riding.
So following @ipulledthepin’s example we come to my word for 2024. No New Year, New Me bollocks. my word will be THANKFUL
I want to appreciate what I’ve got, I’m very privileged compared to a lot of society, I have a job, I have spare time to do something frivalous like ride a bicycle for fun rather than for work. The recent passing of Nils Amelinckx has made me realise that even the shortest ride (or just waking up in the morning) is a gift that not everyone gets. It doesn’t matter if I don’t enter a certain number of events, If I don’t pin a race number on my bike again nothing bad will happen. Thankful to feel the first warm spring sun on my face, Thankful to get to the bottom of a dodgy descent in one piece while giggling to myself that I survived it! Thankful I’ve got friends and riding buddies that will turn out for some hair brained ride idea like tossing pancakes! and thankful if I inspire one person to ride a bike for the first time or the 10000th time it will be a victory and I want to be thankful I’m able to do it.
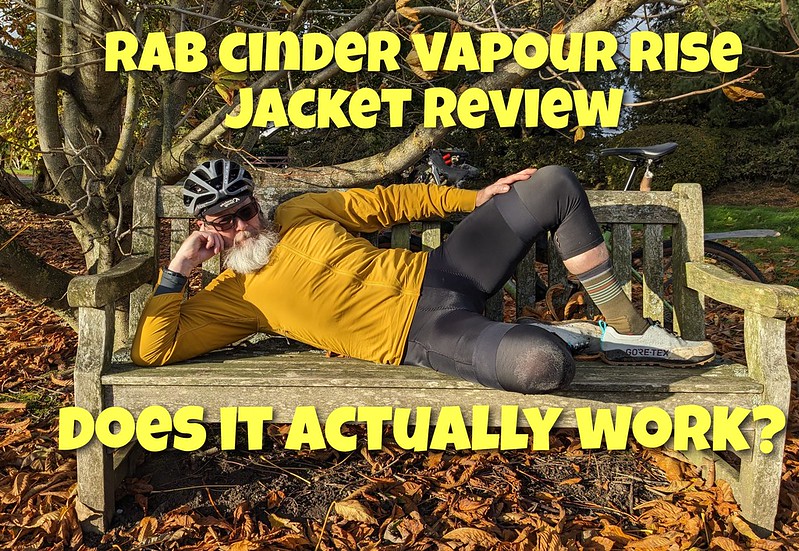
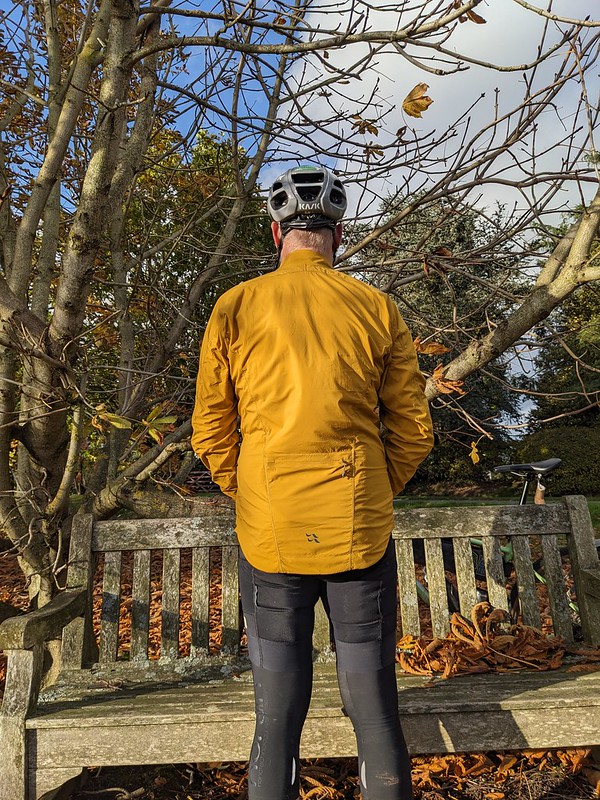
Long known for their outdoor/mountaineering clothing Rab have recently introduced a range of cycling specific garments, some of which I was lucky enough to review HERE
They have added to the line up by introducing a Vapour Rise Wind resistent cycling jacket which I was able to get my hands on and try out over the last couple of months.
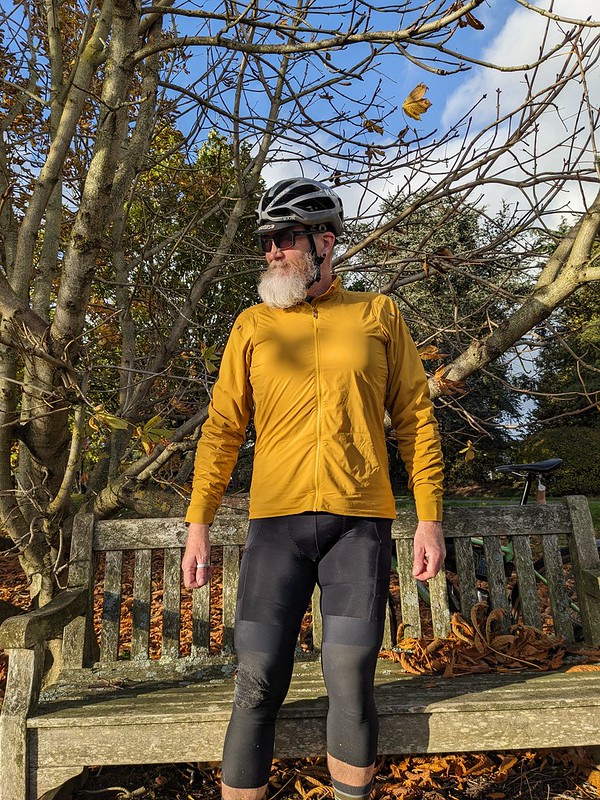
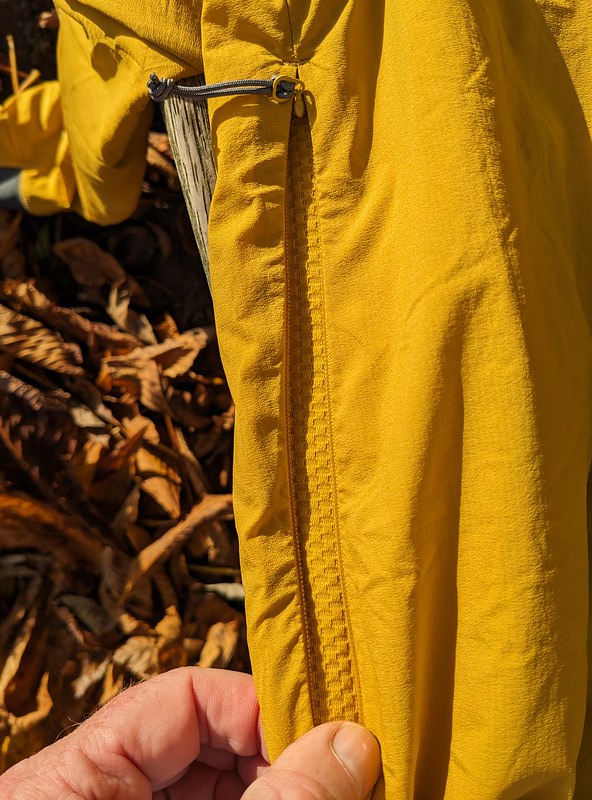
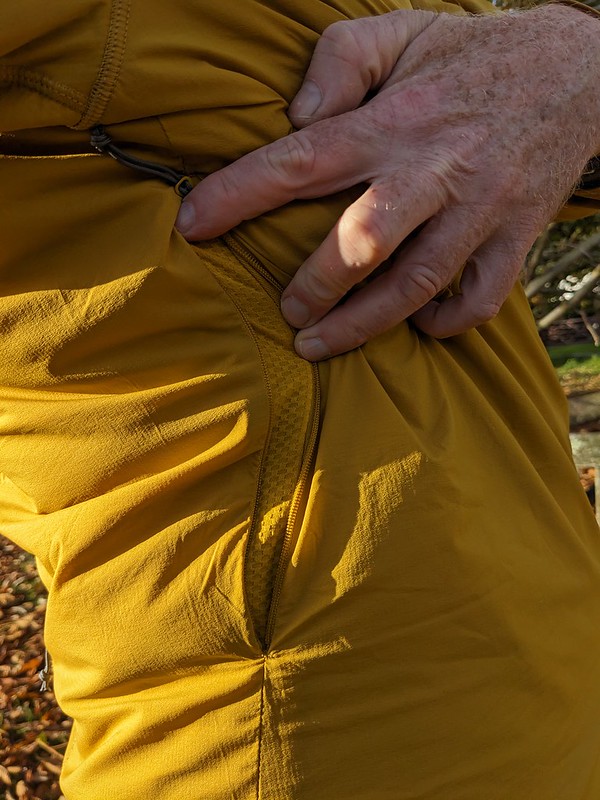
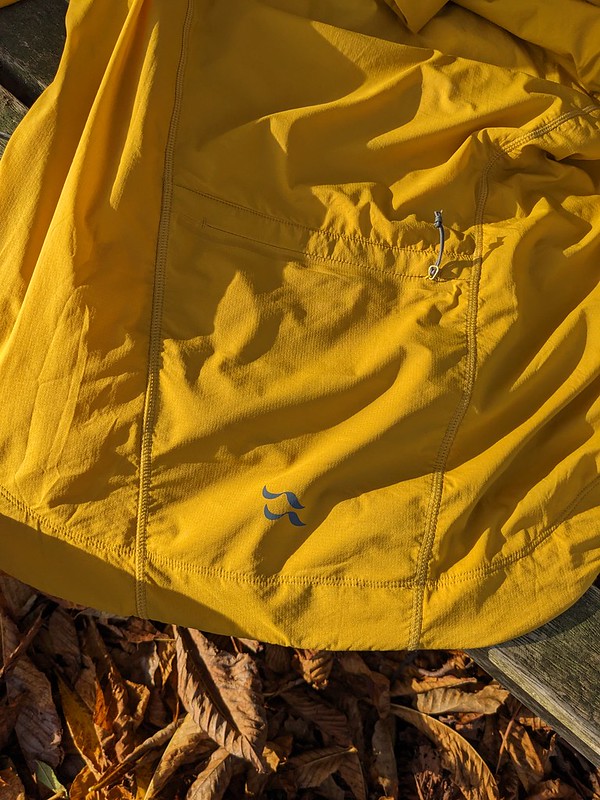
The jacket has what I’ll describe as “fluffy” panels internally in all the areas that face the wind, so on the front and on the leading edge of the arms. The cuffs are elasticated to stop air blowing up but not so tight that you can’t access a watch, useful if using a smart watch to navigate. The jacket has a one way front zip closure, two “pit zips” either side under the arms that allow extra ventilation and a rear pocket. There is no hood and the jacket is treated with a durable water resistant (DWR) coating.
pit zip 1Fluffy panelpit zip 2
It’s interesting that Rab describe the jacket as wind resistent rather than windproof maybe this is just a Rab specific term but throughout the test I didn’t notice anything about the jacket that would stop me calling it a windproof.
One thing that does set it apart from other windproof jackets though is the fluffy panels, this is the “vapour Rise” system of lofted (i think fluffy is better) whch Rab say helps move moisture away from the body to the outer fabric which is made of “Pertex Quantum Air”. Ok enough of the jargon and science, dos it actually work in the real world?
In a word, yes. The outer shell of the jacket does a great job of protecting you from the outside air. Its great on long descents after a lengthy climb as it stops windchill very effectively. When the wind is howling (see embdded video for evidence) that lofted inner suface does do a good job of staving off the cold. I paired the jacket most times on the test rides with a long sleeve baselayer for when temps were around 10 degrees and layered up underneath when it was colder.
loitering with intent to escape the windDWR in action
On that long climb the jacket was pretty effective at stopping me from over heating, no jacket is perfect at this and we all heat up and perspirate at different rates but i didn’t feel uncomfortabe or like I was going to over heat. The pit zips add another way to vent some moisture too. I would really like the jacket to have a double zip though so it would be possible to open the jacket from the bottom for ultimate heat dumping.
The fit is very real world. I usually take an XL in most jackets and I have a Rab Cinder waterproof that is XL and it is just a little too large. I ordered a Large this time and it’s pretty much spot on, even the arm length is good for a cycling position. I’ve got room to move and if i want to layer up underneath I can. this jacket will fit “normal” people. It does flap very slightly on the top of the arm for me but the body is perfect, but I’m not one for full aero skin tight jackets, maybe size down again if you want that restricted feeling.
Talking of feeling, I must mention the material. it almost feels natural to the touch, the outside feels soft and has non of the plastic feeling that you get on many windproofs. I’d be happy to wear this with bare arms as it doesn’t feel at all cold and clammy.
The jacket does not have a hood which to my mind is a good thing, they tend to just act like a windbrake and if you can roll them into the neck it always feels too restrictive to me. The jacket also has a rear zipped pocket to stash stuff while riding. The DWR coating was effective in rain showers I got caught in but note this is in no way a waterproof jacket! it will shrug off light showers and spray only.
The vapour rise system is this jacket’s main feature but also also its drawback depending on how you want to use it. That fluffy lofting makes the jacket bulkier that most wind resistant jackets, although it does feel feather light. that volume means it’s not really a jacket to roll up and stick in your jersey pocket for emergency use of if you are still riding later in the day. it is perfect though if you have a bike packing or bar bag on your bike, it’ll fit easily in there. It’s more of a jacket to put on for the whole ride and it’s insulating and breathable properties mean you can do this.
I think Rab under sell their Cinder Vapour Rise Jacket as merely being a wind resistant garment, it is a lot more than that. For cold autumn, frosty but dry winter and spring riding it could be the most versatile jacket you buy. if they could add a two way zip it would be perfect.
Check out the video review below, filmed during storm Debi, just for wind protecting testing!
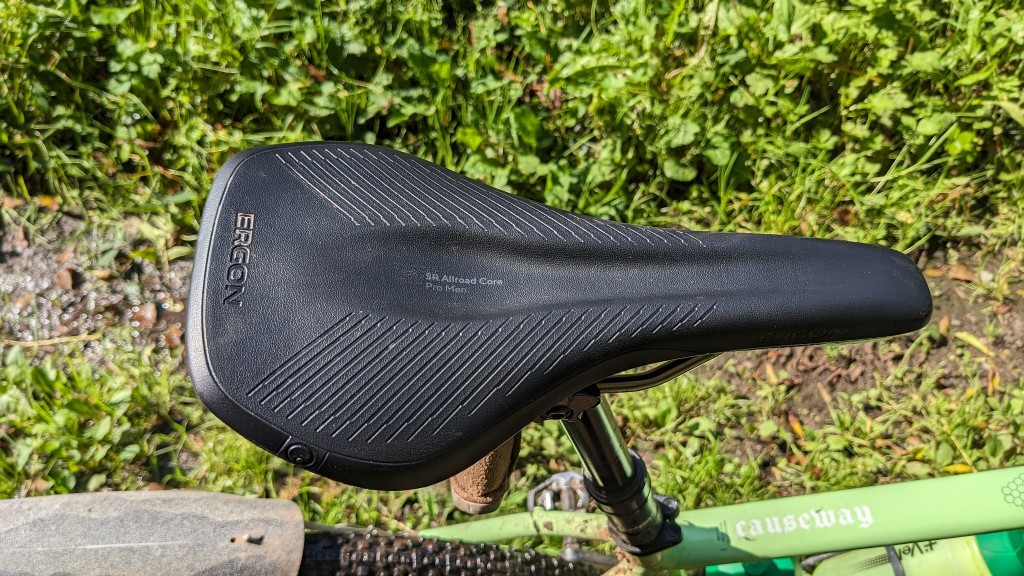
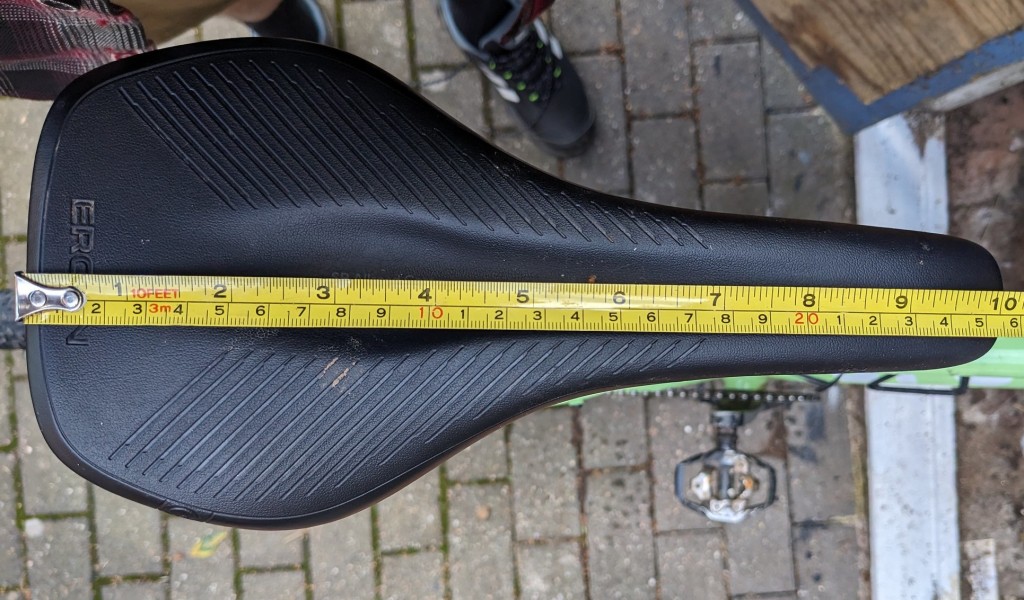
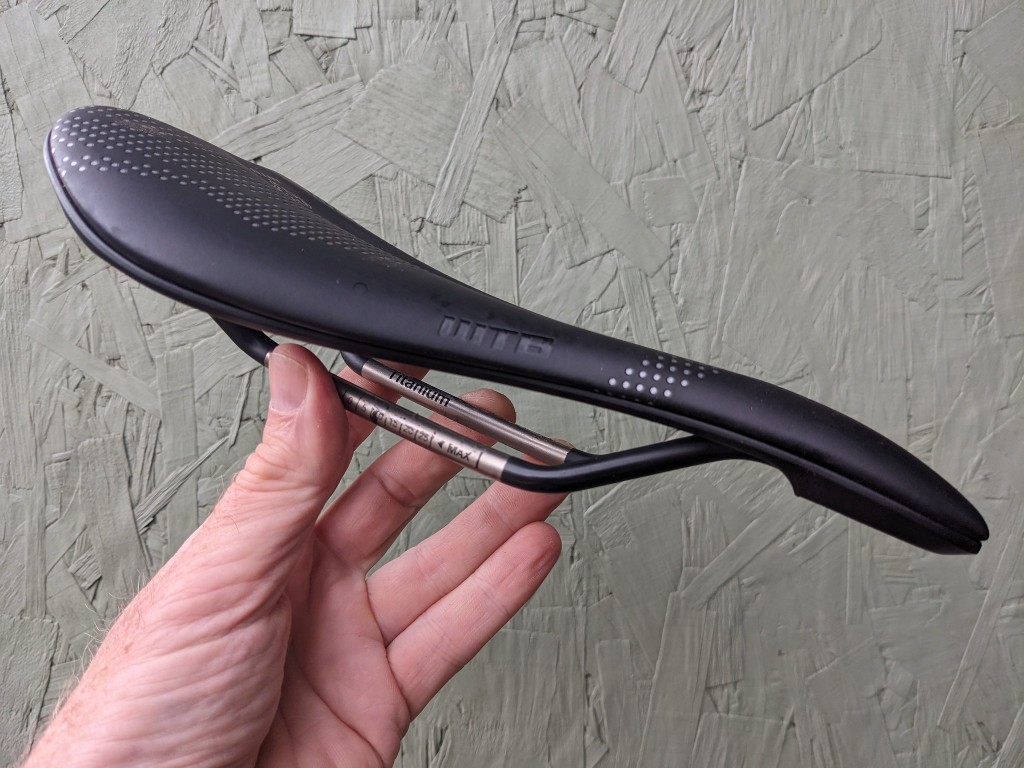
German company Ergon are well known in the MTB scene for their excellent handlebar grips, I have a pair on my hardtail, but they also design and produce products for all the contact points such as pedals and in this review, saddles.
I was interested to try this saddle out but also approached it with some trepidation. Afterall, saddles are a very personal thing, one riders super comfy supportive sofa can be another riders bed of nails, and I have to say, the Allroad saddle doesn’t look at all comfortable to me just from the asthetics. But apart from standing next to the bike once riding you are never going to see the saddle anyway. The performance and how it supports you when riding is the important bit!
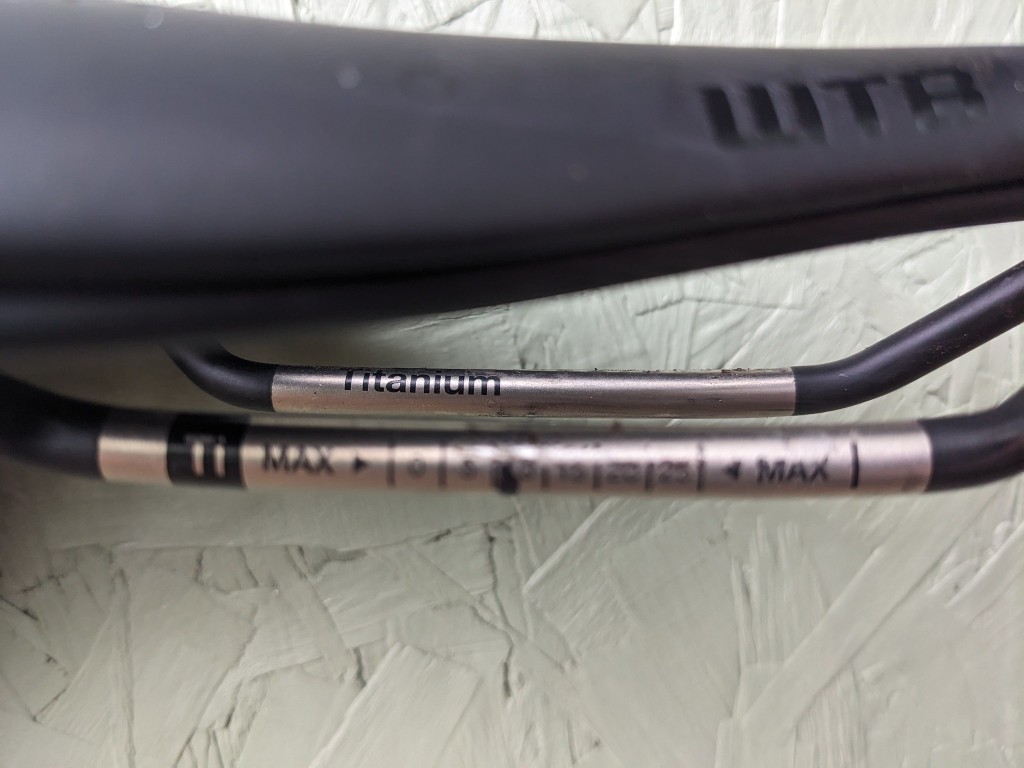
The saddle is of a fairly standard length and width, it’s no “shortfit” saddle. It does come in S/M, M/L versions though. I plumped for S/M as this was the nearest size to my usual saddle. It has a very square-ish profile with a flat top that slightly kicks up to the rear. It has what Ergon call a “pressure reducing surface” to help combat perineal numbness with a core of, and this is where I’m going to use the Ergon jargon…”BASF Infinergy® E-TPU / Closed Cell Particle Foam” ( I always thought BASF made cassette tapes, but I’m probably just showing my age there by Picturing Pete Murphy from the group Bauhaus in the BASF TV ad……but then the Bauhaus art movement was German..anyway, back to the tech!) with a “Orthopedic Comfort Foam” which makes it sound like one of those fancy bed matresses. It comes with “TiNox” rails and is only avaliable in black.
Now we need to kick all that jargon to the side of the trail because what you really need to know is how it feels when its ridden on rather than how much trapped air is in the closed cell foam etc…..ok. the carbon composite shell is a bit fancy so worth mentioning.
view from the saddlegrass up the middle
I’ve had this saddle for a few months. I think it’s important to A) give a saddle a chance to bed in, they all mould to your backside to some degree and B) it should be tested in a variety of conditions from hot dusty days to rain and mud with everything in between. Reviewing a saddle after two of three rides and then publishing a review to my mind doesn’t give the full picture. I bet the distributors, Extra UK wonder were the hell the saddle review has gone though!
So I think I qualify on both counts, multiple rides, the wet summer, hot and humid early autumn through to a few soakings and gritty mud and embarrasingly a couple of crashes have all been thrown at this saddle.
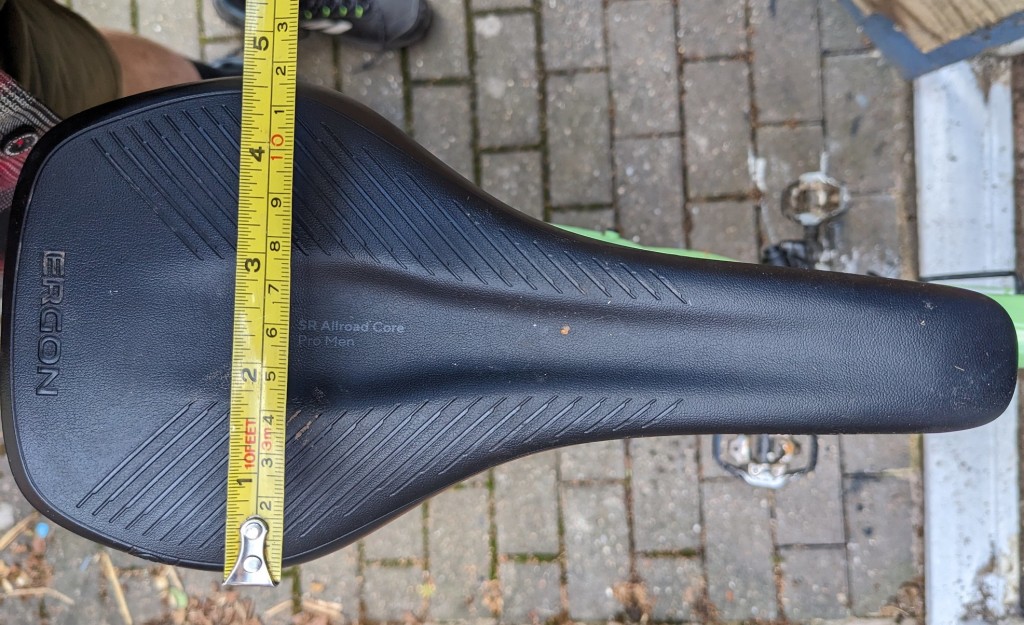
I’m glad I went with the S/M size as the saddle felt plenty long enough for perched on the nose climbing and offered support when cruising along. It also wasn’t too wide or long that it caused hang ups on my shorts when descending and getting my weight back over the saddle. I took a few long rides (100k+) without chamois cream in the interests of testing (what a hero eh?) and suffered less discomfort/hot spots than with my usual saddle. I can report my perineum survived with full feeling intact. The saddle isn’t a big comfy sofa, it cushions you but seems to have just the right amount of give while remaining firm enough to support your back side and sit bones. My one criticism is that the nose of the saddle is quite square and depending on the shorts I was wearing would sometimes catch on the short material, not enough to damage anything but enough to make me change position slightly while pedalling. On that note, moving about on the saddle to change centre of gravity to maintain traction or balance was easy. The saddle was grippy enough to stop you sliding inadvertently about and thankfully not sticky enough that it pulls on the shorts material.
square nose
The Ergon Allroad has come out on the other side of this onslaught with hardly a mark on it. It’s very hard wearing. Multiple cafe wall leanings haven’t scuffed it either and neither have crashes and miles under my undercarriage. My initial fears on it looking uncomfortable have been completely unfounded, turns out the designers at Ergon do actually know what they are talking about! Would i replace my regular saddle with this one? Well, I’ve not taken the Ergon back off the bike yet and the test period has been finished a while, despite the square nose thing I’m leaving it on for the foreseable!
more details and great sizing info to help you choose the size of saddle would be best for you can be found on the Ergon website here
If you, like me, think the Ergon Allroad pro core looks like it could be uncomfortable then don’t forget the old maxim, appearances can be deceptive. In this case they are, it’s a traditional size saddle made with modern materials by a company that focus on rider performance and comfort. Give it a try and I think you and your derriere will be pleasantly surprised.
With Shimano adding 12 speed GRX to the line up Fustle have refined their line up for 2024, simplifying the choices on this excellent frame set. Designed in Northern Ireland these bikes just excel off road and on (yes, I’ve got one myself!) here’s the press release from Alistair Becket, designer and owner at Fustle.
FUSTLE MY2024
As we approach the end of the summer of 2023 (if we can call the torrential rain and colder than average temperates ‘summer’) it marks a milestone in the life span of FUSTLE. We launched in 2019 as a small family run brand, with big ideas, but an even bigger challenge ahead of us, although we didn’t know it at the time.
We have learned a lot, we have had some great luck along the way, and some poor luck at the same time, but our customers have remained as fantastic as we could ever hoped for.
What we have learned in the last 3 or so years is that we thrive when we make products that people don’t know they need, and for MY2024 we have taken this approach exactly.
Gone are the huge variety of custom build options.
Gone are the similar looking specifications that only service to cause confusion amongst our potential new customers.
Here to stay is our proven and award winning Causeway GR1.1 frame and fork kit. We are yet to find a way to make significant improvements to this chassis (and we have tried, with multiple prototypes that are unlikely to make the light of day) so we decided to continue with this chassis and focus our efforts at refining the component choices to really maximise the experience of riding one of our bikes.
What we have done is split our bike range into 2 very clear categories, and then offered 2 spec levels and 2 price points within those.
We have chosen specifications that we feel make the bikes unique and considered for their specific purpose, and feel the latest developments in technology have only served to enable us to refine these products exactly the way we have wanted to for some time.
BACKROAD: Available in both ‘Core’ and ‘Control’ spec tiers.
All of our backroad bikes make use of the very latest Shimano GRX 2×12 groupsets, and are designed for those riders who thrive on endless fire-road adventures, bike packing expeditions and even serves well as your brand new winter road bike given hal the chance.
A refined build kit with lower rolling restistance tyre choices, and proven wide flared cockpit, make these models the ultimate go to gravel bike for anyone with a background or an appetite for riding.
TRAIL: Available in both ‘Core’ and ‘Control’ spec tiers.
Where it all started for FUSTLE with our award winning gravity inspired gravel bikes, the Trail builds utilise the very latest Shimano 1×12 groupset, offering a wide enough range to get up into the mountains, and all the MTB tech to keep your chain in place no matter how excited you get on the way back down.
Retail Pricing: Inc free shipping within UK and EU
Backroad Core: RRP £2249.99
Backroad Control; RRP £2499.99
Trail Core: RRP £2249.99
Trail Control: RRP £2649.99
All of our bikes are available for pre order today, with the ‘Control’ models available for dispatch in October 2023, and ‘Core’ models available for dispatch in November 2023.
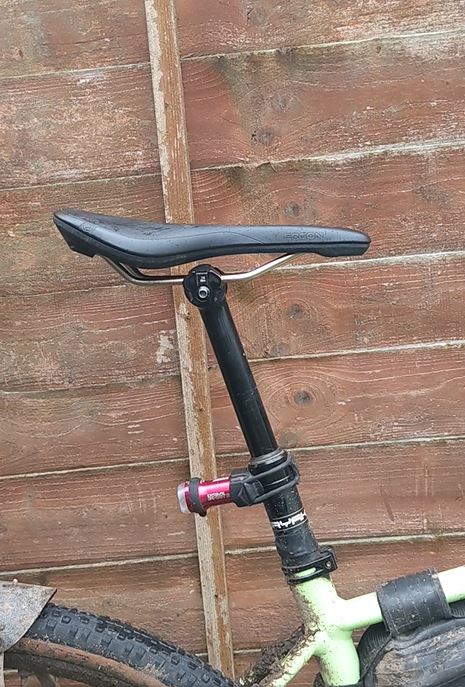
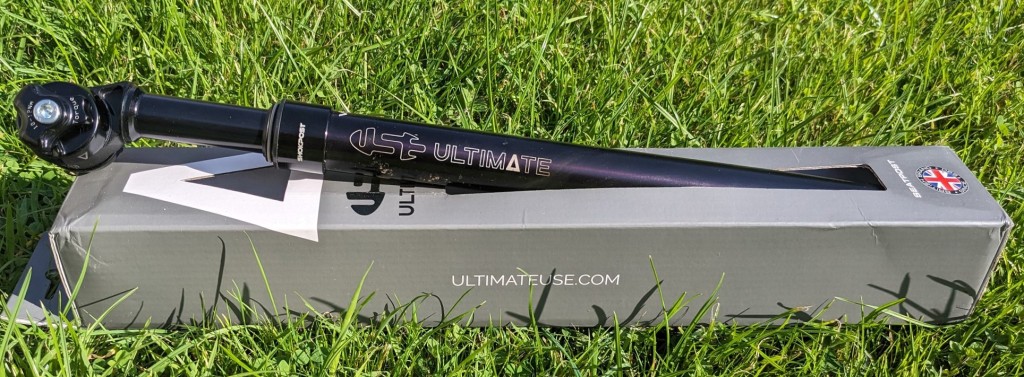
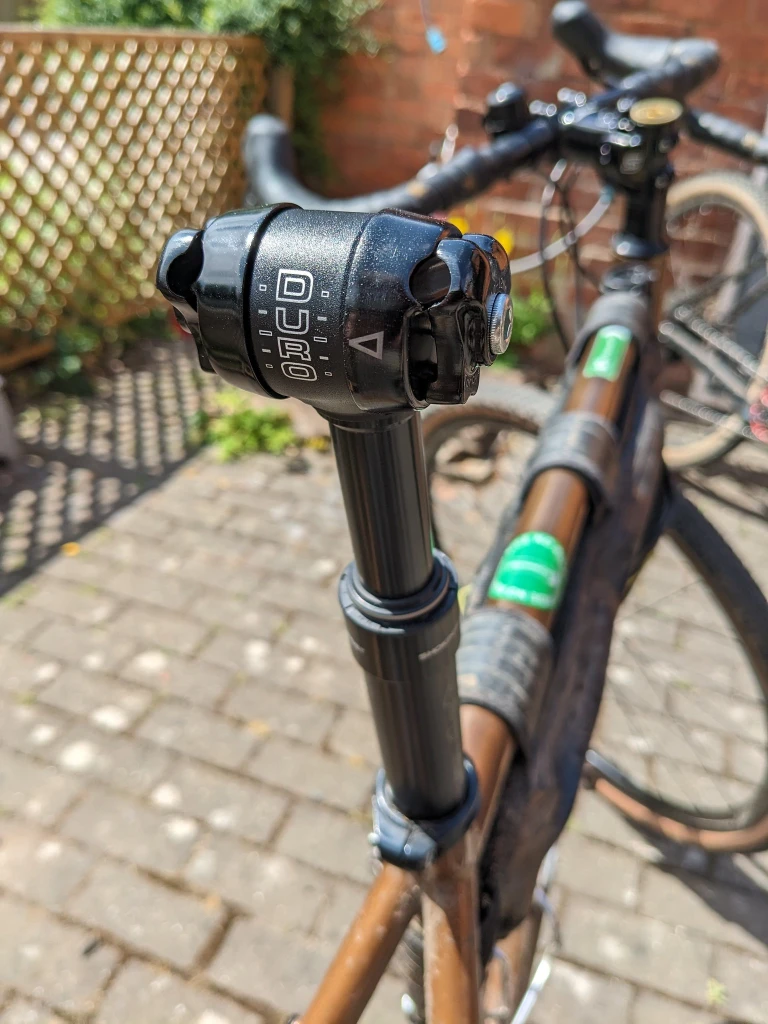
USE (Ultimate Sports Engineering) are probably better known for their excellent range of bike lights but they also have a range of bike components for which they use the brand name “Ultimate”. One such component is the Vybe Duro suspension seatpost.
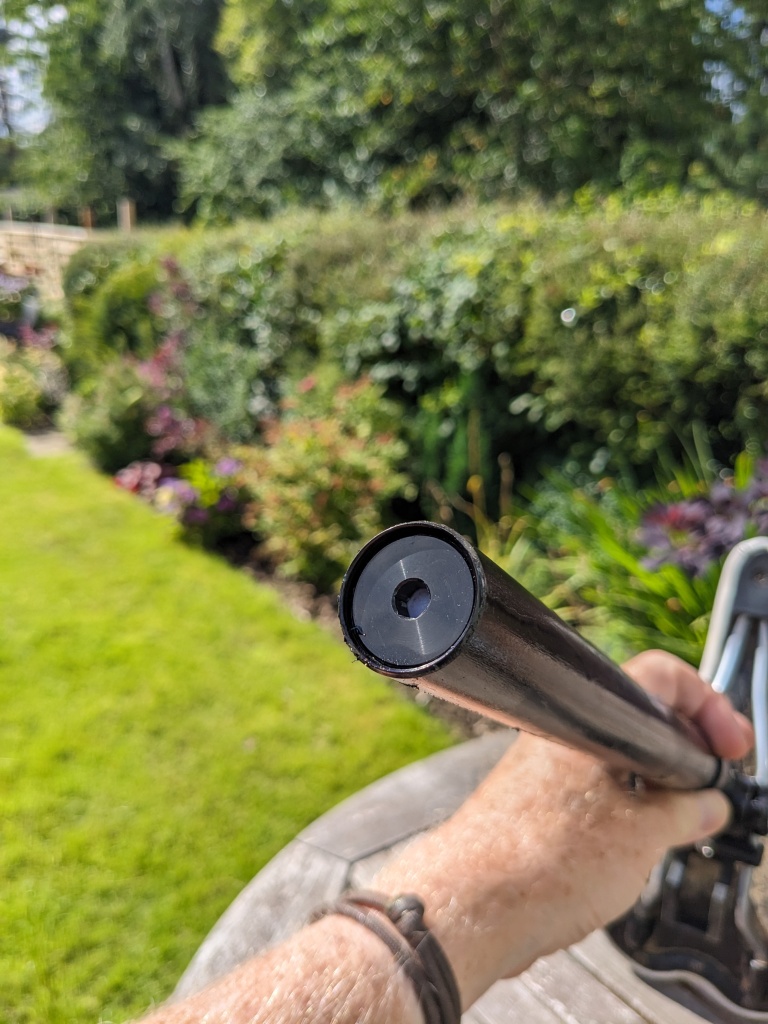
This particular post is made from aluminium and gives up to 50mm of travel that is controlled by an elastomer/spring stack contained inside the seat post shaft. There are no pivots or springs visible, just a neat shaft entering the post via a wiper seal. It is very reminiscent of a dropper post in looks but it does not function like a dropper.
When ordering the post it’s important to check the rider weight guide and choose the density of spring and elastomer that you’ll need. I’m not the most svelte of riders so I went with the hard spring option, but you can buy the others, soft, med etc if you want to change the rate of compression or you lose or gain weight.
the post is available in all the popular seat tube diameters (this one is 27.2mm) and the clamp is a very simple to use clam shell design with one single bolt to adjust fore-aft and pivot up and down. if you have a carbon rail saddle or one with unusual shape rails you’ll need to specify this when ordering. My saddle is bog standard and it took literally seconds to fit and adjust, a refreshing change from some complicated designs on other posts.
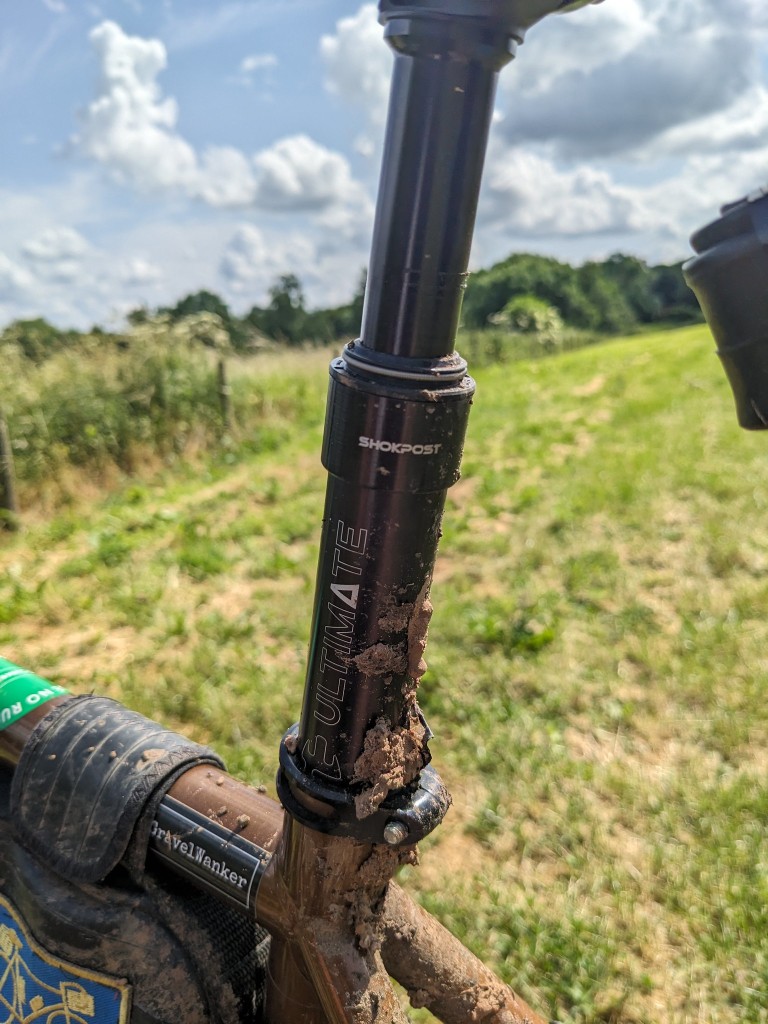
Adjustment to the post is via a threaded disc at the end of the shaft, a simple turn with an Allen key to compress or uncompress the spring is all there is to it. It’s very maintenance shy people friendly! I popped the post into the bike, set the height while it was at full extension and went off in search of something bumpy to ride.
Over the course of the next couple of months I was able to try the post out in both sopping wet and muddy and bone hard dry conditions. the first ride i noticed the post had a quite harsh and loud top out clunk (when the post extended back after being compressed down) For the next ride I wound in the disc inside the post a few turns and this stopped the clunk completely.
It’s very hard to photograph a suspension seatpost working while you are sat on it and harder to video without a film crew following you filming your backside, i wouldn’t inflict that on anyone so what i did do is ask anyone riding with me to have a look as we were riding along to check to see if the post was moving. The thing is when you get the post dialled in the movement is quite subtle and you hardly notice it. I can say definitely that it works though from the feedback from riders staring at my ass! When the going got really bumpy, the time any normal person would stand on the pedals and absorb the bumps with their legs I chose to stay seated, just for testing purposes and I could feel the post working then.
At 434g (on my bog standard non verified set of scales) the Vybe post is never going to be as light as a standard seat post but a standard seatpost will not give you that little bit of give that could mean the difference of a longer day in the saddle and quicker recovery from the chatter of rough trails to ride again the next day and that is worth a few extra grams in my mind. I didn’t notice it moving too much when riding on tarmac either.
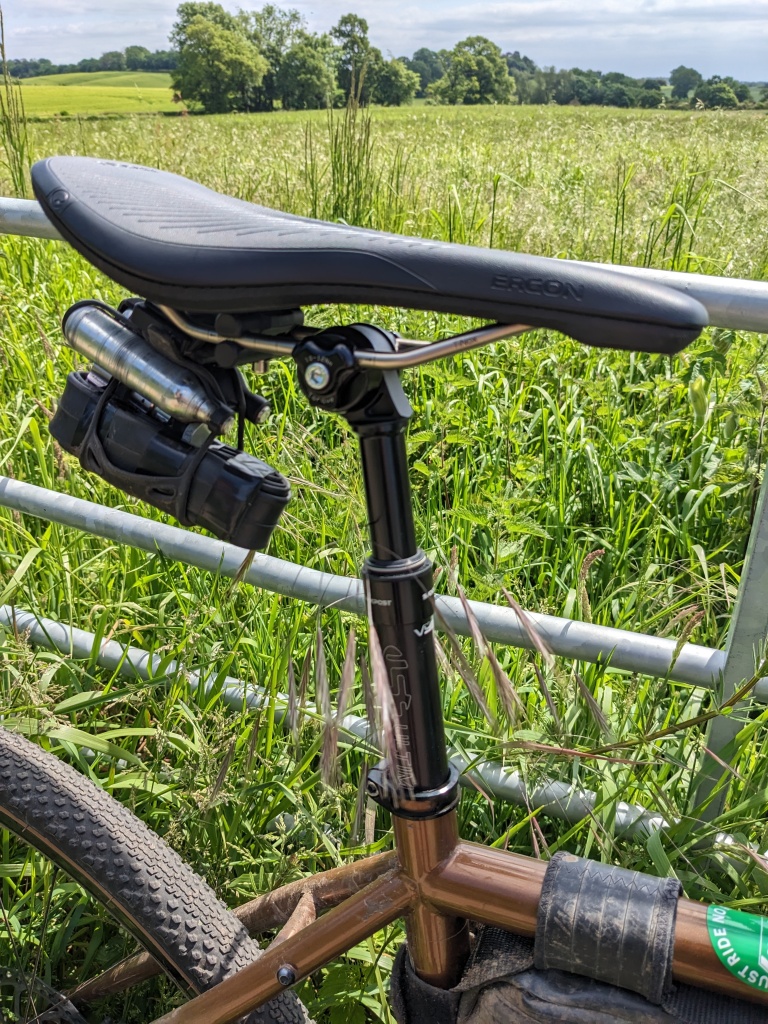
The fact that the post is pretty much maintenance free, just wipe it down post ride is a bonus too. I have to say compared to parallelogram designs the Vybe is a lot prettier to look at and it looks like a quality item. I chose the layback version as the post it was replacing on that particular bike had layback too but a non layback version is available also.
The Ultimate USE Vybe Duro shockpost is a well made, dare i say attractive suspension seatpost that really works, if you suffer lower back problems from the jarring some gravel routes give then it could be a solution for longer more comfortable rides and recovery. Its very user friendly too so popping it on for those rough rides and using a standard post for less violent stuff could be an option too.
find out more about the seatpost here Ultimate USE
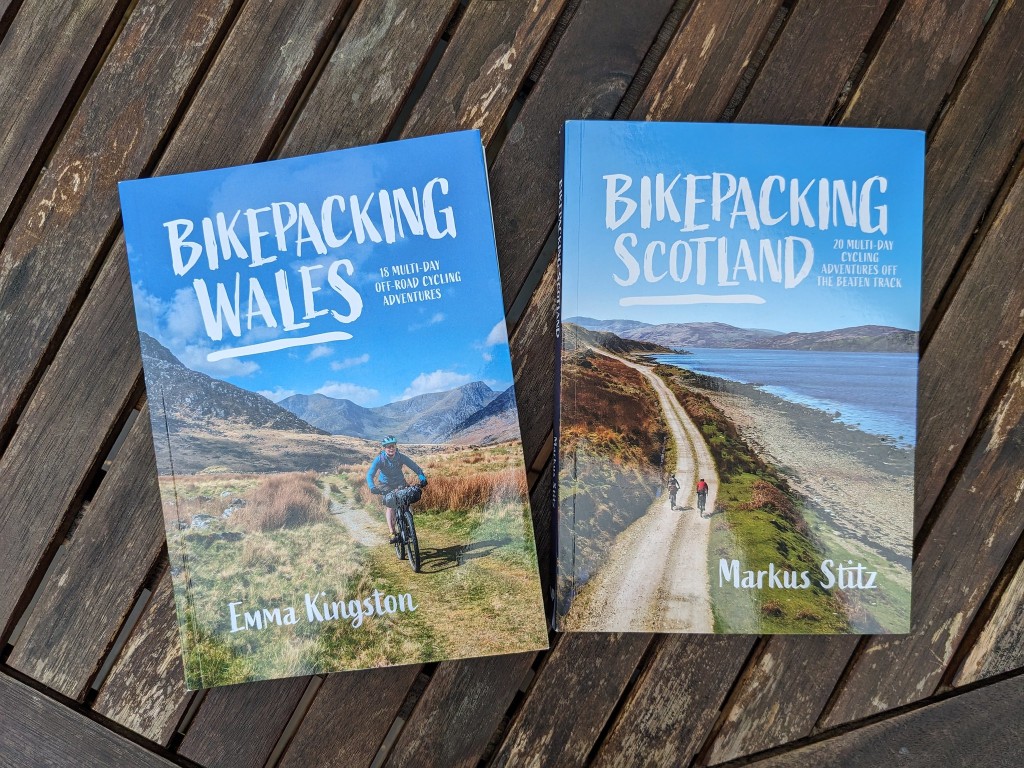
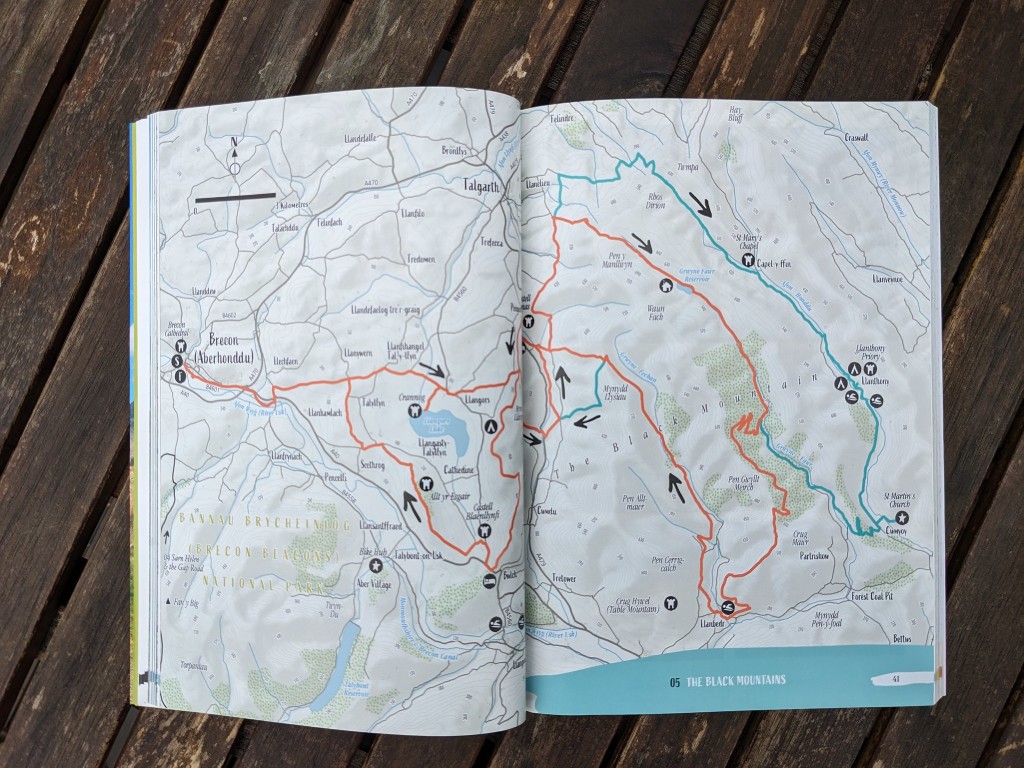
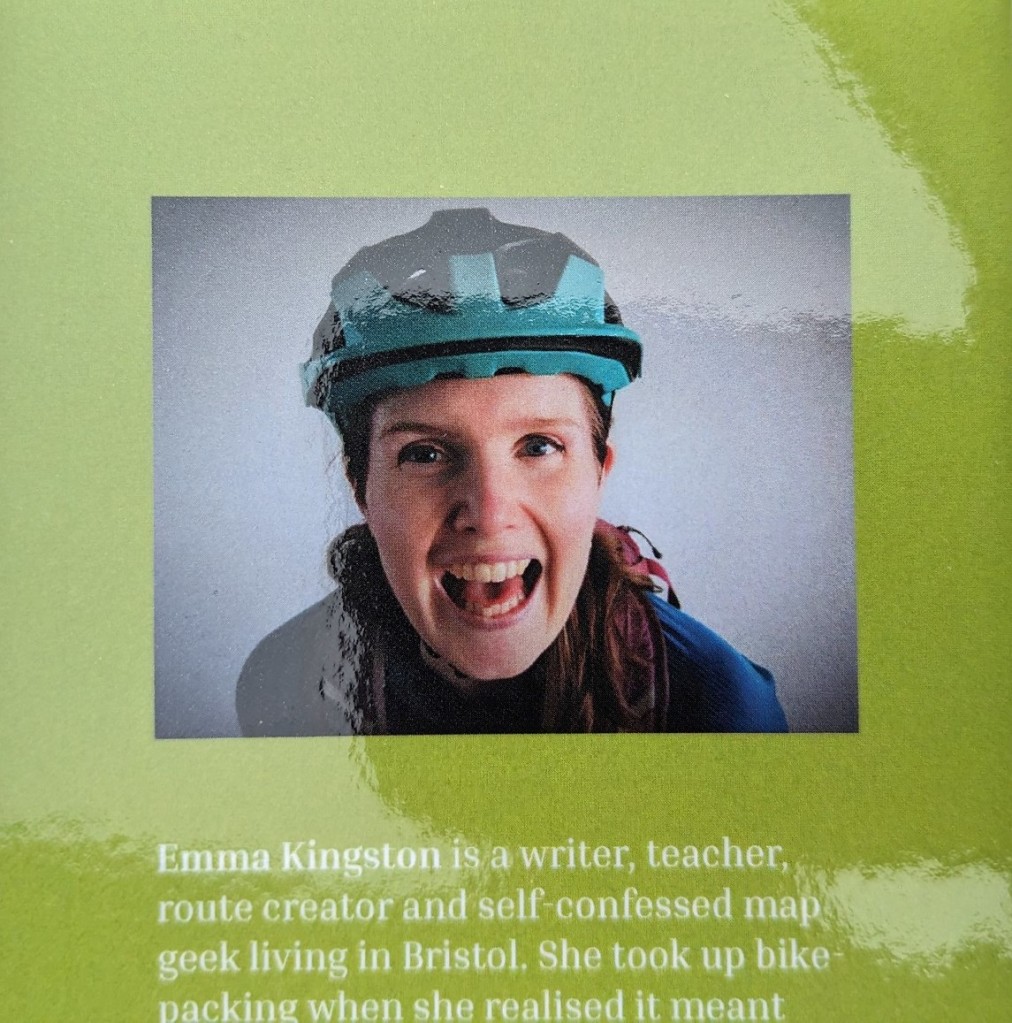
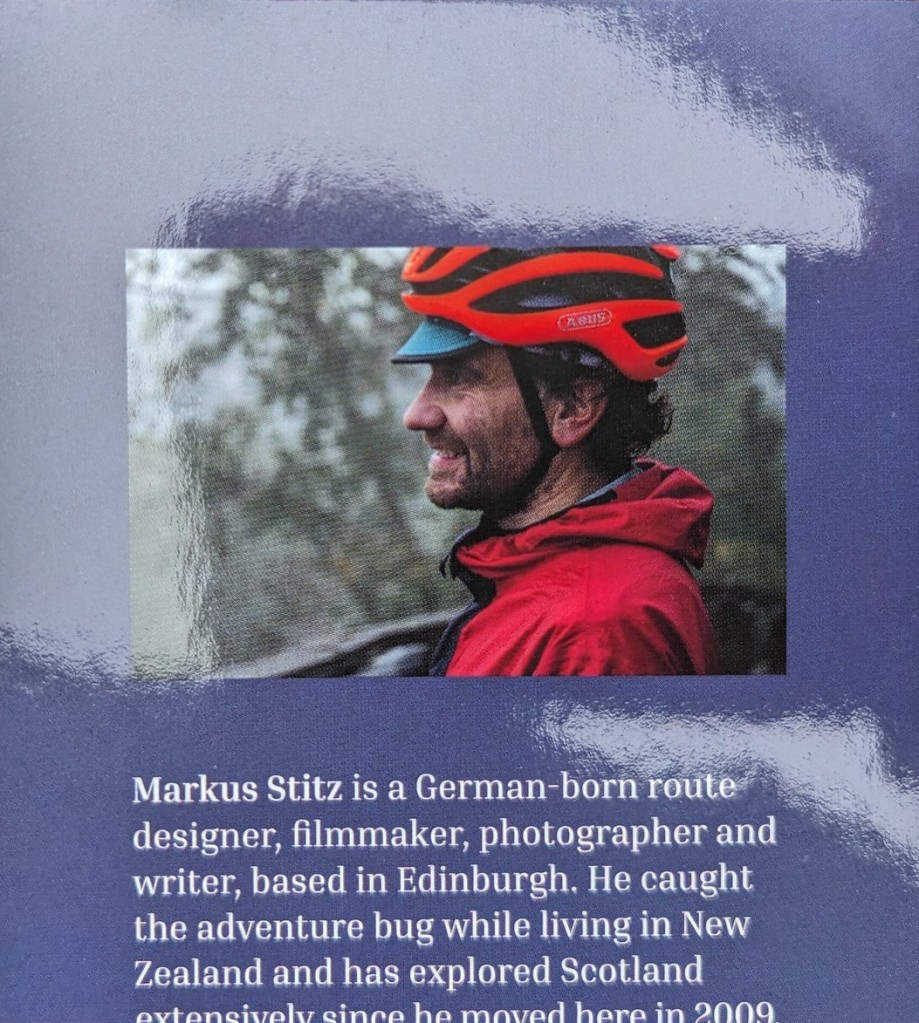
If you are looking for inspiration for your next ride, be it long or short then look no further than either of these two books, bike packing Wales by Emma Kingston and bike packing Scotland by Markus Stitz
I feel its ok to review these two books side by side because rather than competing with each other they in fact compliment each other. look no further than these two books if you want to dip your toe in the bike packing water or are a seasoned leathery skinned wanderer as there are easier routes for the inexperienced (me!) to full on out there riding on lumpy terrain for those with more experience.
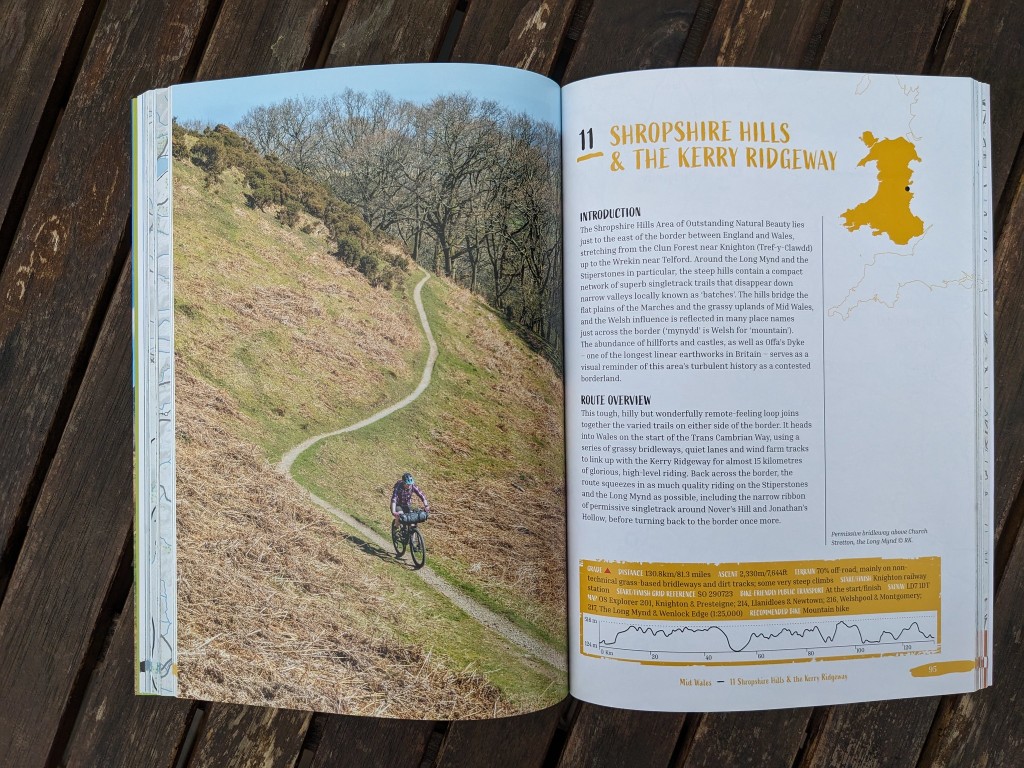
The full colour pictures just make you want to drop whatever you are doing, check the air in your tyres and head out the door on an adventure. A tremendous amount of work has gone into these books from both authors, there’s so much detail. not just about the route and the conditions you can expect at various times of year but also what to look out for on your ride. places of interest you might have just ridden past are listed as well as the essentials like food stops, pubs and bike shops.
The maps are comprehensive and detailed but as you probably won’t want to carry the book with you on the rides there are downloadable GPX file links for every route making it simple to transfer the route to you mapping computer of choice.
You can of course adapt the routes to suit yourself, I adapted a route from the Forest of Dean into Wales as i was tight on time and this is one of the things I like about these books, they are very versatile, you can dip in and out of them, use the published route or join them up for a longer ride. all the rides are graded and the grading system is explained so you get an idea if the route is suitable for you before you start.
The thing I like most about them though is Emma and Markus’s enthusiasm for just riding a bike as it seems to shine through on every page.
If you’ve ever thought about bike packing or just want to go ride your bike in some wonderful places bike packing Wales and bike packing Scotland are must have books, and even if you haven’t thought about it they are worth buying just to look at, i can’t guarantee you won’t be tempted to swing a leg over a bike and ride off into the countryside though!
you can buy these books direct from the publisher, always a good idea for the author
These are non affiliate links, ukgravelco makes not money if you click on these. If you’d like to support ukgravelco.com to ensure more reviews and articles like this then visit the shop here and buy a T shirt or some stickers or please follow the instagram, facebook group or youtube channel
as you can see, my sense of style hasn’t changed much!
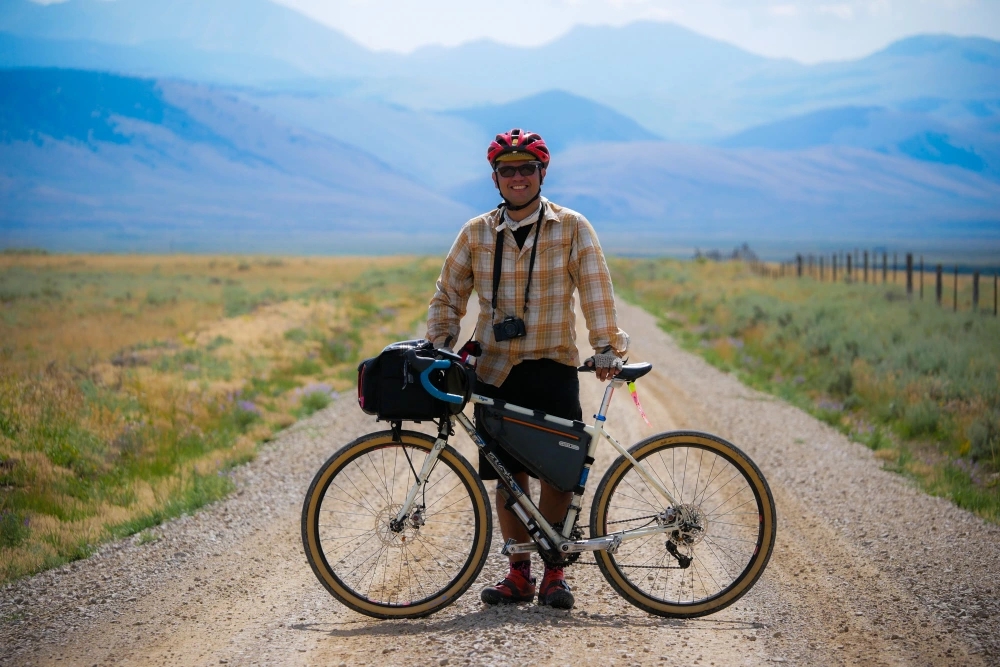
The picture above is the first one I can find of me with a gravel bike back in 2018, I’d been dabbling by adding gravel-esque tyres to my rigid forked 29er MTB in the months before but although a flat bar gravel bike is now a thing I don’t think it counted way back then.
I was lucky enough to be working in a bike shop at the time and the manager let me use the demo gravel bike that we got in for the showroom. I was to showcase this new fangled bike genre and we thought having a bike that looked like it had been used as intended, i. e.- off road, would attract more customers to the idea than a nice shiny showroom pony. I wasn’t going to argue so for around 6 months I got to ride a Trek Checkpoint AL5 iirc. This was in the days before GRX and so the bike came with a Shimano 105 groupset. To preserve the drivetrain as the bike would be sold after the demo period I swapped the double chainset (even back then I felt the 50-34 road ratio was not ideal for an off road bike) for a cobbled together 38t single ring and added a wider range rear cassette which I think was an 11-44, revolutionary at the time! and added a frame bag to carry my lunch and cake money, again, nothing has changed there and went out exploring.
I’d ridden a road bike now and then but was always more of a MTB rider and while the MTB is great for exploring rugged off road routes, where I live the off road is pretty tame and can only be accessed by using roads or tarmac and even then the off road sections are short and sweet. The gravel bike then was the right tool for the job. I could ride 50 miles and the route could consist of 35 miles of tarmac and only 15 of off road but the tarmac bits wouldn’t be as tedious as they would be on a MTB and on the gravel bike if i spotted a new to me bridleway or track I could ride it to explore where it went, something I’d have been hesitant to do on a pure road bike for fear of punctures, mud and tyre clearance etc.
For me this was why gravel bikes were so exciting, it opened up areas I’d dismiss as too far away by MTB or even worse, that I’d have to drive to first before riding. The gravel bike for me was very much like getting your first proper bike when you were a kid, the difference from only being able to play outside your house and not being allowed to go further than the end of your road to being able to ride to the local park or woods (and further, sorry Mom and Dad!)
In its infancy gravel seemed the refuge away from the ultra serious road riders and believe me some of the customers who came in the shop were way too serious about road bikes and wanting to look like pro road riders to the point of duplicating the bike set ups of their hero’s even though it was clearly too extreme a position for them and was causing issues, with their full trade team kit, even though they weren’t sponsored #FKW For Gravel riding there were no rules, you could wear what you liked, ride what you liked, If you met up with other gravel riders it was more about the chat, the sharing of trails and routes and there was no mention of “you must be able to maintain this *insert inflated kph figure* to be able to ride with us and there definitely wasn’t a “if you get dropped, you’re on your own” rule that seems to be applied to every road club I’ve been involved with. I’ve taken riders out for their first gravel ride and their only experience was having ridden with road clubs and they are astonished that someone in the group would volunteer to go ahead and open a gate and wait until everyone else was through before shutting it and then catching up. “I can’t believe how everyone mucks in and supports each other, I love it” is something or a variant of it I’ve heard many times in the last five years.
Group riding is awesome, so many shared experiences and laughs with no pressure to be a riding expert or Iron man distance fit and this area of gravel was growing and growing and I’ve met so many cool people by sharing my or their routes but then a little pandemic hit the world in 2020 and suddenly all group rides were restricted and solo riding was the thing to do.
This also was a boom time for the bike industry, gravel bikes were suddenly the thing to have, which is absolutely awesome but in promoting the gravel bike, companies began to sponsor riders or sponsor events, this is sort of great and yet also I think began the divergence of gravel. When things opened up again we’d gone from home grown events where everyone shared the route and did it at their own pace to “stage races” with timed stages where there was only one “winner” rather than everyone winning through the joy of shared adventure and experiences. The grass roots events in the USA such as Unbound Gravel went from something that riders were proud to just have finished to arguments about the use of aero bars, female riders being drafted by their male team mates to achieve a win and that old favourite trade team kits instead of wear whatever you feel comfortable in. There were now “race gravel bikes” light weight, minimal luggage mounts and steep head angles as well as “adventure gravel bikes” for mounting bike packing stuff and forgiving geometry for riding for days at a time if you wanted to. Ok, I can forgive this as a perk of the commercialisation of gravel as more choice is always a good thing. But someone was waiting in the wings to take this all to a new level.
Hello UCi, the governing body of cycle racing, never quick on the uptake it’s taken them a few years to stumble onto the band wagon bringing the UCi World gravel championships and qualifying events, pro licences for racing, rainbow jerseys and worst of all a rule book as thick as a Ebike down tube.
Don’t get me wrong, I like to watch cycle racing. I sit glued to the Spring classic road races and the Tour de France but now the “i can’t ride because I’m not that good” mentality has started to be heard in gravel racing. I conducted a poll via the 19k+ followers on my instagram account and asked what was stopping them either starting to ride gravel or going to gravel events or organising group rides themselves and by far the most popular response was “i don’t want to ruin other people’s ride because I’m not quick enough” or “my bike isn’t good enough” and this is my whole reason for writing this long ramble.
We need to get the message out that you should just get out and ride your bike, there are no rules, ride what you like, wear what you like. If you just want to ride to the top of a nearby hill and sit on your favourite bench and look at the view, then just do that. Ignore average speeds and distances covered, they are just numbers, your ride doesn’t need to be “epic” just because you see people doing extraordinary distances and trips on social media. Any and every ride is worth it compared to not riding. Ignore the commercialisation, if you want the latest bike and tech then get it, if you want to use your 1992 mtb, then do that too. Want to ride alone? that’s fine, want to share the fun? then why not plan a ride and meet up with other riders. Encourage others and lets stop gravel riding from becoming elitist and get back to how it started. Innovation and progress is good but lets also keep things simple and accessible for anyone to be able to join in.
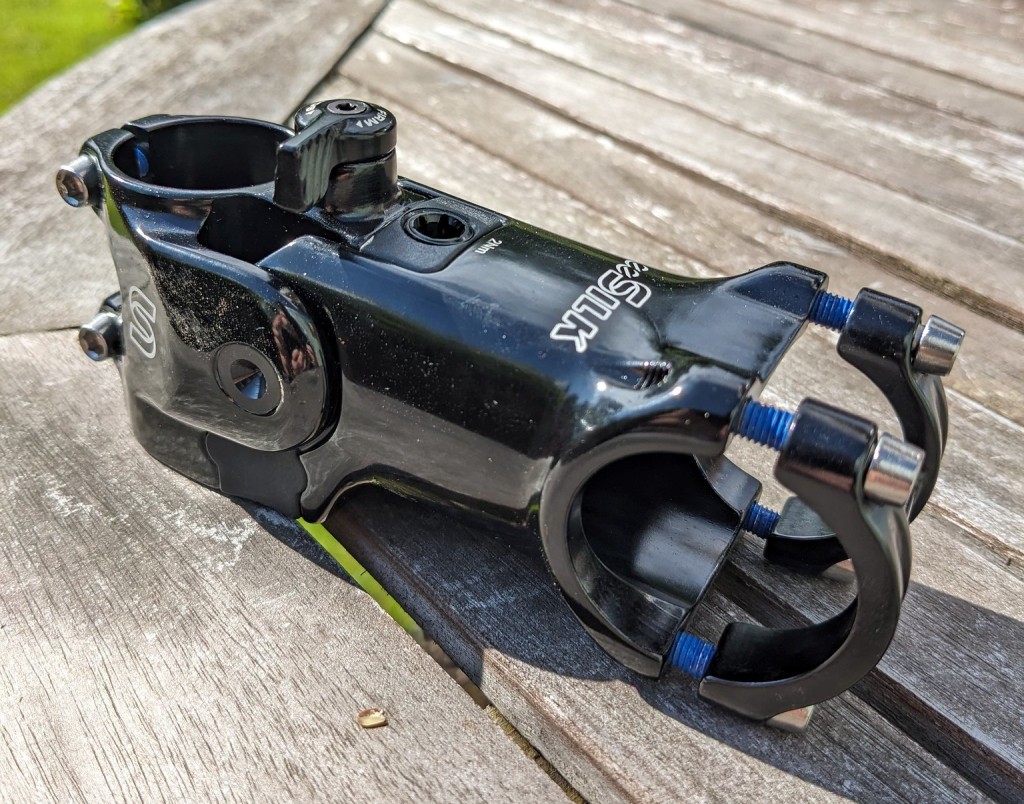
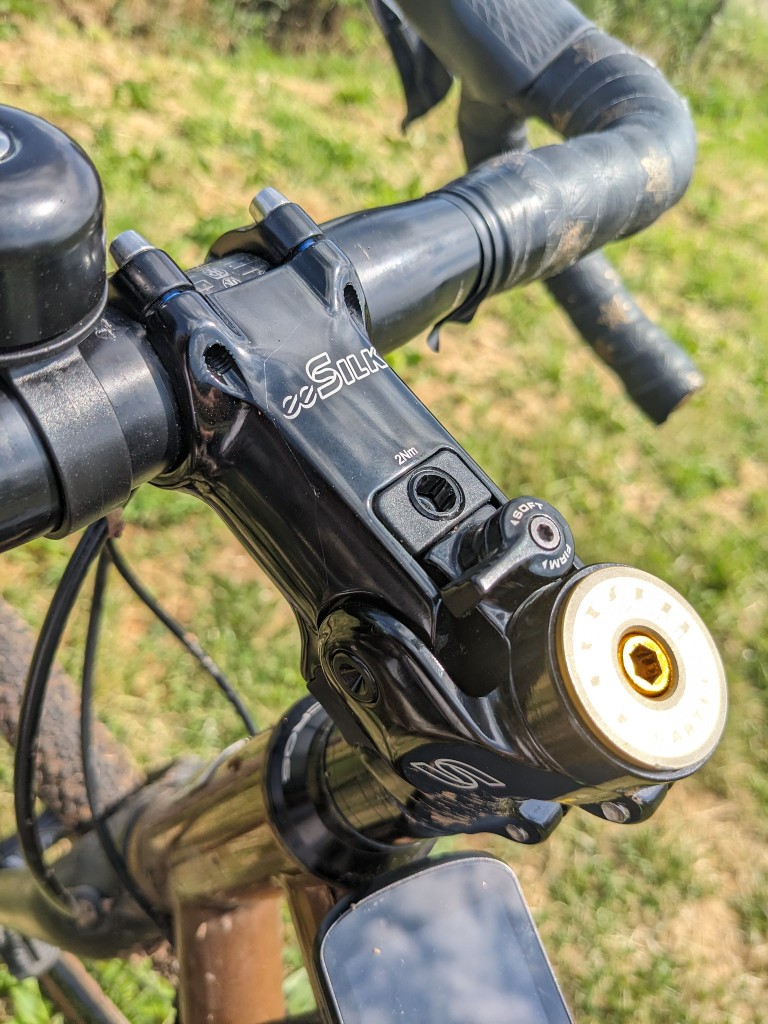
STOP! before you say “flex stem” I do know about those innovative stems that were about in the late 80s-early 90s and if I had a £ for every time someone mentions them when reading a review or looking at a picture of a modern suspension stem I would have enough cash to buy an original one!
The first thing to say about the Cane creek EEsilk stem is that it is not a substitute for a suspension fork. Stems like this are designed to dampen the vibrations coming off the front wheel of your rigid forked bike. There are a few of these stems on the market today and they are perfect for a gravel bike and allow more comfortable riding over rough ground. They reduce fatigue on your arms, shoulders and neck which means you can ride for longer and recover more quickly to ride the next day.
So how does the EESilk stem handle being on the front of a gravel bike ridden by someone not known for their finesse when riding?
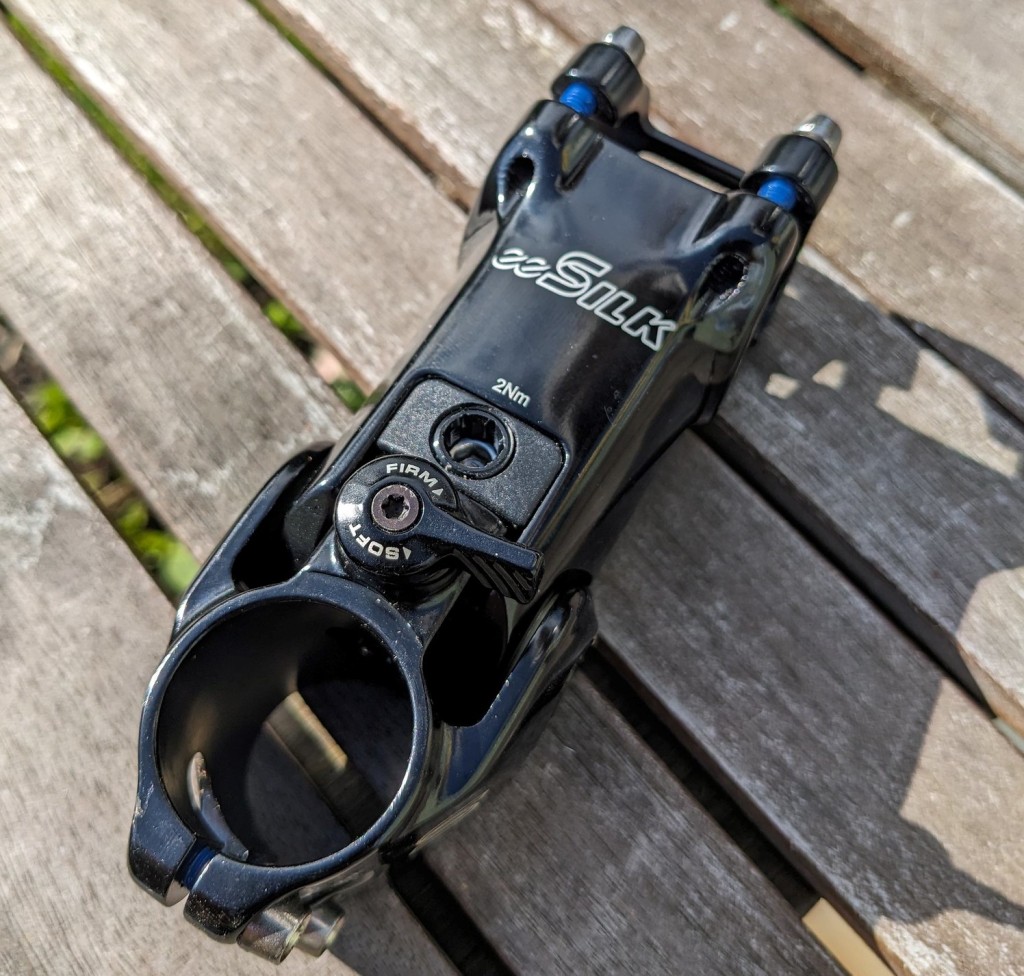
Cane creek EESilk Stem with compliance lever
The EEsilk stem is made of aluminium and offers up to 20mm of compliance, I received the 90mm version to test and this comes with a soft, medium and hard elastomer which controls the travel. An Extra firm elastomer is also available. The stem I tested weighs 231g. This stem includes what Cane Creek call the “compliance switch” This lever on the top of the stem allows on the fly change of compliance from soft to firm. Cane Creek offer a cheaper version without this switch.
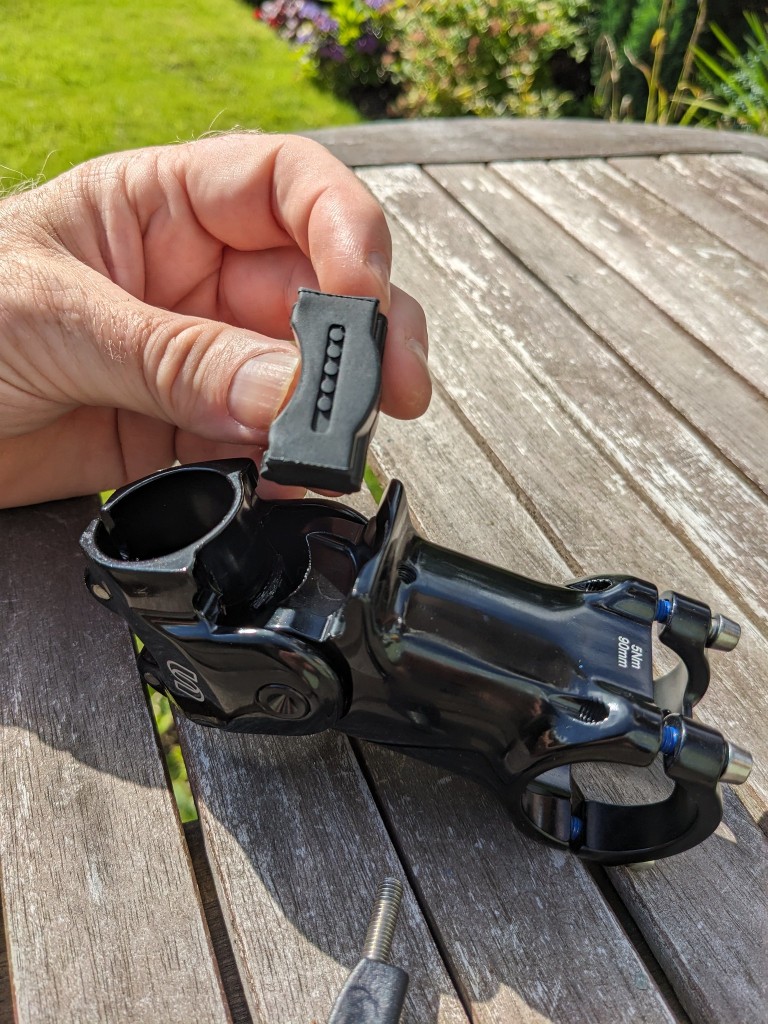
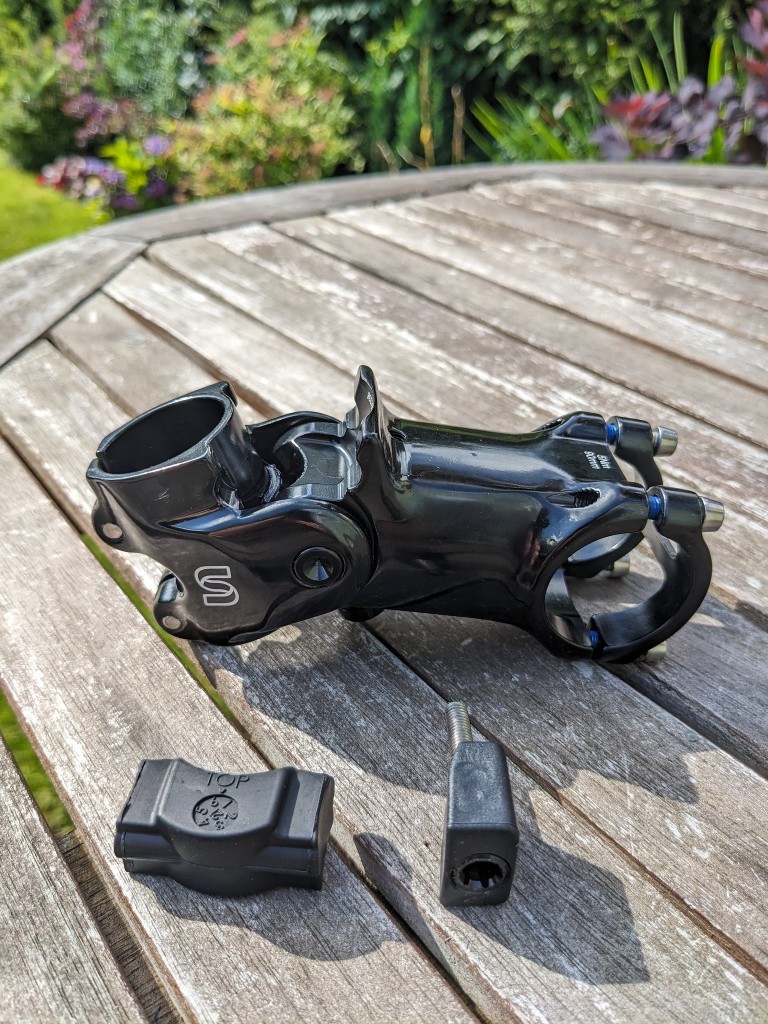
Changing the elastomer is very easy, just a 4mm Allen key will remove the hard plastic wedge allowing the elastomer to be removed from the bottom of the stem and swapped for one with a different density. Reverse the process to secure the wedge into the stem. The bolt needs to be torqued up to no more than 2Nm though so investing in a quality torque wrench (very useful for all the bolts on your bike anyway) would be a good idea. if you don’t have one maybe visit your local bike shop and ask the mechanic to check it for you.
The EEsilk stem fits just like and ordinary stem so it was easy to fit to my bike, I first used the medium elastomer that came factory fitted and went in search of rough trails. I deliberately didn’t load the bike up with anything that I wouldn’t normally carry to give it a fair comparison against my normal stem. Immediately on fitting though i realised that the top cap computer mount I usually run would stop me being able to move the compliance lever, Cane Creek do sell an out front mount that fits to the face plate of the stem though. An ordinary -fits to bar- out front mount will fit perfectly, so something to consider when buying.
After an hour or so of riding on gravel fireroads and in the woods I really appreciated the amount of damping that the medium elastomer was giving me, it is very wrist and shoulder friendly, however even with the lever set to firm I found it too soft on smooth tarmac. When climbing out of the saddle the stem bobbed a little too much for my liking. I pedaled home and swapped to the hardest elastomer, luckily this is a 5 minute job. No need to remove the stem or bars from the bike, everything can be swapped in situ.
Cane creek EESilk StemCane creek EESilk Stem
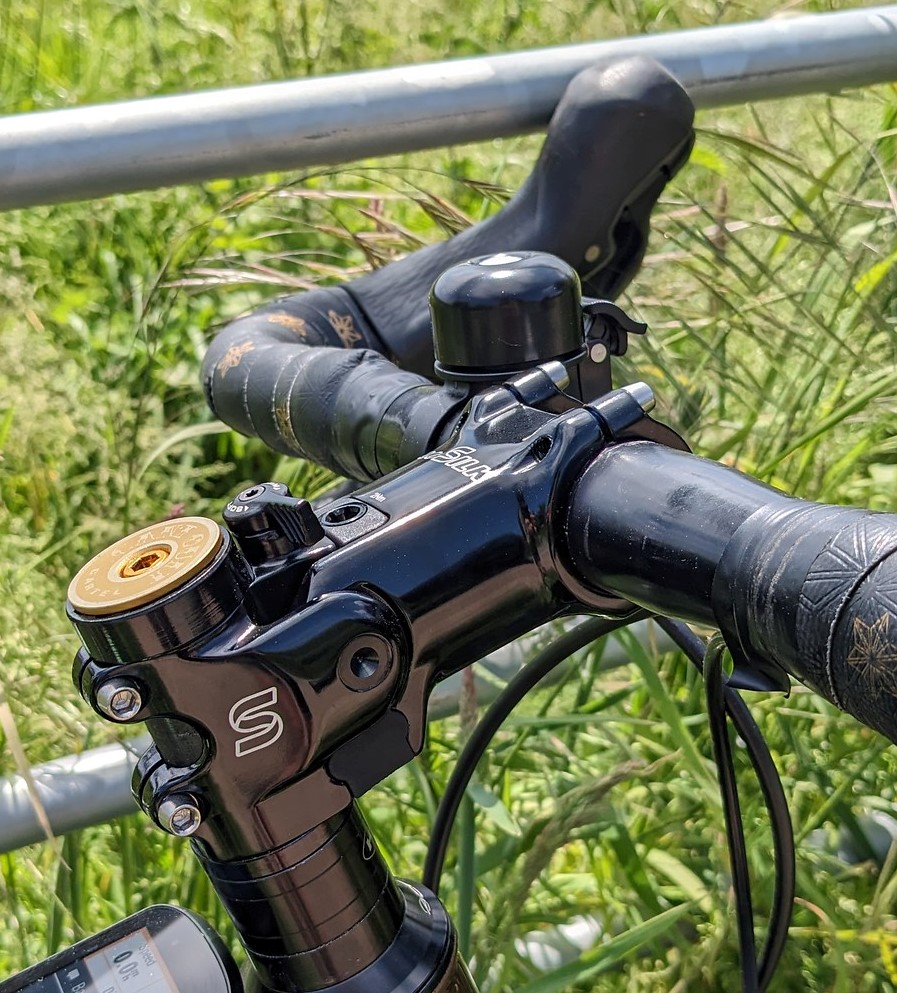
With the firm elastomer in place and the compliance lever set to firm it all but eliminated the bob on smooth surfaces, certainly to the point I stopped noticing it. In the soft lever position the stem obviously didn’t offer up as much compliance as the softer elastomer option but it gave enough to be noticeably more comfortable than a rigid stem. Throughout the test, which was ridden in a period of weather that ranged from 29+ degrees C with 80% humidity to very wet, gritty and muddy single figure temperatures the stem showed no side to side movement or flex and stayed completely silent, no squeaks or creaks. After longer length rides, say over 50 miles I noticed a significant difference in my arms and shoulders compared to my other bike with a standard stem. I even pedalled the same routes one with the EEsilk and one with standard stem with a day in between for recovery to try and give a fair comparison. Using the EESilk stem I didn’t suffer any hand or finger numbness which I had two days before on a standard stem.
If you are in the market for one of these stems, the Cane Creek EESilk stem is a great option to look at, it’s easy elastomer swap out without having to remove handle bars is a great feature while you dial in your preferred setting. This also means it’s easy to increase or decrease the compliance if loading the bike up with luggage for bike packing trips. I had a few messages asking how easy spares and different rated elastomers are to get. The UK Distributor, Extra UK assure me they have good stock of all parts so if you need to change the elastomer to the extra firm one etc it should be easy.
The Cane Creek EESilk stem works silently and efficiently and the ease of fit and adjustability makes it stand out. The compliance lever adds to the versatility allowing you to almost lock the stem out for smooth sections. On rough ground though is where it really shines, saving wrists, shoulders and neck from a battering. The only downside is you soon learn all about Flex-stems from everyone who was around BITD 🙂
Cane creek EESilk Stem in its natural habitat
more details can be found on the Cane Creek website here
This is NOT an affiliate link, if you buy a Cane Creek EESilk stem UKGRAVELCO gets nothing! The test stem will be going back to Extra UK, so if you want to support these independent reviews please consider buying something from the UK Gravel Collective Shop or subscribe to the Youtube channel or follow me on my instagram account
I must have passed this bridleway literally 100s of times but a couple of days ago I noticed a new sign so myself and Lisa from @my.bike.adventure decided to explore. It turned out to be an interesting ride.
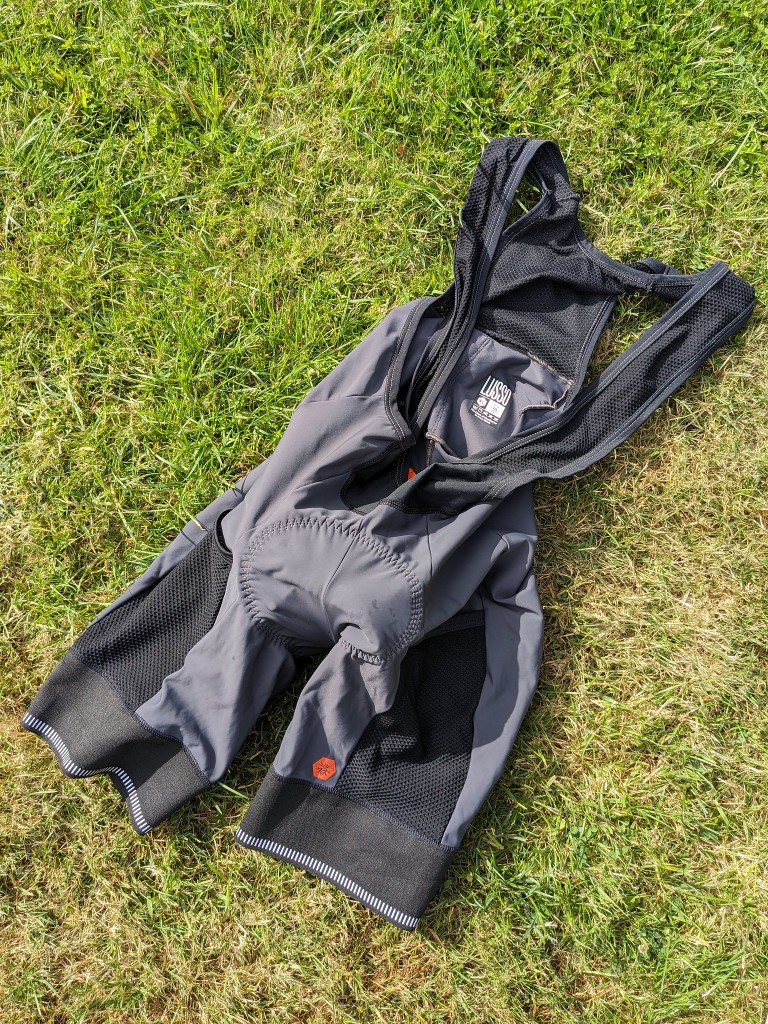
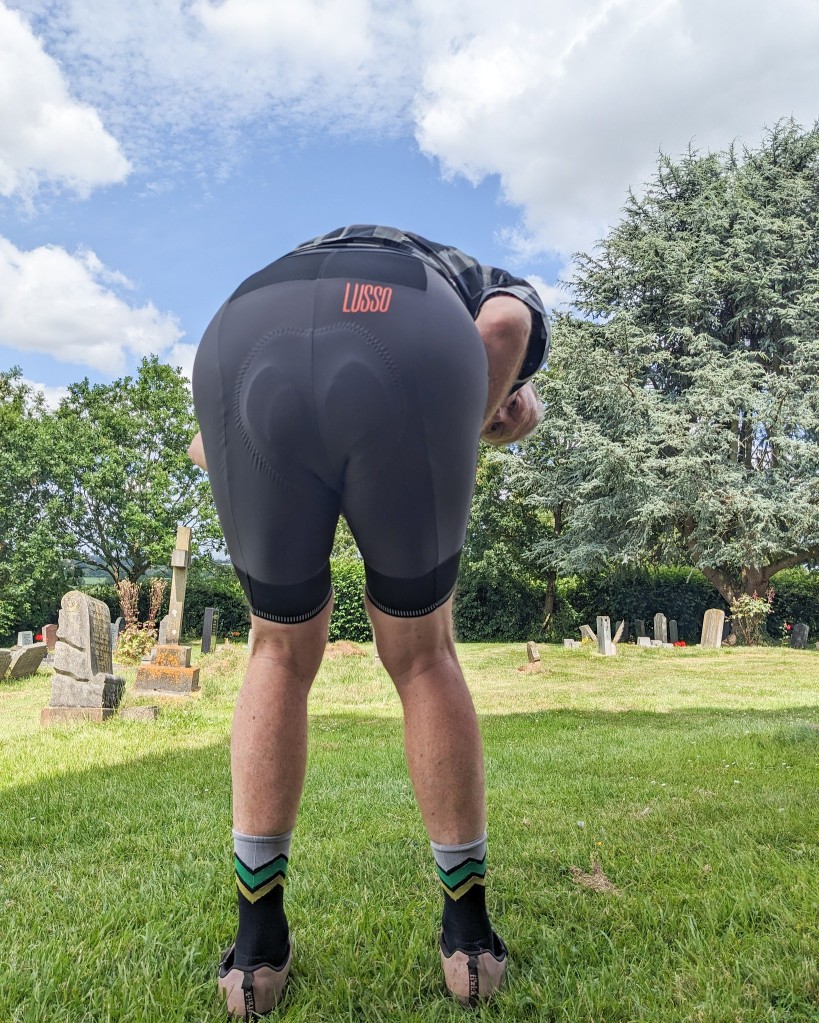
Cargo bib shorts are the in thing right now and most shorts making companies have at least one model on their range so what makes the Lusso Terra shorts different?
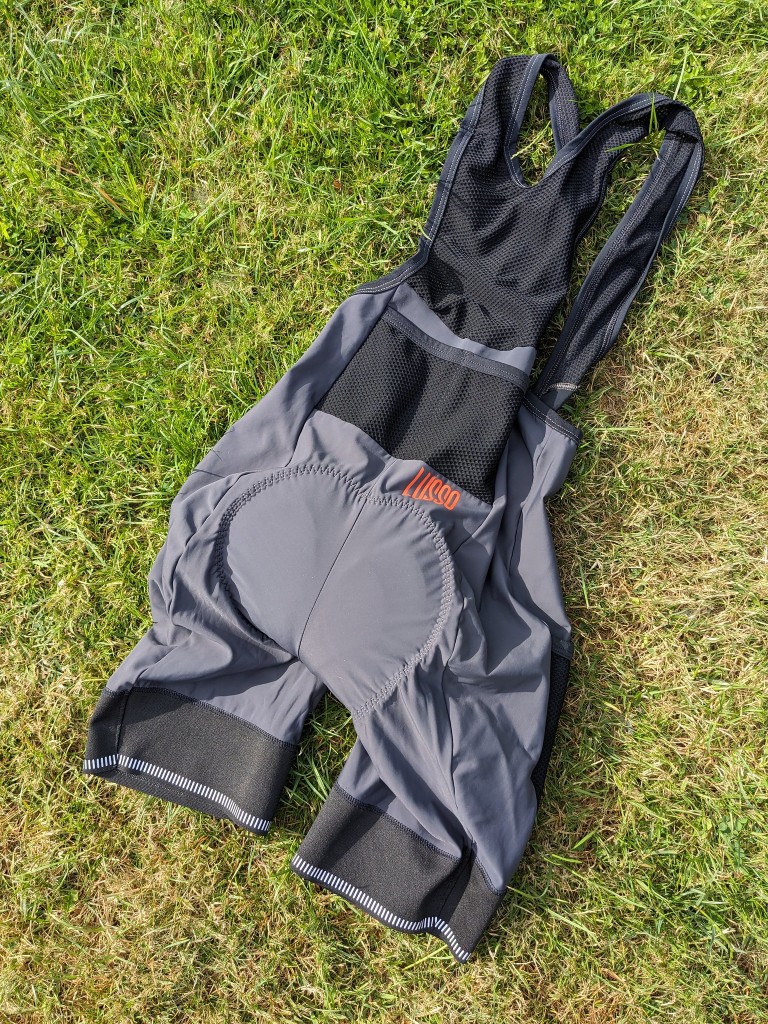
MADE IN MANCHESTER are the three words that made these shorts stand out to me before I’d even pulled them on. In a world where strawberries can be grown in Argentina, packed in Indonesia and sold in a shop in Birmingham it’s a great thing to see that a company is manufacturing on the UK.
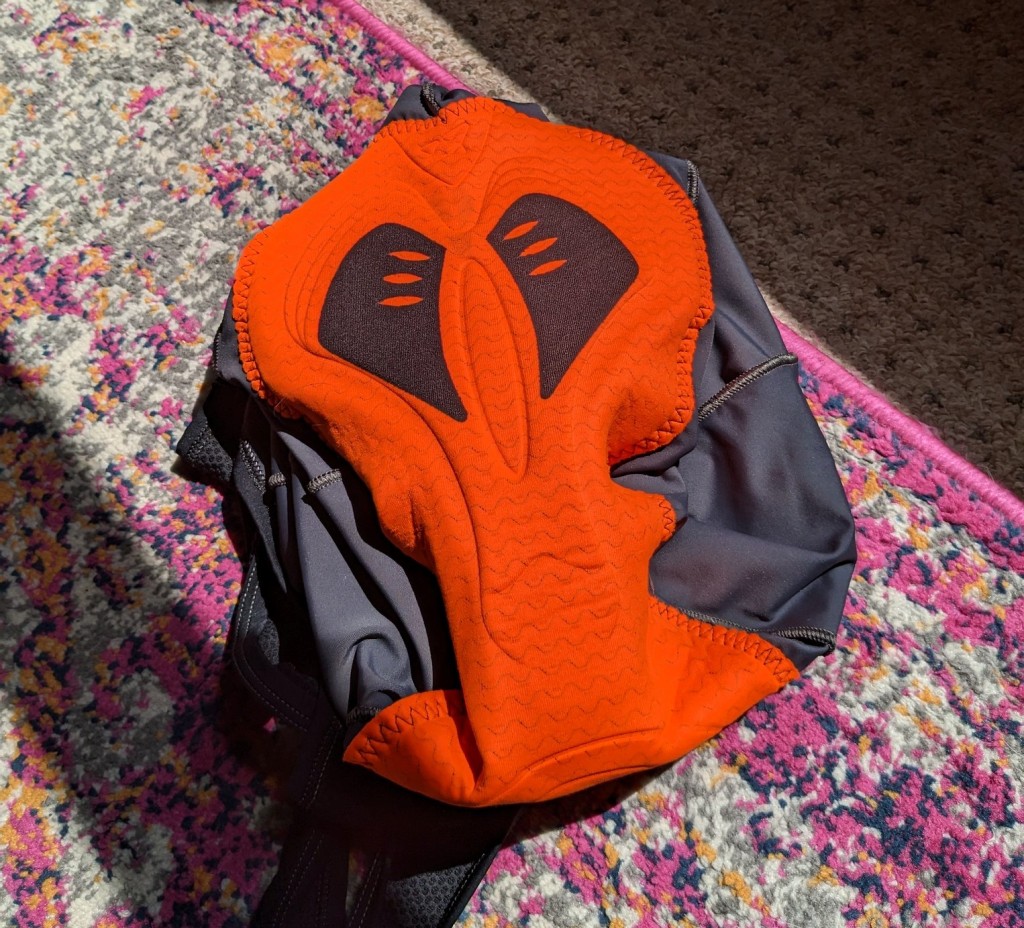
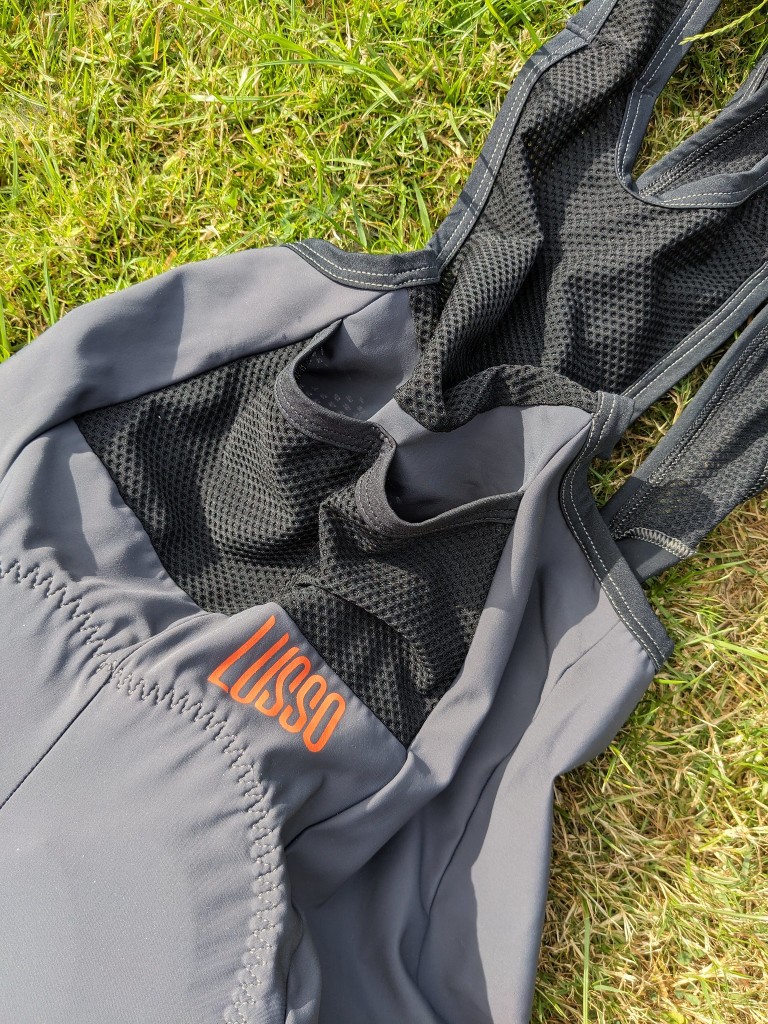
Designed as part of Lusso’s Terra range these bib shorts are hand made with natural and sustainable fabrics from Italy. They have two rear mesh pockets and a pocket on each thigh.
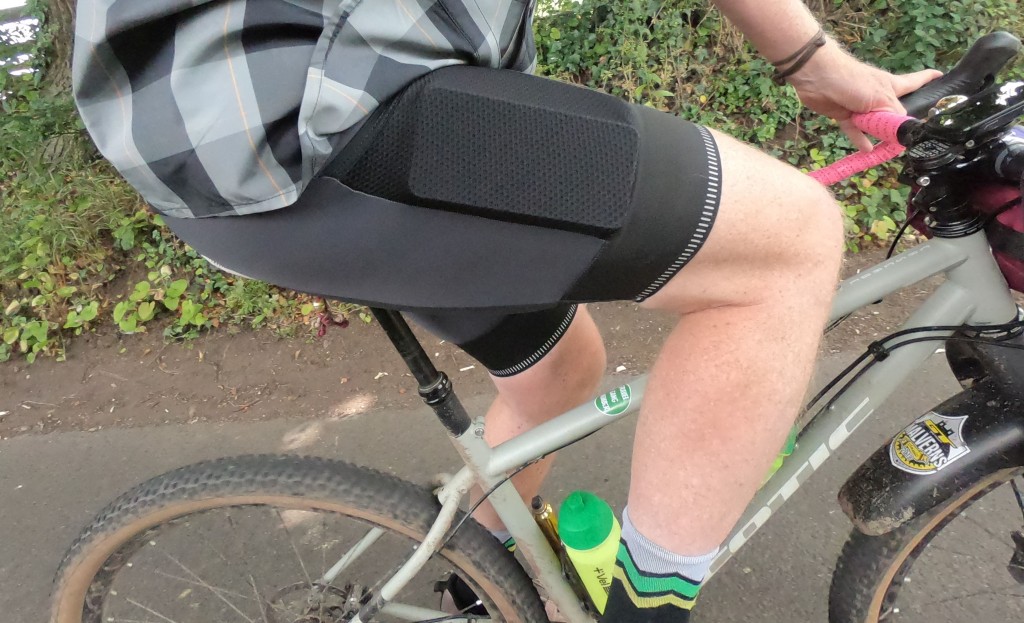
The bib straps themselves are made of the same mesh material and so there is plenty of breathability. the end of the legs has a wide elasticated section that grips well without digging in. The thigh pockets swallow a modern smart phone easily so gels and energy bars can be stowed securely. Even with something heavy like a phone the pockets never felt baggy or restricted movement
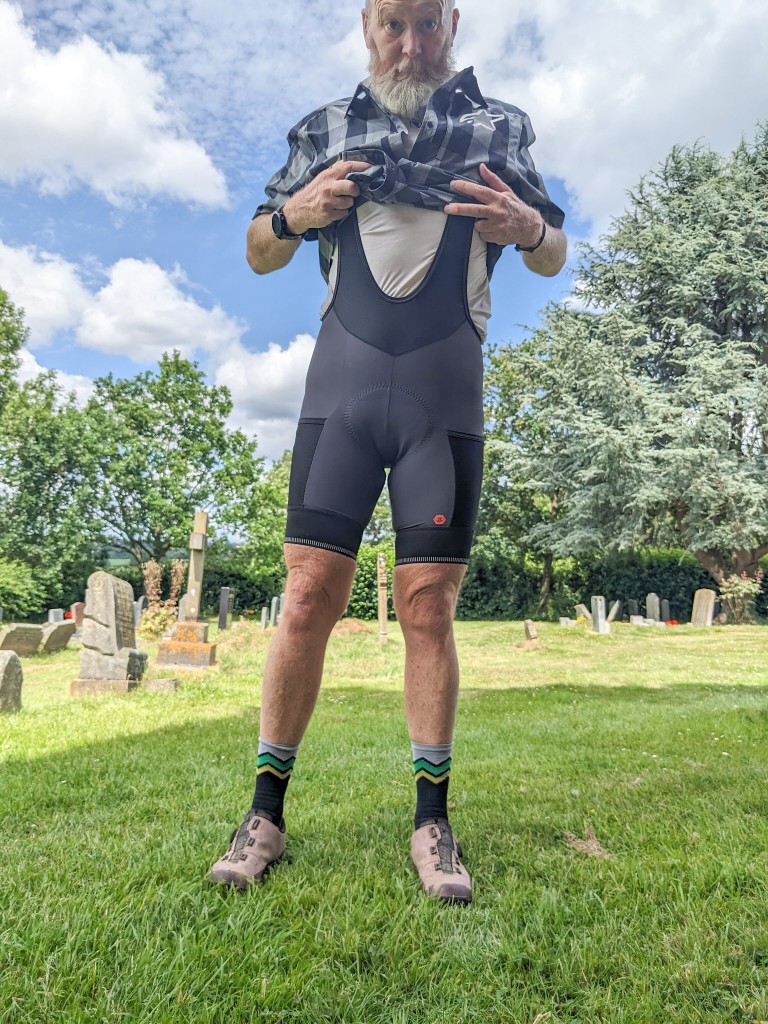
The material feels luxurious against your skin and the pad feels just on the right side of reassuringly thick. It supported me comfortably over short and long distance rides, with and without chamois cream. I’d have no qualms about wearing these on a multi day trip in hot or cold weather (both experienced during the test period). The rear pockets were useful but as with all cargo rear pockets near to your body heat if you intend to carry something moisture sensitive in there it may be as well to bag it in something waterproof as it can steamy in there. Thankfully I haven’t crashed in these shorts yet but after many rides including those in wet and gritty conditions they continue to show little signs of wear. They also wash very well, keeping their shape and the pad remains supportive.
Sizing is normal, I usually wear an XL short being just over 180cm tall and the XL terras felt good, although I might go up one size for a longer bib strap. Lusso offer returns so you can get the correct fit.
It is also great to see some different colours from the usual boring black most shorts come in, the Lusso Terra’s can be purchased in slate (pictured) or thyme both have pockets in a contrast colour.
The Lusso Terra bib shorts are quite simply a great feeling and looking short that will support your adventures over many rides. The fact that they are hand made in the UK and Lusso’s stance on sustainability makes them stand out above other quality shorts in the same price bracket, definitely check these out when you are looking for your next pair of shorts.
you can find out more about these shorts, Lusso and their thoughts on sustainability on their website here
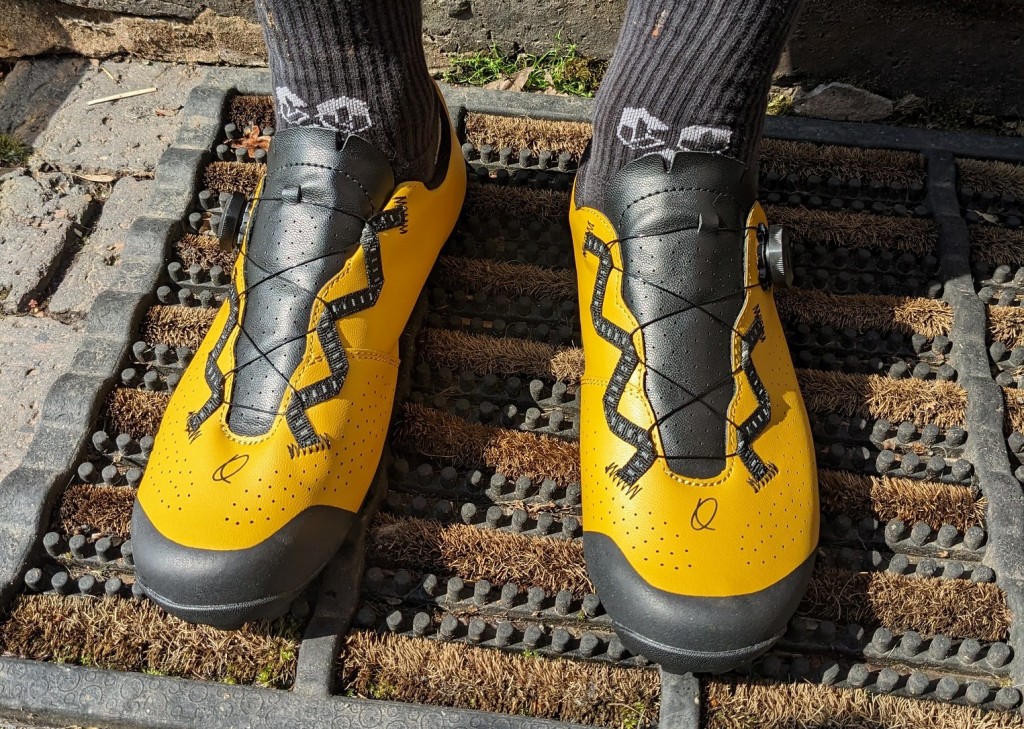
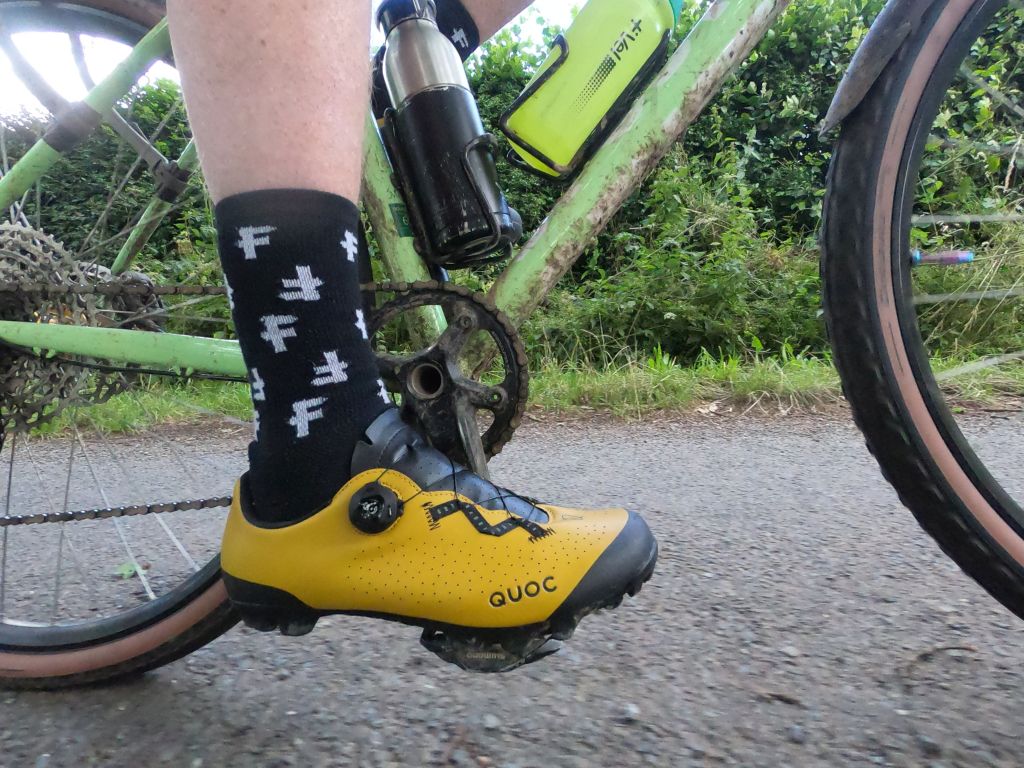
There’s lots of cross over in footwear between Gravel riding and mountain biking, a good cross country mountain bike shoe makes for a great gravel bike shoe too. The cleat system allows the use of double sided clip-in pedals, something I find essential for off road riding, they are stiff enough in the sole for all day riding but have enough give to allow for walking unrideable sections and some don’t look iut of place at a mid ride pub stop.
Quoc do a range of shoes for road, touring and MTB, they sent me these Escape models to try out. I asked for the amber colour as A) I really liked it and B) I thought they’d stand out better in the pictures!
The shoe comes with a polyurethane upper which is easy to keep clean and a glass fibre reinforced sole with rubber tread that works well on all but the slimiest roots. The tread clears well when filled with sticky mud. Quoc use their own Boa-like closure using a turn-able dial that makes micro adjustments on the fly really easy. The upper has punched holes for breathability and the “lace” fitment is reflective. The heel padding is comfortable and I experienced no heel lift throughout the test. The toe cap guard did a good job of protecting the shoe from damage. Power transfer to the pedals felt great and I couldn’t feel the pedal through the shoe when pushing down, something essential for long days out to reduce fatigue and avoid foot hot spots.
The shoes are stiff but manage walking well, I’d say they are at the more racy end of the spectrum though and maybe hike a biking up a mountain path would be possible but a bit more give in the sole might be better. It’s always a trade off between pedalling stiffness and walking in any cycling shoe though. The shoe has the option of fitting studs in the toe for extra grip when say in a CX race and running with the bike.
The Quoc shoes look and feel great, it’s refreshing to see a different approach to shoe design. It’s also good for me at least, that these shoes are not full of mesh on the upper, Quoc have punched tiny holes instead. Too many shoes seem to be designed for hot weather and their vents are perfect if you only ride in summer or in countries with high temperatures but I live in the UK and suffer with cold feet so this may mean I can extend their use into the colder months. This lack of venting doesn’t seem to affect the breathability though as (in contradiction to what was just written) during the test period the UK welcomed it’s hottest June for years!
The Quoc website gives a good fit guide and askes you to measure your feet rather than stick to your usual size. In the event my usual size corresponded with the guide size after measuring. The shoes felt comfortable both on and off the bike so. So you’d think everything was rosy and perfect then, well not quite.
Firstly and in no way affecting pedalling performance, the shoes creak!, more so off the bike when hike a biking (more like walking into cafes) but sometimes when pedalling too. This may lessen as the shoes wear in though. What I found that was an issue for me was the cleat position. Even with the cleat set as far back as it would go on the shoe it felt too far forward. It felt like I was pedalling with my toes rather than the ball of my foot. I’ve compared the Quoc shoe side by side with my normal cycling shoe and to within less than a millimetre they are exactly the same length sole but my usual shoe has much more cleat adjustment and I’ve not got that cleat all the way back either.
This cleat position makes you feel like you are gripping the pedal with my toes and after 30+ miles this starts to make my feet ache. I’m pretty sure the shoe is the correct size, the size guide and my feet tell me so but I do wonder if the next size up would give more cleat adjustment? I fear though that would bring with it some heel lift and the associated problem of wearing shoes to big for my feet.
The Quoc Escape Off Road shoe is a well made quality shoe with good pedalling dynamics and in my opinion looks great but if you like your cleat quite far back I’d look carefully at the sole compared to your current shoes carefully before setting them up so you can return them for a different size pair if needed.
You can find more information on the Quoc Escape off Road shoe here
I’ll come straight out and admit it, I do not like top tube bags, they are never the right size, they suffer from floppy bag syndrome unless you use a stabilising system like the excellent 76projects one reviewed here or, and by far the thing I like the least about them is that when you stand up on the bike to climb or sprint my knees rub on the bag! I know this is a personal thing for me and that the vast majority of riders don’t suffer this but having mentioned it on instagram quite a few other people said they had the same issues.
One of those people was James at tailfin.cc. Tailfin have recently added top tube bags to their excellent range of bike packing kit and this included this tapered design said to be perfect for those of us with a knee inwards pedalling action. I immediately emailed Tailfin and James was convinced the new design would solve my issues, as it had for him and sent me one to try out.
The bag is a dual design and can be bolted to your top tube if you have the mounts for a super clean look or using the supplied straps it can fit just about any frame design. The straps thread through two very sticky rubber mounts that grip the top tube of your bike like limpets! If you are bolting the bag on the bolts go through the middle of these mounts giving a even more tenacious grip.
The bag material is a welded design and comes in two varieties, a zip version (only option on this 0.8L pack) or zip or flip lid for quick access on the larger versions. Tailfin describe it as a sculpted design to be knee friendly. This means the bottom tapers towards the top. The bag does not come with head tube strap as tailfin claim it doesn’t need one. Inside is one large compartment with a cushioned insert and a side pocket.
I first used a bike that allowed a bolt on bag and immediately tried to make it top heavy by putting heavy items at the top inside it and then going for a ride. Straight away I noticed the difference to other bags I’ve tried in that my knees didn’t touch it! I tried to dislodge the bag by deliberately riding over rough ground and it was rock solid. It became a silly game of leaning the bike over or trying to rattle it from side to side just to make the thing move at all! It was all in vain, no movement. This also meant accessing the bag via the zip on the move was simplicity itself, open and closing to grab a snack was easy and i got so confident that it would open and close I didn’t even have o look down. This 0.8l bag was just slightly too small to fit my pixel 5 smartphone so if you want to keep a phone in there go for one of the larger sizes but for energy bars, Gregg’s sausage rolls, emergency Haribo and tools it is spot on.
Tailfin bolt onTailfin strap on
Next i swapped to a bike without mounts and fitted the straps, a word on those actually as they were top quality and worked so neatly with a tiny holder to hold any over lap on the strap they looked good too. Any fears that this mounting system would be looser were unfounded, again the bag was rock solid (this time on a MTB).
The tailfin top tube pack has been on but never off various bikes since April and that says everything you need to know from a self confessed top tube pack hater! The shape works fantastically with my knees, I’d say 95% of the time my knees don’t touch it. On other bags it was the other way around with my knees hitting them to the point of snagging knee warmers. Tailfin are correct, it does not need a head tube strap to be stable. Using the bolt on method and the lack of needing the head strap means the pack looks very good and tidy indeed. The fact that is it functions superbly and the fact that is is 100% waterproof too is just icing on the cake.
The tailfin top tube pack is currently £52 and that sounds like a lot of money, this cost means it is in the same price bracket of some bespoke bag makers stuff but, from a design, materials and function perspective it is worth every penny.
you can see more details on the Tailfin Top Tube Pack on the Tailfin website
A gravel specific saddle? No sniggering at the back! When Wilderness Trail Bikes started showing their new range of saddles the one labelled “Gravelier” obviously stood out to me. I messaged the guys at WTB UK and asked if I could test one of the new seats to see if there was such a thing as a gravel specific saddle and they very kindly sent one out to me to try out. Saddles, and it seems silly to write this as it’s blindingly obvious, are a very personal thing. We all have the same bones in our body but that is where the similarity ends. Because we are all different the fact that a particular saddle might be very comfortable or uncomfortable to me doesn’t mean it’ll be the same for you. So take any saddle review you read with a pinch of salt. I can tell you how the saddle interacts with the seat post, the quality of the construction and how it performs in different conditions and how hard wearing it is but really at the end of the day the only way for you to know if a saddle works for you is to try it and do so over many miles. Yes, I know, that is difficult to achieve without forking out some cash on something you might hate. So what I’ll do in this review is tell you how this saddle compares to my regular saddle and to the many I’ve ridden in the last 53 years. Don’t forget though that your bum might see things differently!
tested in a variety of conditions!
My regular saddle is a Charge spoon, they don’t even still make them so I’ve been looking for an alternative for a while for the time when the back stock o those models dries up. I’ve always liked the look of the shorter fit saddles, again this is silly because you should be looking for comfort first not looks but hey, I’m a bit of a tart when it comes to shiny bike parts. The WTB Gravelier is around a third shorter (246mm) than my charge and has a cut out in the middle, said to ease perineal pressure. If you’ve ever been on a ride and felt numbness down there then that could be caused by that pressure. WTB say gravel riders tend to sit more forward and so the saddle accommodates this with a narrow front and a curved shape that widens towards the back. personally it think i sit the same on all my bikes .
The material is generally smooth with little dimples and is just the right balance of grippy/slippery. There is nothing worse than a saddle that grips onto your shorts when you move around on it or slide your bum off the back to counter balance the bike on a steep descent or one that you slide off forwards on when you brake hard as the saddle has such a frictionless surface. On this the WTB is perfect. The rails on this model are titanium, it weighs a hair under 210g on my kitchen scale, there is a lighter carbon railed version. Fitting the saddle was as easy as your seat post makes it (some seat posts are a right pain to swap saddles on) as the rails are standard size and there’s plenty of room for fore-aft adjustments. I set this one so the rear would have been in line with the saddle I swapped out as I felt that would be a good place to start. This made the front look very short in comparison to my old saddle but as written above, comfort before looks.
A new saddle always feels weird to start with and so the first decent length ride was spent adjusting the saddle angle, it ended up pretty flat in relation to the ground and i moved it forward slightly on the rails. I also raised the seat post a few mm as the distance from the rails to the top of the saddle was less that my old saddle, bear all this in mind when you try any new saddle.
The Ride I received this saddle back in May when the UK was having a very wet late spring/early summer so I got to try it in a variety of conditions, wet and muddy, dry and dusty and rides with all that going on at the same time. The saddle has a little padding, just enough to support you without feeling like an over stuffed sofa but with a bit of give for cushioning over the rough stuff. The titanium rails help here as they have a springiness that you wouldn’t notice riding along side watching the saddle but are glad of over longer distances. I’ll admit the first few rides I wasn’t convinced but more position adjustment trial and error and I came to like the saddle more and more. Lots of short 50k rides and the longest so far being 120k proved that the saddle was supportive in the right places and the hole in the middle did seem to work. When swapping to my other bike with my regular saddle I could definitely feel pressure down below that I didn’t feel on the WTB. I’m still not sure if this is gravel specific though as I’ve tried it on my MTB too and it was equally as comfy and easy to move yourself back over it for steep descents.
I can honestly say this is the best “short fit” saddle I’ve tried so far (fizik, selle Italia, san marco, specialized and prologo to name a few). I think WTB should change the name though as it’s good enough for a lot more bikes than just the gravel models
more details on this saddle can be found on the WTB Website
UKGC Podcast latest episode just went live, Russ Roca, along side his partner Laura run Path Less Pedalled, a website and youtube channel that is a refreshing change to most of the others. PLP is about riding for fun, not worrying about average speed or what you wear to ride in, but Russ can tell you more about that as I embark on my first trans atlantic podcast. Russ was on Montana and I was in Worcestershire, that will explain the sound issues we had. I hope those don’t spoil the great chat I had with a true enthusiast for “real” cycling.
listen via the link below or search for uk gravel collective cycling podcast where you normally listen to your podcasts
You are probably going to scoff at this next statement but I’m going to go ahead with it anyway and that is that wheels are very hard to review!
Ok, I know you are rolling your eyes thinking this guy is crazy, he gets sent a set of carbon rimmed wheels to test out and review and he says its hard! he doesn’t know he’s born!
Of course you are correct. But look at it this way, if you get sent a product and it lives up to all expectations and there are zero issues or anything you’d change it’s going to make for a pretty boring review right? Well read on and see. if you scroll away now you might miss out on something actually worth the money.
Halo XCD 35mm wheels are hand built in the UK, the rims are 35mm deep with a 26mm internal width allowing up to 50mm tyres and come pre-taped and tubeless ready. The spokes are a standard J-bend with brass nipples 28 front, 32 rear. The hubs feature sealed bearings, a 120 point engagement freehub, available in Sram or Shimano fitting and are 100/142 spacing.
Before starting the review properly I want to go through that list above and what it means. First off spokes, the fact that these wheels don’t come with a fancy one off standard spoke specific to the wheel is terrific, no apologies for the alliteration. This means pretty much anywhere in the world in the event of a broken spoke you’ll be able to find a replacement and if in a bike shop the mechanic won’t swear under her or his breath and start telling you how long it’ll take to find a replacement spoke. Believe me, I’ve been that bike shop person and seen the look on riders faces when you tell them how long it’ll take to get a spoke and how much it’ll cost. Brass nipples are the icing on the cake. Max points to Halo for this.
26mm internal width rims mean you can fit any gravel tyre on the market today, you can even fit 28mm road tyres if you are that way inclined. 35mm deep rims add stiffness in the right places (I won’t mention Aero, but that too) without acting like a sail for cross winds and also means you don’t get that awful rumble noise you hear from deep section wheel rims on tarmac. Add all this together to give max points again.
120 points of engagement on the free hub does two things, makes take up when pushing on the pedals almost instantaneous and makes a great sound a bit like an angry wasp trapped in a dangle mug, which strangely isn’t annoying at all to me but I have had comments from other riders who can hear you come up behind them! Sealed cartridge bearings mean the wheels should last longer between bearing changes and when it does come time to swap them it’s quite easy with the right tools, Points? go on then!
The Review I think you can tell I like the sum of the parts so when all that is put together how do they actually ride? I fitted Halo’s own GXC tyres and Halo tubeless valves and sealant. As mentioned above the rims come pre-taped so I took a risk and added the sealant to the tyres before they were fully seated on the rim. I usually seat the tyres then add sealant via the valve. I took up my standard track pump and went to work. The tyres seated first time! that does not happen very often at all and I’ve swapped a lot of tubeless tyres during various tests. Impressive. Since I received the wheels in February they have been put through some very dirty filthy conditions
From frozen mud, over the rim watery mud, clay that is so much like peanut butter like that the wheels wouldn’t turn to at last some dry and very bumpy singletrack and bridleways of summer riding.
I’ve got to say I’ve had absolutely zero issues with the wheels. They’ve stayed absolutely true despite my highly suspect riding style. They are light at Just over 1700g but not superlight where you’d be scared to take them on some routes. I’ve also had zero tubeless incidents since the first set up and the Halo sealant
has lasted in the tyres until the day I packed them to return some 4 months later. The valves also did not clog. The bearings were smooth throughout the review period despite some regular soakings in the early weeks. The rims showed a few battle scars at the end bit no damage and some soap and water always brought them back to their matt black best. despite a couple of absolute soakings and stream crossings the bearings have remained smooth and noise free.
So there you are, nothng to report which makes for a boring review really but when it comes to wheels boring in the reliability side of things is great! No one wants excitement from their wheels imploding!
The wheels at time of publishing have a price of £950 per pair recommended price but lower if you search around.
Nearly a grand for a set of wheels is a lot of money, but given that they are made without any propriatory spokes or weird size bearings that a lot of their competition have plus they seem reliable, again over some of their competition I’d go for a set of Halo Carbaura wheels if i was my money.